Drivable 3D Printed Mario Kart Go-Kart V2.1


Print Profile(1)

Bill of Materials


Description
This project originated from my fascination with Mario Kart on the Nintendo Switch, and its design prioritizes the feasibility of open-source replication. Please read the text below before commencing this project.
Important: This is an exceptionally large project, requiring a significant time and financial investment to complete the replication!
Preface:
The vehicle in this project is constructed using a framework of carbon fiber tubes and 3D-printed connectors made from engineering-grade filament using FDM technology.
Below are videos of previous vehicles built using the same structure
I. Single-speed road bicycle (PPA-CF components): https://www.bilibili.com/video/BV1Fo15YcEXX
II. VPP-structured mountain bike (ABS-GF components): https://www.bilibili.com/video/BV1WCfbYVEeb
III. Go-Kart V1 based on standard go-kart components (PA6-CF components): https://www.bilibili.com/video/BV1nyEszNES8
The Go-Kart V1 design is now open-source➡️https://makerworld.com/zh/models/1629021-go-kart-v1-1-carbon-fiber-tubes-and-nylon-3d-print#profileId-1720255
Its popularity surpassed my expectations, but frankly, the V1 design did not consider open-source feasibility. For instance, the rear axle assembly, a core component of V1, was highly integrated and lacked precision. I myself had to undergo numerous adjustments, compensating for manufacturing inaccuracies using shims, to complete the vehicle's construction. In the V2 version, therefore, I minimized the use of specialized go-kart components, instead employing readily replicable 3D-printed parts, tubing, and standard components with easily controlled machining tolerances.
The vehicle was initially designed based on a traditional go-kart structure without a rear differential (due to the 10-degree kingpin inclination of the front wheels, the inner rear wheel lifts during turns, releasing power to assist cornering). Furthermore, the H-shaped chassis, constructed from carbon fiber tubes and PA 3D-printed components during the construction of the Go-Kart V1 version, provided excellent shock absorption. I aimed to combine these elements, and during the design phase, I did not foresee any issues.
However, during vehicle testing, I discovered a conflict between these elements. The height difference between the left and right wheels during turns was absorbed by the flexible chassis, preventing the rear wheel from lifting and thus compromising the cornering experience.
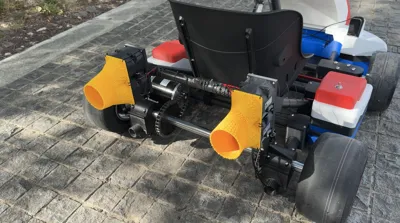
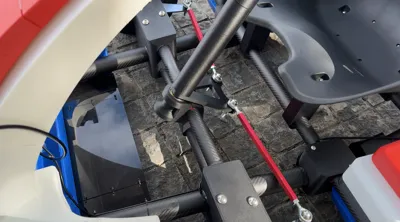
This proved troublesome. I attempted to add extra carbon fiber tubes, tie rods, and other devices, simulating their effect on the chassis using Altair Inspire, without significant improvement, until I tried installing a 15mm thick carbon fiber plate horizontally and upright beneath the main chassis beam under the seat. This addition enhanced the chassis stiffness by 880 newton-meters per radian, a result I found highly satisfactory.
After weighing driving and riding comfort, I should clarify that using aluminum tubing might yield a superior driving experience for this project. This includes replacing the aforementioned 15mm carbon fiber reinforcement plate with an aluminum plate. However, lacking testing with aluminum tubing, I will still refer to the tubes as carbon fiber tubes in the materials list below.
This project's go-kart uses 40mm outer diameter, 2mm wall thickness, and 30mm outer diameter, 1.5mm wall thickness carbon fiber round tubes (T300) as the chassis framework.
Components printed from H2D and PA6-CF material serve as connectors and structural components; parts made of ABS-GF material are used for decoration and cladding; PETG-CF+TPU is used for the integrated 3D printing of the front wheel assembly via AMS.
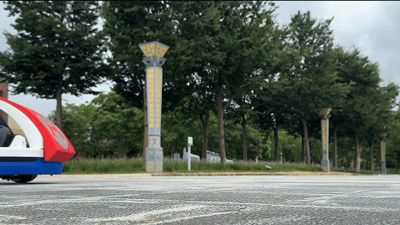
Road testing (driver 183cm, 82kg) verified that the structural strength is adequate and possesses considerable reserve strength.
This project has been released as a video on Bilibili:
The current design has evolved to version V2.1
V2.1 specifications
1. Added a chassis reinforcement component under the seat
2. Replaced the steering rod from a hexagonal carbon fiber tube to a metal hexagonal tube
Preparatory Work:
➡️Go-Kart Components
30mm diameter, 900mm long solid rear axle with 6x3 keyway x1
https://e.tb.cn/h.hOmuBzRRiv3aP90?tk=1r7D4VACVCA
Regrettably, I couldn't find an exact match for this rear axle in North America, but I found a seemingly similar kit on eBay
https://www.ebay.com/itm/205140649784?
Its shaft is 100mm longer than mine. This kit includes the bearings and gears needed for this project, and the aluminum tire mounting bracket should theoretically be superior to a printed one (though it will still necessitate discarding the brake disc and its mounting bracket).
My shaft is quite simple—a 900mm long, 30mm diameter solid shaft with four keyways for mounting the two rear wheels, brake mounts, and gear mounts. You can simply purchase a plain shaft and machine a through keyway to address this.
Rear axle bearing to fit 30mm round shaft x2
https://e.tb.cn/h.hmbZ7nbazO7hfez?tk=yY1k4VABkSh
I found this component on eBay; the dimensions are compatible.
https://www.ebay.com/itm/114702313582?
Rear axle 32-tooth 428 split gear x1
https://e.tb.cn/h.hONY9WCyJo9Jr2G?tk=2JS94VAAjDX
I found this gear on eBay; it's compatible with two keyways, 31 teeth, and should be usable.
https://www.ebay.com/itm/126481903809?
Pair of front wheel handlebars
https://e.tb.cn/h.hOmxnOjMVgtzvyo?tk=oeFL44aZNQb
This one appears to have the same dimensions.
https://www.ebay.com/itm/277180035004?
Pair of 210mm long steering tie rods with ball joints, secured with 8mm screws
https://e.tb.cn/h.hOQlCNY3MFntr6K?tk=gvmB44aXWVj
This seems usable.
https://www.ebay.com/itm/286212039902?
Pair of 10x4.50 tires, 5-inch 3-hole hub go-kart wheels
https://e.tb.cn/h.hONYxjJHWJVPRb2?tk=CDui44a3wS4
Tires and hubs are generic; I won't provide links for North American purchases.
Go-kart seat
https://e.tb.cn/h.hmbD89AClKNdhRk?tk=v8rM44aD3Zu
This is identical to the one I purchased.
https://www.ebay.com/itm/353780728828?
➡️Hardware (Since these are standard components, I've only provided links for mainland China)
6203-ZZ bearings x4 for front hub
htts://e.tb.cn/h.hONnl543R5RotEw?tk=x62u44a9MzO
6004-ZZ bearings x2 for steering column
https://e.tb.cn/h.hONqxLs02I2kzTB?tk=2FlY44annT0
Hexagonal aluminum tube with 16mm opposing distance, to be used as the steering column
https://e.tb.cn/h.hmbBe5Ppul4C20X?tk=ZgLz44ayeLG
➡️Chassis Tubing
I used carbon fiber; you may try aluminum alloy.
40mm outer diameter, 36mm inner diameter tube, 1100mm x2
30mm outer diameter, 27mm inner diameter tube, 322mm/592mm/642mm/750mm/750mm/456mm/456mm/456mm
Total of 10 tubes
Additionally, acquire some 7mm carbon fiber tubes, cut into 90mm lengths; approximately 20 are needed.
➡️Bolts and Nuts (8.8 grade is sufficient for securing composites and 3D-printed parts) (Since these are standard components, I've only provided links for mainland China)
All bolts and nuts mentioned below are sold in pairs (matching nuts are required; locking nuts are recommended).
It's advisable to purchase at least 10% more of each type of hardware component.
Brake disc M5*40 hemispherical head x6
Brake disc fastener M5*30 hemispherical head x4
Brake caliper mount M6*45 cup head x2
Rear axle nylon fastener M5*120 hemispherical head x8
Crossbeam nylon fastener M5*100 hemispherical head x8
Motor mount M8*25 hemispherical head x2
Motor mount bracket M5*50 hemispherical head x2
Seat mount M5*30 x2, M5*50 x2 hemispherical head
Front axle fastener M10*140 hemispherical head x8
Steering column screw M5*50 hemispherical head x2
Rear wheel fixing screw M8*65 hex x6
Rear wheel flange locking component M5*30 hemispherical head x2
Front bumper through-bolt M10*140 hemispherical head x2
Throttle pedal hemispherical head M5*40 x2
Brake pedal reinforcement screw hex M12*120 x1
Steering wheel installation and flange locking component hemispherical head M5*30 x4
Steering tie rod M8*50 hemispherical head x4
➡️Drive System
500W 36V 1020 motor, requiring a 428 gear
https://e.tb.cn/h.hO9pqdw9UFhsRp7?tk=BKaW44ZeRM3
Controller to match the motor
https://e.tb.cn/h.hO9pqdw9UFhsRp7?tk=BKaW44ZeRM3
I found an identical motor and controller on eBay.
https://www.ebay.com/itm/195831936268?
Makita 18V battery power tap x2 (for power extraction only; not essential)
https://e.tb.cn/h.hOnXHte3R1fKCwq?tk=pgz244Z4jTx
I use two Makita brand 18V power tool batteries connected in series to drive the rear axle motor. All related equipment is wired to the side box on the left side of the vehicle.
After careful consideration, I opted for higher flexibility in the electrical components, creating a large side box. You can determine your desired drive components and neatly house them within the side box.
Go-kart throttle pedal
https://e.tb.cn/h.hO9IX9Cury1qLea?tk=3cdg44ZfIRc
I found an identical one on eBay.
https://www.ebay.com/itm/235556599640?
428 chain, approximately 40 links required (this is a standard part; links for overseas customers will not be provided).
https://e.tb.cn/h.hO9HXt3RWi2SkSy?tk=QnNL44ZU95M
➡️Braking System
Shimano MT200 brake kit (requires reconnecting oil lines and bleeding during assembly)
https://e.tb.cn/h.hmYOXaZ8oRJjv9X?tk=TF0f44ZPlxb
This is also a standard component; purchase a right-hand brake lever and a front brake caliper, along with approximately 3 meters of brake line and related components for brake line fabrication.
➡️Additional Fan Power
12V 8085 server fan x4
https://e.tb.cn/h.hOnnOQmaccmT9tU?tk=ZO5w44ZQMmK
This is a standard component, used in this project to enhance sound effects.
I use a 3S model aircraft battery and a simple switch to drive the rear fan.
Like the rear axle power, I've retained flexibility in the electrical components; the right-side box is reserved for you to place the fan's related drive components.
➡️Consumables
Adhesive
It should be noted that due to the bonding of carbon fiber tubes, epoxy adhesive is optimal, such as 3M DP460 or SikaPower 1200.
Furthermore, as this is an integrated project, it's advisable to disassemble each part after ensuring all components are correctly assembled, apply additional adhesive, and securely fasten the nuts.
The total consumption for this project is within 100ml.
100ml of brake fluid
Note that Shimano MT200 uses mineral brake fluid. Reconnecting lines and refilling brake fluid during installation, considering air bleeding, will consume at least several tens of milliliters.
➡️Tools
Small or medium-sized automotive repair tool set (must include socket wrenches of common sizes; two of each size are recommended because of double-locking requirements).
Common size drill bits (for enlarging 3D-printed holes when extrusion is not properly calibrated).
Carbon fiber tube cutting tools (fixture/specialized saw).
Soldering iron (for electrical wiring, etc.).
Forced-air oven (for annealing 3D-printed parts containing carbon fiber/glass fiber).
➡️3D Printing Filaments
Black PA6-CF 5KG
Gray PETG-CF 2KG
Black TPU for AMS 3KG
Black PLA Basic 1KG
Black ABS-GF 1KG
White ABS-GF 4KG
Red ABS-GF 3KG
Blue ABS-GF 3KG
Yellow PA-GF 1KG
Concluding Remarks, Before Assembly Instructions:
The above lists all the required materials. In addition, I've prepared assembly instructions in PDF format (listed below). The document uses component drawings and annotations to illustrate the installation process. However, due to the project's considerable scale, I cannot provide comprehensive, step-by-step instructions for everyone. Many minor details require your own ingenuity. For any unresolved issues, please feel free to discuss them in the comments section. I will respond promptly upon seeing your comments.
Documentation (1)
License
You shall not share, sub-license, sell, rent, host, transfer, or distribute in any way the digital or 3D printed versions of this object, nor any other derivative work of this object in its digital or physical format (including - but not limited to - remixes of this object, and hosting on other digital platforms). The objects may not be used without permission in any way whatsoever in which you charge money, or collect fees.
Comment & Rating (234)