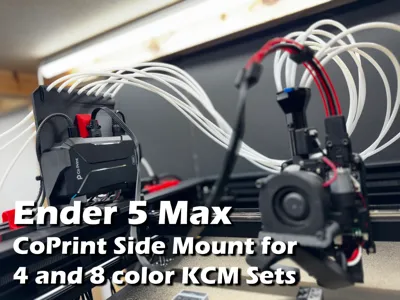
CoPrint Ender 5 Max Side Mount - 4/8 Color KCM Set


Print Profile(2)


Description
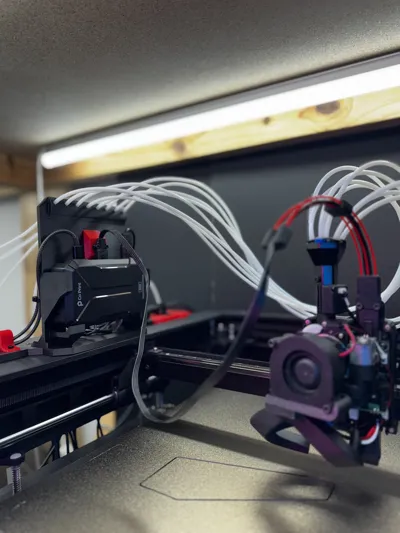
While CoPrint does provide some basic mounting hardware to attach their CX-1 Extruder Bracket to the Ender 5 Max, it leaves a lot to be desired. It forces you to mount the extruders to the back of the machine, and in situations like mine, where the machine is up against a wall, it won't work at all. Even in cases where there's room in the back to access these, you still have to climb behind the machine in order to change out your filaments. Definitely not ideal.
 |  |
Features:
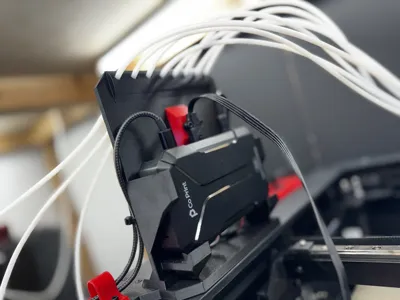
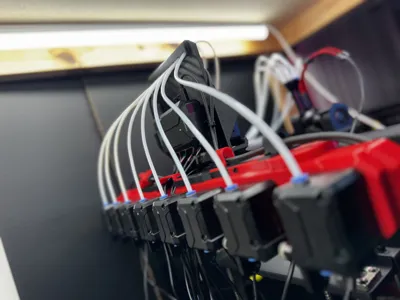
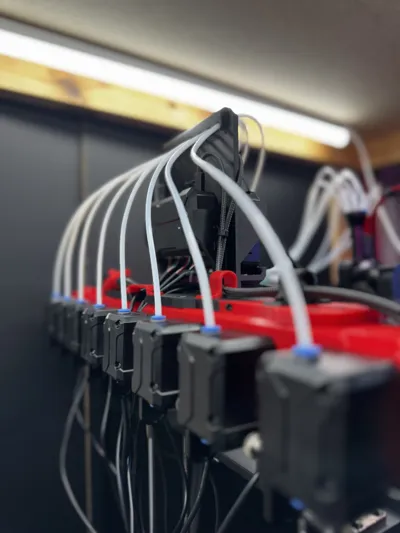
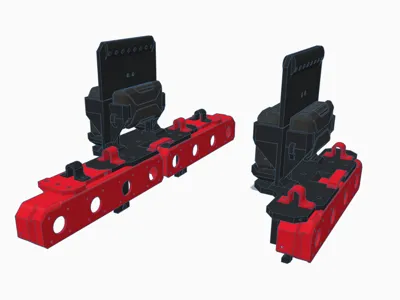
- A universal style that will work with both 4/8 color KCM kits
- Semi-modular design - you can start with parts for 4 color and expand to 8 later
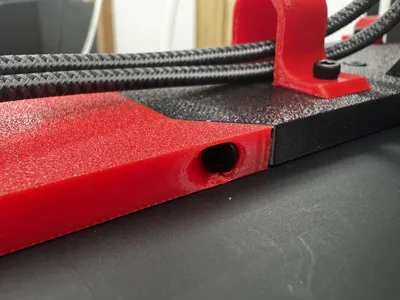
- Cable management via clips, passthroughs, and zip-tie mounting options
- Uses original CoPrint CX-1 extruder brackets, if you've already printed them
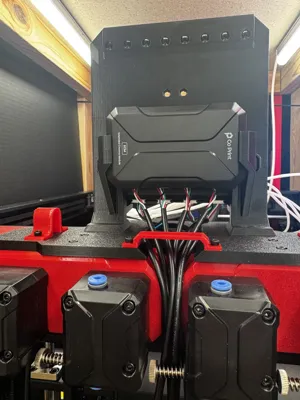
- Top-mounted KCM ensures compatibility with standard-length ChromaHead cable
- Parts can be printed on a standard, Ender-3 sized 220x220 build plate if necessary.
- Strong and stable, mounts securely to the Ender 5 Max frame
- Provides reverse bowden tube management, directs tubing up and out of the way of the ChromaHead cable
Things you will need:
Assembling the parts for this kit requires the use of M3 screws in a variety of lengths, as well as two 12mm M4 screws to secure the mount to the printer's frame. If you're into 3D printing mods, you probably have a few variety boxes of these lying around already. If not, you'll need to pick some up. You're also going to need a LOT of PFTE reverse bowden tube, because the ones that come with the CoPrint kit aren't even close to being long enough. Thankfully, it's pretty cheap.
- 4x 12mm M3 screws and nuts to attach the CX-1 extruder block to the Side Mount.
- 2x 12mm M3 screws to attach the KCM/ECM bracket to the Side Mount.
- 1x 16mm M3 screws to secure the Side Mount to the top of the E5M frame.
- 2x 25mm M3 screws and nuts to secure the ChromaHead cable to the KCM/ECM bracket (well -22mm- but that's not common in any of the widely available kits. 25mm is fine, and will allow you to add a cable support if you need it).
- 2x 12mm M4 screws to secure the Side Mount to the side of the E5M frame.
- 5 meters of .25 ID / 4MM OD reverse bowden tubing for EACH block of 4 CX-1 Extruders. This will give you enough to work with and make a mistake or two.
Optional / 8-color Parts:
- 4x 12mm and 2x 16mm M3 screws for attaching the side wings for 8 color kits.
- 4x 12mm M3 screws and nuts for attaching a second CX-1 Extruder Block
- 2x 6mm M3 screws for each cable management clip you choose to use (both USB/Power and Extruder types, total of 10 if using all)
Note: The Side Mount is designed to be mounted on the left-hand side of Ender 5 Max frame (facing the machine), and the default profile reflects that. A right-hand side profile is available, please make sure you select that if you want to mount your hardware on the right-hand side of the machine, the necessary parts have been mirrored.
Note 2: While I am more than happy to try to answer questions about the E5M and CoPrint installation, please understand that I'm not any kind of a 3D printing expert. I'm six ADHD-addled raccoons in a trenchcoat with a hyperfixation problem. The folks over at the CoPrint Discord are far more knowledgeable than me and are super helpful.
Please read the attached installation instructions/notes before getting started.
And hey, thanks for checking out my project! If you're not familiar with CoPrint, check out the Related Links below for info on getting it installed on the Ender 5 Max, as well as these related models you might find useful. If you can think of anything I should add to these, let me know!
Related Models:
- ChromaHead - Improved E5M Mounting Adapter
Resolves problems I had with CoPrint's adapter where the nuts would vibrate loose during prints, causing failures. - ChromaHead - Cable Support / Strain Relief
Keeps the ChromaHead cable out of the way of moving parts. - Creality Power Coupler Housing
If you, like me, did absolutely no research whatsoever and ordered the Ender 3 V3 Plus CoPrint kit from Creality thinking it would be the same as the kit that comes directly from CoPrint only to discover that it is, in fact, NOT the same kit, there is hope! You can still use the power adapter. The E3V3P and E5M don't use the same printhead cable, but they do use the same connector and pinout. This housing will keep the wires from remaining exposed and vulnerable.
You will still need to buy a bed leveling sensor from CoPrint though. Or try to make one yourself, I'm not the boss of you. Do what you want. The socket on the board is for a 3-pin PicoBlade 1.25 connector. Godspeed. - Ender 5 Max Bed Support Arm - by k2thestank🇨🇦
I use six of these (three in the front, three in the back) to help offset bed warping during heating. It brought my mesh range down to under .3mm at 65c instead of 1.3mm. Not perfect, but much better. The M5 screw kit that I got from Amazon came with smaller (9mm) nuts than the one the model expects (12mm). You can find my remix here. Measure your nuts on the long diagonal before printing. - Ender 5 Max Screen Bracket - by Jcarnold8806
Use this when you get sick of looking at a broken Creality screen (yes, CoPrint will bork your touchscreen). Put GuppyScreen on it using the Creality Helper Script. Comment out all the stuff in the .cfgs that are making Klipper yell at you. Enjoy having a functional, occasionally responsive screen again. If you, like me, want to position your screen with the USB ports facing down, you'll want to edit the GuppyScreen config file to rotate 180 degrees before you do anything with it, especially the touch calibration. Thank me later. - ChromaHead 5015 Fan Duct by Andizzle
I had too much curling using PETG with the ChromaHead, and modified this to use a 5020 fan I had sitting around. Curling gone. Also gone: 25mm of print area on the Y axis to keep it from crashing into the front of the frame. Bummer.
Related Links:
- Ender 5 Max - Rooted Firmware Github by Zevaryx
In order to use a CoPrint system on the Ender 5 Max, you will need root access.
Creality does not (currently) provide a way to root the firmware. You will either need to root it yourself using various tools, or download a pre-rooted firmware (which I strongly recommend) to a USB drive and let the machine update to it.
Update: The latest official E5M Firmware apparently adds the option to enable root access. I have not tested it. - Creality K1 KCM Set Setup Guide - CoPrint Wiki
This link should skip past all the irrelevant hardware installation and take you to the software setup process. The process for the Ender 5 Max is the same, to the letter, as that of the K1 series, with the exception of the fact that you cannot just “enable” root access at the printer and the password will be different. You will need to SSH into the printer and make a few edits. I use MobaXTerm for this. - Creality Helper Script Wiki
You will be using the Creality Helper Script to install moonraker/nginx, as well as either Mainsail or Fluidd (my preference) - The steps needed for this are all laid out in the guide above, but you should check out the wiki for more information. Optionally, you may decide later to install other tools like GuppyScreen. This script has been updated to support the Ender 5 Max. - CoPrint Github - Ender 5 Max Assembly Parts
The original assembly parts provided by CoPrint for the Ender 5 Max. You can get the 4x CX-1 Extruder holder file from here, if you haven't printed it yet. - CoPrint Github - Ender 5 Max Configuration Files
Out of date, but a good starting point. You will need to adjust the extruder settings if you're using the new version of the ChromaHead with the runout sensor, which you probably are. If you don't do this, filament will not retract far enough during changes and will cause a jam. There's a lot of information about this on the CoPrint Discord, in the FAQs section. - CoPrint Discord
If you don't have Discord, get discord. Join this group. You are GOING to have problems and questions, and the folks here are super knowledgeable and helpful. CoPrint support has also been very responsive and helpful to me, but they do live on the other side of the planet, so responses tend to come in while I'm sleeping. Discord is much faster.
Boost Me (for free)
If you found this model useful, please consider throwing me a boost! Thanks!
_____________________________
All of my original models are free to be remixed with attribution and used commercially.
Feel free to sell or give away prints, or use them in your marketing materials in any way you like.
Support a free and open 3D printing community.
Remixes of others' models are shared using the same license as the original work.
Comment & Rating (5)