Search models, users, collections, and posts

Moonveil Katana - Elden Ring

Print Profile(1)

All
X1 Carbon
H2D
A1
X1E
P1S
P1P
X1
H2D Pro
H2S
P2S
H2C
X2D
A2L

0.2mm layer, 2 walls, 15% infill
Designer
11.7 h
2 plates
4.9(18)

Open in Bambu Studio
Boost
748
1923
54
59
832
282
Released 

Description

Boost Me (for free)

If you enjoy this model, please consider leaving a boost — it helps others find it and supports future projects like this one. Every bit of feedback means a lot! Thanks for your support, Tarnished !

Note: please read Chapters Printing Notes and Assembly Instructions


Update: I uploaded a custom vertical wall mount designed specifically for the Moonveil Katana! It’s the perfect companion to complete your Moonveil display setup!

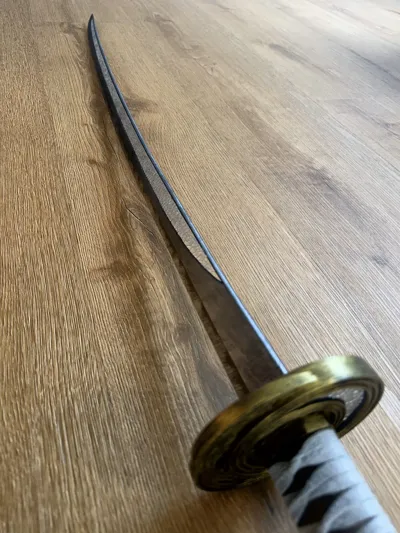
After my recent Elden Ring upload, "Site of Grace – Elden Ring Diorama", I wanted to show the game a bit more love – so I recreated the iconic Moonveil Katana in full real-life size! It’s the weapon my character wields in-game, and bringing it into the real world as a detailed 3D print was an absolute blast. 


This is a 3D-printable replica of the Moonveil Katana from Elden Ring, designed for display or cosplay use. The model features decorative silver inlay slots along the blade and guard, which not only serve as striking visual elements but also add internal structure to improve alignment and strength during assembly. The katana is about 135 cm long (53.15 inches).

That said, it's still a PLA print, so please treat it as a decorative prop—not suitable for swinging or combat simulation.

If you plan to use it for swinging, you’ll find uncut STL files for both the blade core and the matching inlay plates included. This allows you to modify the stl and insert carbon rods for additional reinforcement.

Printing Notes

I highly recommend using the provided print profile — it's been thoroughly tested and gave me great results. If you really want a Version of the print profile for A1 mini, tell me!
The blade segments are printed standing upright on their cut faces. This makes build plate cleanliness and adhesion critical.

  • If you're experiencing issues like layer shifts or poor bed adhesion as the height increases, try reducing your print speed.
  • On my X1C, prints worked fine on the first attempt using the included print profile without tinkering with any settings mid print.

Assembly Instructions

If you're planning to paint the blade, do it before assembly. Avoid getting paint on the glue surfaces! Paint can interfere with bond strength.

Refer to the included labeled diagrams for part names and orientation. 

Here’s the general build process:

Blade Assembly

  1. Start at the tip of the blade with parts A and B.
  2. Glue the blade cores A + B together using PLA glue or superglue.
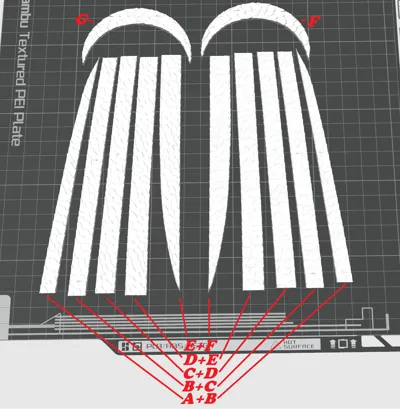
  3. Once the core begins to hold, attach the matching inlay plates A+B (left side) and A+B (right side) to align and secure the blade.
  4. Continue by attaching blade segment C, then plate B+C, and so on in the following order:
    • D, then C+D
    • E, then D+E
    • F, then E+F

 At the final plate pair (E+F), you might find the fit imperfect due to minor tolerances. I observed a ~3–4 mm overlap. Use a precision flush cutter (the kind used in model-making and 3D printing) to trim off the excess – the cut blends well with the texture and won’t be noticeable (see image). 

Guard and Grip

  • Parts F + G form the guard. Two sizes of alignment dowels are provided – the smaller ones fit more smoothly. The dowels are just for positioning and shouldn’t require force to insert.
  • Grip parts are joined as follows:
    • G + H
    • H + I

Before gluing the grip, test the alignment to ensure you're not gluing any part upside down or facing the wrong way.
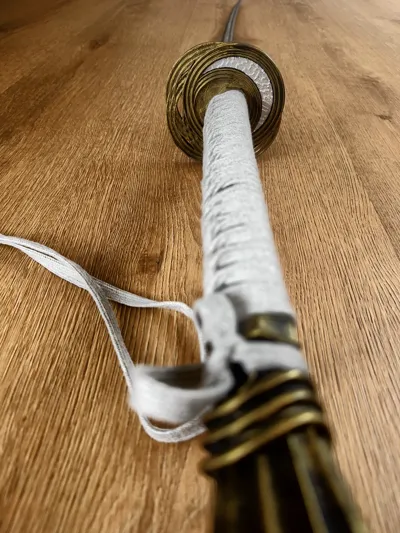
Grip Wrapping

To wrap the handle, I used a flat cotton ribbon, approx. 10 mm wide and 10 meters long (about 0.4 inches x 33 feet). You can find similar ribbon on Amazon.

This was my first ever grip wrap, and I followed this YouTube tutorial. I skipped most of the tools and simply wrapped it tightly by hand, which took ~30 minutes. The result looks much more authentic than any printed grip pattern could.


Enjoy printing, Tarnished!

Comment & Rating (54)

(0/1000)

Don't suppose you have seen this one by joseph aguilar?
2
Reply
This looks like a real steel replica. What does that have to do with the print though?
0
Reply
Replying to @Xenomorphic :
Its a 3d print that is very similar to this one, by the aforementioned creator.
0
Reply
Print Profile
0.2mm layer, 2 walls, 15% infill
splendid, a marvel. I am currently painting it
Show original
profile
1
Reply
Print Profile
0.2mm layer, 2 walls, 15% infill
THX my first print
profile
1
Reply
Boosted
what was the full process for painting and finishing this?? and what layer height did you use?
(Edited)
The designer has replied
1
Reply
i just use brushes and acrylic paint. black base color, then metallic colors. the gold paint was done drybrushing.
1
Reply
Boosted
Replying to @user_2954013514 :
any kind of smoothing for the layer lines?
0
Reply
Replying to @nintynine :
no, im always too lazy for that. but it would definitely look better 😊
0
Reply
Boosted
Good job, but connection parts is too long(~1 cm).
The designer has replied
0
Reply
looks awesome! thanks alot for printing! which part are you referring to? the plating along the blade or a dowel?
0
Reply
Hi, the model is fire!! I'm an art student at Leeds Art University, and i plan to make this katana as a practice for my later projects and add this piece to my reference, can i ask for some advice on how to post process the katana after i print it? Like did u add filler primer and sand it before coloring, or what kind of paints did you use, any advice would be so appreciated!
The designer has replied
0
Reply
hey 😊 thanks alot! I am actually way to lazy to prepare my projects before painting. so you can only make it better thank me. i would really like to see your katana once its finished. please share a picture 😊
1
Reply
Replying to @user_2954013514 :
Thanks for the respond and ofc i will share a picture after i finish it!
1
Reply
Replying to @user_2954013514 :
Finally finished and brought the outcome hehe, such a cool design, im planning to add this katana to my coursework portfolio! I will make sure your profile and names be shown on it!
2
Reply
Print Profile
0.2mm layer, 2 walls, 15% infill
great sawed printed great son loves it
The profile uploader has replied
profile
1
Reply
happy to hear that 😊
0
Reply
Sword
0
Reply
if I could give this zero stars I would, there is something wrong in the print profile that has caused the print to fail multiple times wasting almost a whole spool of filament
0
Reply
Seems to work fine for everyone else. What specifically is happening when yours fails?
1
Reply
Thats a bit mean when everyone else seems to have managed. Considered that the error may be with you?
0
Reply
Hello, I'm a 3D printing novice, your model is stunning, and I'd love to print it for cosplay Could you advise if modifying the STL file is necessary to insert carbon rods Thank you
The designer has replied
Show original
0
Reply
hello! thanks for being interested in my model! yes! for being able to swing the sword you would need to reinforce it! you could either use the program „fusion 360“ if you have a decent pc or „Blender“ to cut out cylinders with the length and diameter of your desired carbon rods. remember to add tolerances, to ensure a good fit! after that you can cut the model into pieces again just as i did in the print profile using „bambu studio“ if you have strong glue and if you are not planning to swing the katana rapidly you might get away without reinforcing it. it is suprisingly sturdy for only being made out of pla. i hope this helps!
0
Reply
Replying to @user_2954013514 :
Thank you for your detailed reply, I, a novice, understand it perfectly! It's time to learn some Blender skills. I will measure the dimensions of the carbon rod and add holes to the model, enlarging the holes slightly for easier insertion. Then I will cut it into small sections, making it convenient for me to travel to comic conventions across the country and allowing me to carry it on airplanes. This is the first weapon in my game, with exceptional toughness. It feels like I've returned to the winter of 2023 when the game first came out, filled with the thrill of exploring the unknown!
Show original
designer
1
Reply
yooo I just got this from the magma wyrm in game. def gonna print
(Edited)
1
Reply

License

This user content is licensed under a Standard Digital File License.

You shall not share, sub-license, sell, rent, host, transfer, or distribute in any way the digital or 3D printed versions of this object, nor any other derivative work of this object in its digital or physical format (including - but not limited to - remixes of this object, and hosting on other digital platforms). The objects may not be used without permission in any way whatsoever in which you charge money, or collect fees.