


Print Profile(2)

Bill of Materials


Description
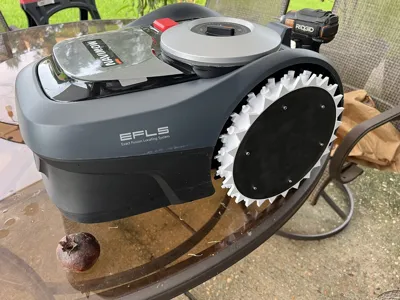
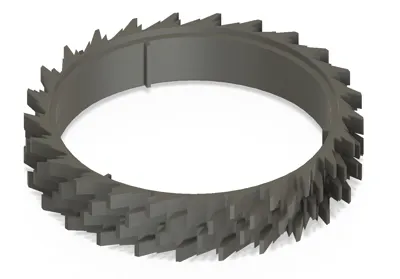
Upgraded Wheel and Tread system for the Segway Navimow i Series!
Background:
When I first got the Navimow I was so disappointed I was planning on returning it. It couldn't navigate the grass at all. It would get stuck left and right. I turned to online and saw all the comments about how horrible the wheels were, but I wasn't willing to spend $100 for the "Offroad" wheels when I could waste hours and hours and build my own.
I felt the biggest issue with the mower was the low front bumper. The mower would sink into the grass a little bit and then be unable to "plow" through the grass. My main focus was width. I felt if the wheels were wider it could ride along the top of the grass better and the bumper wouldn't be an issue. I also wanted a more aggressive "spike" to help dig into the grass when needed.
Main Features:
- Wider Wheels (48mm across)
- Aggressive Modular Tread Design
Parts List
The print profile I used should work for most people.
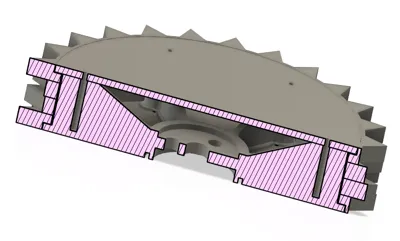
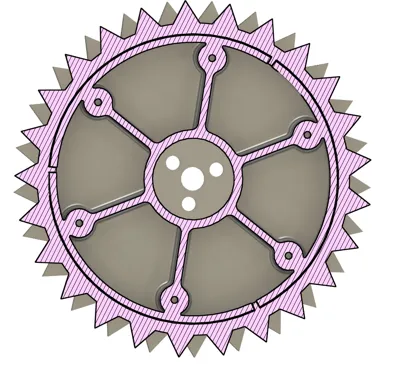
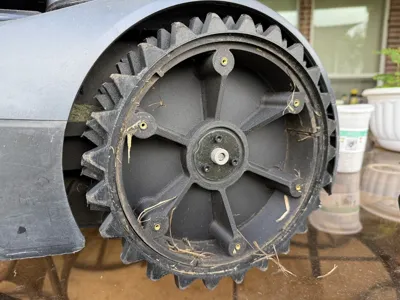
Main Wheel
- 2x The Wheel Hub should be printed in a strong material like PETG-CF or like. You need 2 of these.
- 2x The Wheel Faceplate & Ring are not structural but should be printed in PETG or like.
Treads - If you do not have any pavement “crossings” then a hard material like PETG / ETC will work. The stronger the material the longer it should last. If you have any pavement crossings at all I would recommend going to TPU as the extra grip on the pavement will be substantial from my testing.
- 4x Outer Treads Total - You can mix and match which treads you want. I found the most success with “paddles”
- 4x Inner Treads Total - You can mix and match which treads you want, again I found “Paddles” to be the most successful.
The “Full width treads” are still included but I do not feel these were that helpful compared to the other options here. Although being it's a single print for a full wheel I can understand the desire to print this.
External Parts
- 12x M3 heat inserts
- 12x M3x10mm+ Bolts.
Assembly
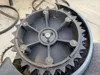
- Using a solder iron insert M3 Heat Set Inserts are heated / pressed into the Navimow Wheel.
- Press the Navimow Wheel Ring into the Navimow Wheel [Larsih recommends gluing, but I didn't find that necessary].
- Attach Wheel and Ring to Segway Navimow.
- Slide tread (either V1 or the Modular top/mid1/mid2/bottom) onto Wheel.
- Using the M3 Bolts, attach the faceplate to the wheel.
Future Upgrades
Let me know what you want to see.
Downsides
The only downside I have found thus far is due to the extra width some “Mower Homes” don't fit anymore when you add the little bit of error they have getting into their “homes”.
6/10/2025 Update
After hundreds of hours of mowing:
- The treads are still going strong, they are showing wear and tear but that is expected. They take about 1.5 hours to print.
- There is a little bit of debris getting into the hub, but I don't see any problem there.
- The treads have stretched little bit, but they haven't ever skipped off their index.
- Only once did a stick get caught between the tread and the mower, but it still ran fine.
New Tread Designs
As promised… (albeit probably 8 months after I expected to do this) I have two more tread designs that I am currently testing. I am uploading to everyone just incase people want to try. They are all modular and can swap.
- Blocks - More inline with general Off-Road vehicle tires.
- Paddles - Should help moving in a single direction, I recommend putting these going both directions as the mower does move forward and back.
As before, anyone with any tread designs please submit them and I'll create them as best I can!
5/15/2026 Update
- Added a new profile that combines everything and should make things a little easier to understand.
- I have these on two mowers now, and have a combined total mowed area of about 750,000sq ft. Of that, I would argue at least 500,000sq ft is using these mowers. I have yet to actually need to change the treads, but I have due to testing.


Comment & Rating (15)