Shure MV7+ Monitor mount


Print Profile(2)


Description
Before printing: Refer to this discussion to get an idea if this is goig to be something you'd want or not.
| Update (Dec 28, 2025): Added a new “Smoother thread” print profile. This profile has the thread hole with increased tolerance to make it easier to thread. Please notice, the good thing about the original thread which is harder to thread is that it holds up well, so the adapter doesn't slip with use. This version hasn't gone through thorough testing, but I am assuming it could suffer from slipping with ongoing usage. |
| Update (Dec 29, 2025): Increased the tolerance of the small screw hole (In the big screw) so now it's smoother to screw in. That refers to both profiles. It should now be smoother to screw in. |
Back story:
So the main use I have for the MV7 Plus I have is for online meetings. I've had many complaints about my low voice during online meetings and after a while figuring out the problem, it came down to my voice. I get this comment in real life as well away from mics. So I decided to buy a good mic rather than start shouting into the mic I have during meetings.
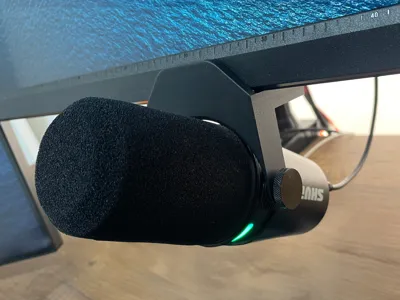
Only later after I bought it I realized this mic is used to it's fullest while speaking right into it. So I thought I need something to get it closer to my mouth while not having it in frame of my webcam. I saw that everyone is using an arm for that but I didn't like it. If I get it close enough to my mouth it'd be in the frame.
This is why I made this. It's not the closest to my mouth but it does the job. Bear in mind that I have to use Motiv's virtual output to have my low voice high enough in meetings.
Parts:
- Mount
- Big screw
- Small screw
- Pressure cylinder
- TPU pad and circle
Installation
TPU pads:
We need the pads so it holds the mount strong enough, you can use any pads you have as long as they're thin enough. The pads will basically sandwich the screen from the back and front. They are the parts touching the screen directly.
- Glue the circle pad on the cylinder on the flat side (which has a small hole)
- Glue the bigger pad on the mount itself from the inside on the side that's far from the thread hole
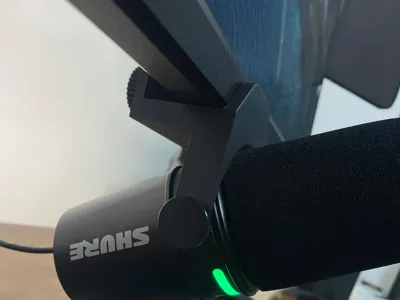
Mount:
- Screw the big screw from the back in the mount thread (just deep enough that the tip of the screw shows from the other side)
- Place the Pressure cylinder on the screw tip so the hollow side is covering the screw tip
- Screw the small screw from the inside of the mount through the cylinder and the big screw so it holds both of it together. (Make sure the cylinder spins freely.
- Install the mic on the mount using the screws that came with it, it should be obvious and easy to do.
- Mount the mount on the bottom of the screen and tighten the screw from the back to hold it in place.
Comment & Rating (19)