Search models, users, collections, and posts

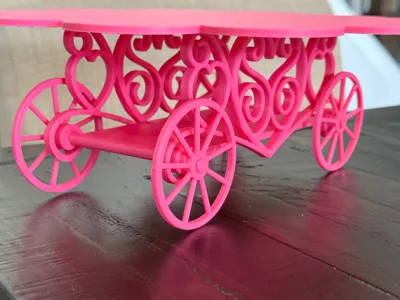
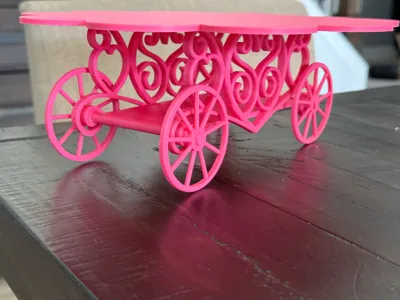
Princess Carriage Dessert Tray/Centerpiece

Print Profile(2)

All
A1
H2D
H2D Pro
H2S
P2S
H2C
X2D
A2L

0.2mm layer, 2 walls, 15% infill
Designer
6.5 h
3 plates
4.5(2)

0.2mm layer, 2 walls, 15% infill
Designer
14.4 h
1 plate
2.0(1)

Open in Bambu Studio
Boost
359
908
15
2
192
102
Released 

Description

This is my first foray into 3d Modeling.  My wife was organizing a baby shower for our daughter with a princess theme.  She wanted a fancy carriage that would hold treats and centerpieces.  This is what I came up with.  Constructive critique welcome if you have any ideas for improvement.


The STL is larger than the print plate.  You need to size it down to 69% (really).  It can be printed plate side down but the supports are a pain to remove and I found it much better to print in pieces and assemble.  The 3mf file is already split.

Comment & Rating (15)

(0/1000)

Print Profile
0.2mm layer, 2 walls, 15% infill
Strength Issue:Assembly for the multipart carriage is far to delicate. Every knob broke. I had to drill new holes and use toothpicks. Even if I got the parts connected they couldn't handle any kind of weight and broke when trying to use the stand.
Support Issue:The All-in-One print was much more stable but removing the support was horrible and i did end up breaking off a piece in the removal. I love the design of this carriage and have already been asked if I could make more for a naming ceremony. I think this could easily be redesigned with large connector-cylinders for the wheels into the undercarriage. long groves in stead of tiny triangles might be better for top attachment to the legs. I will look into it but I haven't used my modelling skills in ages. So it is slow going :)
The profile uploader has replied
0
Reply
Thank you for your reply. This model was my first foray into CAD. My imagination far outstripped my modeling abilities. I went through a few tries before getting to this iteration. I'm sorry to hear it was so delicate to put together. And yes support removal absolutely sucked--I could also maybe adjust that profile for easier removal. I ended up assembling about 15 of them and most didn't give me as much trouble as you had.... that said I also put together miniature models for a hobby, so maybe I'm used to finicky construction! I agree that the model could probably be improved. I'm currently working on another small project and haven't used CAD since making this carriage during last summer. If I'm able to improve it I'll let you know, and please feel free to make improvements yourself. Let me know if you do!
(Edited)
1
Reply
Replying to @Towehaal :
I have made a remix with different connectors. Mine is made with only 4 cylinders as connector between the undercarriage, sides and wheel. For the top plate I made raised cylinders and matching grooves on the sides. I just finished testing the assembly today. Edit: I also change the connectors to lie flat for added strength.
(Edited)
1
Reply
Replying to @LakshoejGrann :
mmmm... cool. That groove on the plate is a good solution. I have to learn how ot think less like an artist and more like a modeler/printer. Quite a learning process. Thanks for working on it!
0
Reply
Anyway you can enable this model for the p1s?
The designer has replied
1
Reply
maybe? this was my first time creating a print profile so I’ll have to figure it out. Let me work on this tomorrow and I’ll get back to you. Do you need this soon?
0
Reply
Nevermind! when I pulls it up in Studio, I was able to print on the P1S. It was the Handy app where it wouldn’t work! Thanks anyways!
designer
1
Reply
Replying to @CD3DNutz :
If you are able to post a photo I'd love to see it, thanks!
0
Reply
hi this is absolutely beautiful, can you create this for a P1S and please make it stronger, I read the other reviews and would love to use this for my daughters birthday 😇and tea ☕️ party’s
The designer has replied
0
Reply
It should work on the P1S, but you'd have to load it up in the slicer on your computer vs the Bambu Handy app. I do have a p1s at work, so I'm giving it a dance here to make sure the profile works. The assembly required is only slightly tricky--I got it down to a quick science once I printed more than a dozen of these for a baby shower. You will need super glue. I also recommend on the rectangular piece slowing down the printer. If you have the time to wait, I can hopefully upload a P1S "strength" profile tomorrow, but no guarantees.
0
Reply
Print Profile
0.2mm layer, 2 walls, 15% infill
The profile uploader has replied
0
Reply
thanks for the rating! if you printed it I’d love to see a picture!
0
Reply
the person I made it for loved it
0
Reply
Replying to @Beachbum_3D :
Awesome! I missed when you posted this originally. Thanks for the picture! This was the first model I ever designed myself so I'm thrilled to see someone else got something out of it!
(Edited)
1
Reply
Print Profile
0.2mm layer, 2 walls, 15% infill
0
Reply
No more