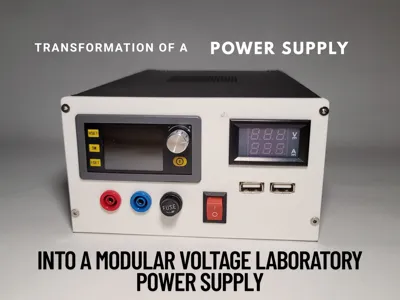
Modular voltage laboratory power supply


Print Profile(1)

Bill of Materials


Description
Hello, if you like my models, don't hesitate to subscribe, like and especially boost me. It would be a great help.😁
Boost Me (for free)
Even a very small action on your part can help me enormously. This kind of small action can really make a difference! Seeing that people support me motivates me even more and allows me to continue publishing models for free for everyone. 💪 Thank you in advance to all those who will take a few seconds to help me. You are the best! ❤️
I have long desired a modular-voltage laboratory power supply. Therefore, when I was able to salvage a PC power supply from an old HP tower, I decided it was time to act.
First and foremost, be aware that you will need the list of materials above, and it will cost you slightly less than €50 in Europe if you purchase everything from Amazon, assuming, as I did, that you can find a power supply for free.
WARNING!!!! This project is not without risk. If you are unfamiliar with electronics, I advise you to thoroughly research or abstain. I also disclaim all responsibility in case of accident.
10W 25-ohm ceramic resistor (one is sufficient; it works with my power supply, but some may not require one, or may need a different value. Please refer to the DroneBot Workshop video below.) https://www.amazon.fr/R%C3%A9sistance-Ciment-10W-25-ohm
Voltmeter-ammeter (one sufficient) https://www.amazon.fr/HUAZIZ-Amp%C3%A8rem%C3%A8tre-Voltm%C3%A8tre-daffichage-Multim%C3%A8tre
Banana plugs (x2) https://www.amazon.fr/HUAZIZ-bananes-haut-parleurs-connexion-damplificateurs
10A 5x20mm fuse (x1) https://www.amazon.fr/BOJACK-F10AL250V-Fusibles-fusion-rapide
Fuse holder (x1) https://www.amazon.fr/Gebildet-pi%C3%A8ces-Fusible-Capuchon-Panneau
You will also need 12mm M3 screws (if anyone has inserts, please share your results in the comments 😉).
As well as an LED and a resistor.
I soldered the components. If you do not have a soldering iron or do not know how to solder, alternative solutions likely exist. If you find any, please let me know so I can update the model and make it more accessible.
1 x 10A 250V on/off switch https://www.amazon.fr/KINYOOO-commutateur-Interrupteur-appareils-
1 voltage regulator https://www.amazon.fr/Jadeshay-R%C3%A9gulateur-Convertisseur-dalimentation-Affichage
And two USB modules. Unfortunately, the ones I had do not support fast charging, as they operate at 5V 1A. I'm including the link anyway (I strongly advise you to find another module that supports fast charging). https://www.amazon.fr/LaDicha-Chargeur-Converter-Booster-Module
I encourage you to watch DroneBot Workshop's video. His video is very comprehensive and accessible. As the wiring will differ for my version, here's how I wired it:
Indeed, I connected several 12V cables to the fuse, then to the variable module, and from the variable module to the banana plug.
The same applies to the negative, without the fuse, and of course, with the ground cables.
I connected the switch to the green wire (power on) and to a ground. One of the two USB modules is directly connected to the 5V and ground. The other, which has the multimeter, has a different connection: first, connect the small red wire to the standby (purple); the two black wires go to ground; the large red wire to the negative of the USB module; and the small yellow wire to the positive terminal of the USB module with a 5V cable.
Remember to connect an LED and a resistor to the gray wire (power good), then connect it to ground.
WARNING!!!! I reiterate that this project is not without risk. If you are unfamiliar with electronics, I advise you to thoroughly research or abstain. I also disclaim all responsibility in case of accident. If you notice any errors I've made, please let me know.
For the power supply, here is the model I used:
HP DPS-300AB-31 A
Therefore, any power supply with the same dimensions and compatible with my model will suffice.
It is possible to find it on eBay for around €15.
In my project, I only keep part of the metal plates surrounding the power supply; this allows me to screw it in place and access the cables more easily (see documentation).
If you're still here, don't hesitate to like the model, subscribe, etc., etc.
Your appreciation of my work and the time I invested will be greatly appreciated. 😊
If you ever have any questions, don't hesitate, I'll be happy to answer them 😊
Comment & Rating (0)