FOLLOW ME AND GIVE ME A BOOST 🚀, YOUR HELP, WHICH IS COMPLETELY FREE, IS GREATLY APPRECIATED AND I WILL CONTINUE CREATING LITTLE THINGS
UPDATE 10/08/2025
A smooth, logo-free printing profile for the side support of the print plates has been created
A printing profile without side plate support has been created
UPDATE 25/07/2025 The poop chute screw has been modified so that users with more than one AMS can place it correctly and it does not hit the hub
An error with the supports on plate 16 has been corrected
UPDATE 20/07/2025 A printing profile with smooth drawers and smooth handles has been created for those who do not want the embossed Bambu Lab letters
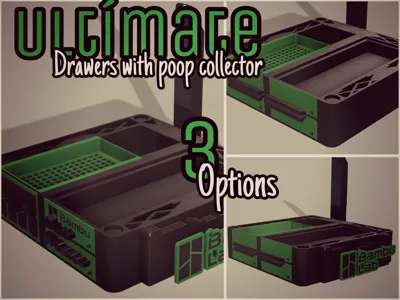
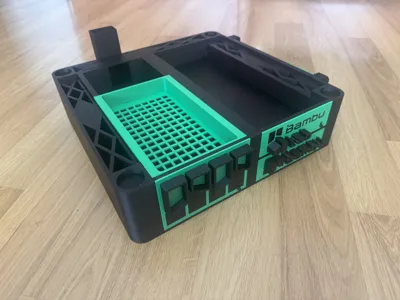
After looking at many organizers to place under the printer, I decided to make my own, as other models did not suit my needs. They are too tall, too short, or only have one drawer. This model is compatible with the Bambu Lab X1C, P1P, and P1S printers
With this model, I believe it is the right height to store your printer tools and spare parts, and the print purges fall directly into one of the drawers, so you don't have to worry about your printer's "poops"
Another thing you don't have to worry about is the printer's stability, as this model has thick walls that allow it to hold firmly without risk of breaking
And with a height of only 10 cm. Less height, more stability for your printer
ASSEMBLY
Assembly is not difficult, as the parts only fit in their correct place
ASSEMBLY GUIDE
1st- The 4 base pieces join easily and without the need for glue, as their rail system allows one piece to slide in from above so that all four fit well
2nd- The base supporting the upper right drawer is placed on the right side as shown in the image, using the same joining system, without the need for glue
3rd- You will have no problems with the drawers, as they align well in height. It is not necessary to use glue due to the rail system they have, but if you want a firmer fit, you can do so
REMEMBER: The narrower drawer goes on top
4th - For the print plate holder, first place the one in position 1, then the one in position 2
5th- We place the base of the "poop chute"
6th- When assembling the drawers, I found it very useful to be able to add a small latch, as with the printer's vibrations, they could open. So I designed a small latch that is activated with a finger to release it and open comfortably
It is important to follow the steps well for assembly to avoid problems later
1- Place the latch with the rounded end facing the drawer base
2- Once placed, apply glue very carefully, avoiding the latch area
3- Place the drawer lid in position and let it dry
4. The three drawers are made in the same way
To glue the side logo, for convenience, remove it from the main body and glue it separately
For the duct where purges are discharged, you can use the same screw that comes with the printer, or place a longer one of the same diameter
AND WE WOULD NOW HAVE OUR PRINTER BASE WITH DRAWERS, AND ONE OF THEM TO COLLECT THE PURGES
IMPORTANT: TO MAKE IT EASIER TO PLACE THE PRINTER ON THE BASE, I RECOMMEND PLACING THE PRINTER WITHOUT THE BASE DRAWERS
This user content is licensed under a Standard Digital File License.
You shall not share, sub-license, sell, rent, host, transfer, or distribute in any way the digital or 3D printed versions of this object, nor any other derivative work of this object in its digital or physical format (including - but not limited to - remixes of this object, and hosting on other digital platforms). The objects may not be used without permission in any way whatsoever in which you charge money, or collect fees.


Comment & Rating (115)