Paçoquinha Press

Print Profile(1)

Bill of Materials
Description
Make Perfect Paçoquinha at Home — With This Sweet 3D Printed Press! 🇧🇷
Love paçoquinha? Now you can create Brazil’s beloved peanut treat right in your own kitchen with the 3D Printed Paçoquinha Press — a compact, hand-powered mold designed specifically to craft smooth, perfectly packed peanut candy with authentic texture and charm.
Why You’ll Love It
- 🍬 Authentic Crumble – Achieve that signature crumbly-but-firm bite every time by pressing your mixture to the perfect density.
- 🖨️ Print & Press – Designed for home 3D printers using food-safe materials. Easy to print, simple to assemble, and quick to clean.
- 👩🍳 Homemade Made Easy – Mix roasted peanuts, sugar, and a pinch of salt, load the press, and press it down. That’s it! Perfect for small batches and family fun.
Whether you’re celebrating Festa Junina or just craving a nostalgic, nutty bite, this press makes it easy (and fun!) to bring Brazil’s most comforting treat to life.
What Is Paçoquinha?
Pacoquinha (pronounced pah-so-KEE-nya) is a traditional Brazilian sweet made from ground peanuts, sugar, and salt. It has a crumbly, melt-in-your-mouth texture and a rich peanut flavor — like a softer, drier peanut fudge or a Reese’s without the chocolate.
It’s especially popular during Brazil’s Festa Junina (June Festival), but is loved year-round by peanut fans everywhere. If you adore peanut butter, this treat is your next obsession.
Assembly Instructions
Requirements
| ||
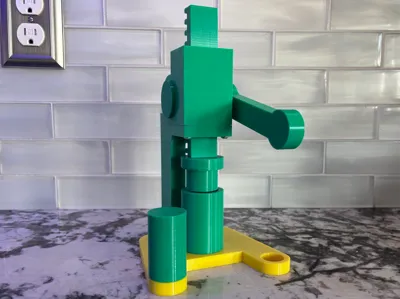
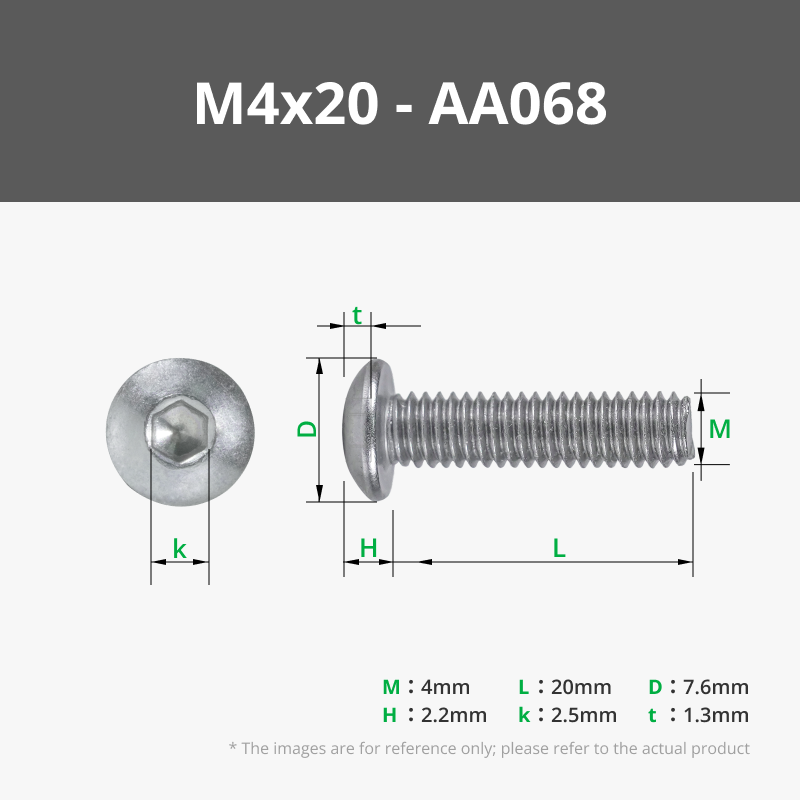
| 1 | Attach the Column to the Gear and Rack Container Use 4x M4x20mm screws. (See Figure 1) |  Figure 1 |
| 2 | Install the Gear and Arm
|  Figure 2 |
| 3 | Insert the Rack and Arbor Cull
|  Figure 3 |
| 4 | Attach the Base to the Column Use 2x M4x20mm screws. (See Figure 4) |  Figure 4 |
| 5 | Install the Form and Form Base
|  Figure 5 |
| 6 | Attach the Form Plunger
| |
Homemade Paçoquinha Recipe
Makes about 10–12 small pieces (depending on mold size)
Ingredients:
- 1 cup roasted, unsalted peanuts
- 1/2 cup powdered sugar
- 1/4 tsp salt (adjust to taste)
- 1–2 tbsp cassava flour (optional, for texture)
- 1 tsp neutral oil or peanut butter (optional, for binding)
Instructions:
- Grind the Peanuts
Use a food processor to grind the peanuts into a fine, crumbly flour. Don’t overblend into a paste. - Mix
In a bowl, combine the ground peanuts, powdered sugar, salt, and optional cassava flour. Mix thoroughly. - Test the Texture
The mixture should hold together when squeezed. If too dry, add a tiny bit of oil or peanut butter. - Press
Spoon the mixture into your 3D printed Paçoquinha Press. Compact it firmly using the plunger until tightly packed. - Unmold
Carefully remove the candy from the press. It should hold its shape. - Enjoy!
Store at room temperature in an airtight container for up to 5 days.
Tips:
- Use powdered sugar (not granulated) for a smooth, classic crumble.
- Add a pinch of cinnamon for a fun variation.
- For extra flavor, lightly toast the peanuts before grinding.
Usage Guide – How to Press Perfect Paçoquinha
- Fill the Form:
Place the Form cylinder on the Form Base, and fill it to the top with your prepared paçoquinha mixture. Level off the top for best results. - Press the Mixture:
Slide the filled Form under the Arbor Cull (press head), and press down firmly and evenly using the handle until fully compacted. - Release the Paçoquinha:
Remove the Form cylinder from under the press, and use the Plunger attachment to gently push the paçoquinha out from the bottom.
Tips for Best Results:
- Slightly overfill the form and scrape level before pressing.
- Apply slow, even pressure for a clean, compact shape.
- Let the candy rest a minute before unmolding if it feels too soft.
Comment & Rating (5)