Search models, users, collections, and posts
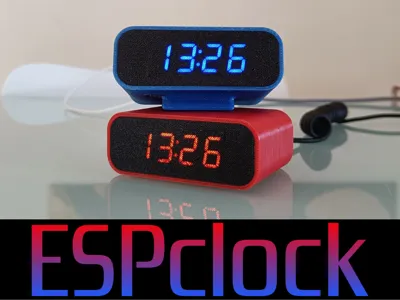
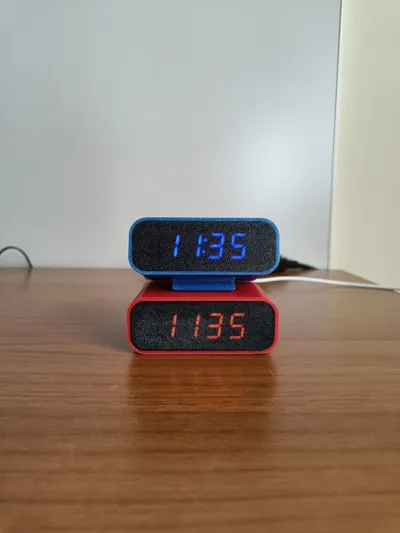
ESPclock | Digital Clock
IP Report


Print Profile(2)

0.2mm layer, 2 walls, 25% infill
Designer
1.3 h
2 plates

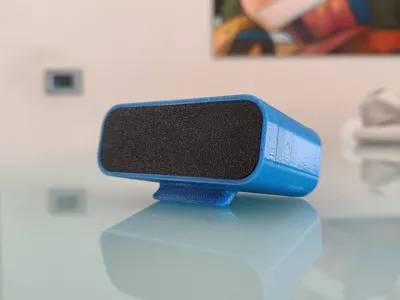
Tilted case - 0.2mm layer, 2 walls, 25% infill
Designer
1.4 h
2 plates
Open in Bambu Studio
Boost
94
277
39
4
138
52
Released
Description
Boost Me (for free)
If you liked the project, please consider leaving a boost!
This helps me a lot!
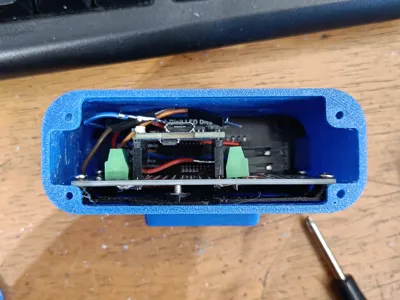
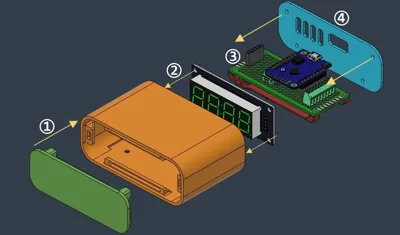
ESPclock is a credit card-sized DIY smart digital clock that connects to wifi and NTP servers to synchronize the time.
💻 INSTRUCTIONS + WIRING + FIRMWARE (current is v2.1)
https://github.com/telepath9/ESPclock
🟠 How to print
- Layer width: 0.4
- Layer height: 0.2
- Perimeters (case): 3
- Supports: no
- Perimeters (lid): 1
- Ironing: on topmost surface
🟡Tip for perfect Light Diffuser (on Orca slicer)
- layer height: 0.2mm
- Filament: PETG or other translucent filaments
- select diffuser then right click on it
- Click Height range modifier → choose Range: from 0mm to 0.2mm
- Enable IRONING: on all solid layers (only applied to the diffuser)
- Print. Done.
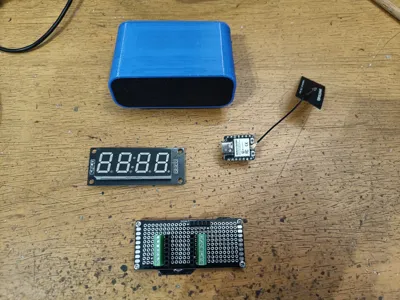
🔵 What you need 🛠
- XIAO ESP32 C3 or Wemos D1 MINI (mine is V3.0.0 clone)
- TM1637 module https://it.aliexpress.com/item/1005001582129952.html?spm=a2g0o.order_list.order_list_main.49.370e3696i4W9Sn&gatewayAdapt=glo2ita
- x11 M2.5x6mm screws
- x2 M2.5 nuts
- Wires (dupont for TM1637 and 22AWG single core for wemos)
- 7x3cm perfboard ;
- female 8pin header: x2;
- DG308 8pin terminal block: x2 ;
- 1x single row female 5 PINS for common GND
- male connectors 8pin (for wemos) : x2;

🪛 HOW TO ASSEMBLE ESPclock

License
This user content is licensed under a Standard Digital File License.
You shall not share, sub-license, sell, rent, host, transfer, or distribute in any way the digital or 3D printed versions of this object, nor any other derivative work of this object in its digital or physical format (including - but not limited to - remixes of this object, and hosting on other digital platforms). The objects may not be used without permission in any way whatsoever in which you charge money, or collect fees.
Comment & Rating (39)