Bogen/Manfrotto 3/8" Hexagonal Quick Release Plate


Print Profile(4)


Bill of Materials


Description
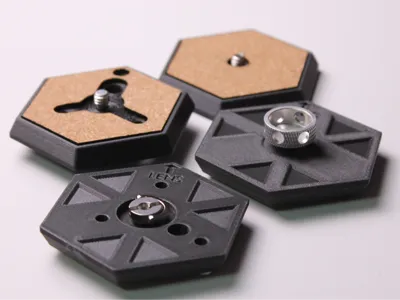
Meet the Bogen Hex Quick-Release Plate:

A sleek, modular solution that combines rock-solid PETG-CF durability with precision-laser-cut cork comfort. Whether you’re shooting on a tripod, slider, or gimbal, these low-profile hex plates give you a perfectly flush mount every time.
I designed these plates for all Bogen / Manfrotto Tripods and accessories that use the 3/8" Hexagonal Quick Release, such as the Bogen/Manfrotto 3021 Tripod and the Bogen Elbow-Cam Mount.
I've created 4 Print Profiles to better suit all photographers and printers alike
Print Settings:
Arachne Wall Generator
8 Wall Loops, 25% gyroid Infill
Slower Speeds and Acceleration for PETG-CF
Supports on
Common baseline
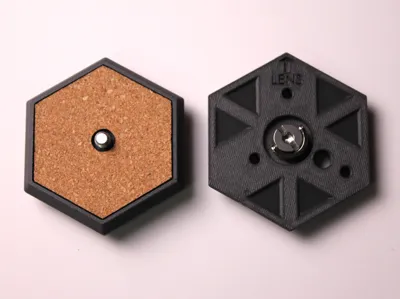
- Outline: 66.1mm across flats, 8.2mm thick hexagon
- Cork insert: 2 mm top pad with matching central and hole cut-outs
1. Bogen Camera Mount Simplified – FC010
- No OEM holes: the four standard Manfrotto thru-holes are omitted
- Center counterbore: made ~1.6mm deeper than FC011 versions, so the lower-profile FC010 ring-nut sits flush
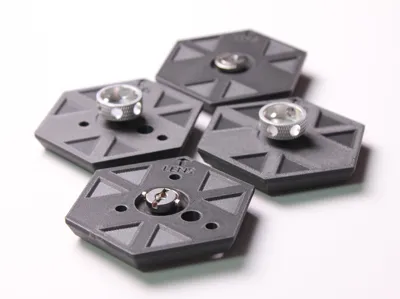
2. Bogen Camera Mount Full – FC010
- All 4 OEM holes present: four 4 mm thru-holes in the exact Manfrotto pattern, letting you attach straps, pin‐locks, or alignment pins
- Center counterbore: same extra depth (~1.6mm deeper) to clear the FC010 nut shaft
3. Bogen Camera Mount Simplified – FC011
- No OEM holes: blank top hex - ideal if you never use the Manfrotto strap pins or anti-twist pegs
- Center counterbore: shallower by ~1.6mm compared to FC010 plates, sized exactly for the taller FC011 knob
4. Bogen Camera Mount Full – FC011
- All 4 OEM holes present: lets you clip in the standard Manfrotto retaining pins or use anti-twist lugs under your camera
- Center counterbore: the shallower FC011 depth. Without it, the screw would bottom out in the camera
| Variant | OEM Holes? | Center Recess Depth | Print Complexity |
|---|---|---|---|
| Simplified – FC010 | No | Deep (FC010) | Very Low |
| Full – FC010 | Yes | Deep (FC010) | Low–Medium |
| Simplified – FC011 | No | Shallow (FC011) | Very Low |
| Full – FC011 | Yes | Shallow (FC011) | Low–Medium |
Choose “Simplified” if you want the quickest print and don’t need strap/pin mounts, or “Full” if you want the exact OEM hole pattern. And pick FC010 versus FC011 tooling based on which screw hardware you’re fitting.
.DXF Files have been included to use in Bambu Suite for those of you who own an H2D. These files can also be used on any other laser cutter. I used a 10-watt module.
For those of you without access to a laser, you can simply print the .dxf file using a normal printer and trace and cut the part out with scissors.
Boost Me (for free)
Thanks for taking the time to check out some of my work! Every like, comment, follow, and Boost helps me bring my ideas to life and share more cool gadgets with all of you :)
Assembly Guide:
Follow these simple steps once your 3D-printed plate bodies and 2 mm cork pads are ready:
What you’ll need

- 3D-printed plate
- Laser-cut 2mm cork insert
- Super-glue (cyanoacrylate) or other quick-setting adhesive
- Camera screw (FC010 ring-nut or FC011 knob depending on model)
- A clean, flat work surface
1. Prep the Plate
- Clean off any loose filament strings or supports from the bottom surface of the printed plate.
- Dry-fit the cork pad into the top recess to confirm it seats flush and all holes line up correctly.

2. Glue the Cork
- Apply a thin layer of glue around the flat top face of the plate. Avoid excess in the screw cavity or through-holes.
- Press the cork pad into place, making sure its edges align perfectly with the hex outline and any cutouts align over the center recess and pin holes.
- Let the adhesive cure fully (check your glue’s recommended cure time, typically 1–5 minutes).


3. Install the Camera Screw
- Flip the plate over so the cork side is down.
- Thread your FC010 or FC011 screw down through the plastic and into the plate’s central hole. The hole is perfectly sized to accept the camera-screw and prevent it from falling out.
- Continue turning until the screw’s threads emerge on the top side of the plate. This will “capture” the hardware so it can’t fall out.
- Test for smooth operation: the knob or ring-nut should turn freely to tighten/loosen your camera but stay captive when stowed.


4. You’re Done!
With the cork glued and the screw captive, your custom hex quick-release plate is ready to mount your camera or switch between tripods. Enjoy your new low-profile camera plate!

License
You shall not share, sub-license, sell, rent, host, transfer, or distribute in any way the digital or 3D printed versions of this object, nor any other derivative work of this object in its digital or physical format (including - but not limited to - remixes of this object, and hosting on other digital platforms). The objects may not be used without permission in any way whatsoever in which you charge money, or collect fees.
Comment & Rating (0)