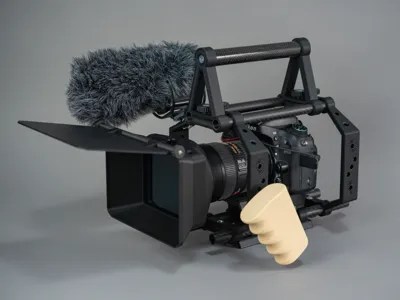
DSLR cage/rail rig with Matte box


Print Profile(3)


Bill of Materials


- M6x30mm countersunk x 6:
- M6x50mm hex head x 2:
- M6x25mm hex head x 6:
- M6 nut x 14: optionally more for mounting accessories
- 1/4" nut x 2: optionally more for mounting accessories
- M3 all thread 185mm long x 1:
- Manfrotto 577 Quick Release Adapter with Sliding Plate and Safety Lock x 2: Only one needed if attaching the rig to a tripod is not desired (https://www.manfrotto.com/global/quick-release-adapter-with-sliding-plate-and-safety-lock-577)
- 15mm OD, 200mm long rails x 4: Carbon fiber or aluminium (pictured is 2x 200mm and 2x 250mm but the longer ones aren't needed)
- 22mm OD/20.5mm ID, 165mm tube x 1: Carbon fiber or aluminium
Description
This is a rig based on the standard 15 mm rail system (60 mm spacing), where a large part of the rig is 3D printed, though rails, screws and some of the camera and tripod mounting hardware are not.
I have used carbon fiber rails, but aluminium tubes can be used as well, but be careful with the dimensions, as some of the tubes I have gotten from the hardware store have been a little under in size, which results in a less firm grip.
If 15 mm tubes are not easily available, you can use the customizer to tweak some of the parameters, though it's not designed to be way different, but should work fine fo small adjustments.
The pictured setup is using a Nikon D600 camera, and a D800 will also fit, but it's a little tight and if you would like to use a larger camera, the cage size (distance between the lower and the upper rails) can be customized, but the print will not fit on the A1 mini build plate anymore
On the side and top/bottom of the cage are mounting options for different sorts of accessories. This can be the adjustable handles, that can be mounted on either the top start pattern position or the lower one, or it can be smaller equipment, like microphones, lights, monitors, etc. that uses ¼" screws, where eg. the Bambu Lab Maker Supply Camera Quick Release Plate Nut can be used (used for the microphone in the photos). Those screw in and stay in there, even when the accessories are removed.
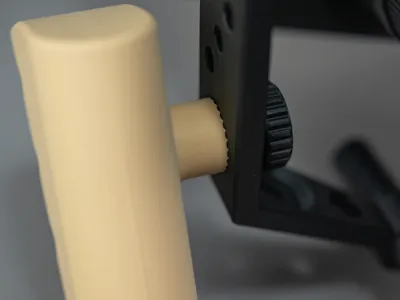
Side handles
The handles are printed in 2 pieces with M3 brass inserts and an M6 nut embedded in the middle. They are hold together with 4 pcs. M3 x 20 mm cap head screws.


Quick release plate assembly
The camera plate uses 4 M3 heat set inserts for the connection to the Manfrotto 577 that sits under the camera. They are inserted from the bottom side (what will be bottom when mounted on the rig) to best secure the manfrotto plate.

On the other side (what will end up being the top) insert 4x M6 nuts

Then place the Manfrotto 577 adapter without the actual sliding plate on top, covering the M6 nuts.

And secure with 4x M3x20mm machine screws. The ones pictured are black, but the ones listed in the BOM are stainless steel.

For the bottom part, the one used to connect a plate for mounting the rig on a tripod, insert 2x ¼" nuts

Put the rails and 2x “camera_plate_clamp" on top.

Then place the tripod place with the nuts facing towards the inside

And finally secure the complete assembly with 4x M6x30mm countersunk screws. This will both keep the assembly together and tighten the clamps around the rails

Finally you can mount a plate to the two ¼" nuts. I highly recommend using both mounting options in a plate with a long slot (like the one that comes with Manfrotto 577 Quick Release Adapter with Sliding Plate and Safety Lock), but you will need an extra ¼" QR plate nut (eg. the ones from Bambu Lab) as the Manfrotto kit comes with one ¼" and one 3/8". Using two screws here help a lot with the stability and makes it much less likely to break.
Matte box with filter holder
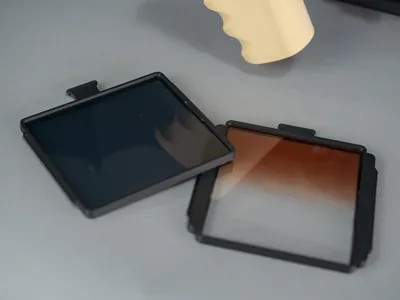
In addition to the cage and different handles, there is also a matte box, for shielding the lens from direct sunlight and for holding one or more filters (this is designed around relatively cheap plastic filters). It's modular, so you can add how many filter holders as you like, only thing is that the screws you use to assemble the matte box need to be 6.3 mm for each filter holder + 8-10 mm extra to hold everything in place securely.
The sun block on the matte box also functions as a lid to protect the lens during transport and when packed away. The thumbscrews for the lid uses M3 bras inserts and a 185mm long piece of M3 all thread to keep the lid in the desired angle during operation.
The filter frames, that allow you to put in and take out the filter come in two versions, one for placing the filter in the wide orientation and one for the tall operation, eg. for partial fade type of filters. There is NO support for rotating a filter, so this is not ideal for polarizers or similar where the rotation is needed.
The matte box is mounted to the lens and there are support for either the Nikon 24-70 f2.8 or the Canon 24-105 f4, though it might not be too difficult to adjust it to also fit other types.
When using it with the Nikon 24-70 f2.8, the full wide will move the lens into the filters, if they are in place, so be careful when zooming.
Comment & Rating (62)