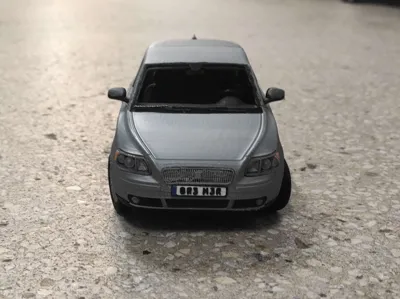
1:22 Volvo V50 (Working steering wheel!)


Print Profile(1)

Description
Detailed model of the Volvo V50 in 1:22 scale, with full interior, rotating wheels and working steering connected to the steering wheel.
The model consists of just over 100 parts, is ~20 cm long and weighs ~200g when assembled. Licence plate not included.
Using the Textured PEI plate is not recommended since it can cause issues with fitment and holes in the bodywork.
Required tools and materials:
- Hobby knife
- Superglue - you'll need a lot of it
- 2.7mm thick rod - can be plastic or metal, I used an empty pen refill
- A few centimeters of filament
Preparation:
- Firstly, check if all the parts printed successfully
- Carefully remove all supports
- Every part in the .3mf file is named, this should help in identifying them.
- If parts don't fit during assembly, use a knife to make the clearances bigger
Assembly:
Front:
Assemble the steering system as shown in the image below (just the 5 parts at the bottom, skip the gears and steering wheel for now):

Cut some filament into 4 axles and use them to connect the parts together. Make sure everything moves smoothly, or else the steering will NOT work.
Connect the steering system to the front chassis, then take the bottom steering mount (the long part with 2 holes on the ends), and test-fit the wheel hubs into the holes. if they don't fit, use pliers to round and smoothen the axles.
If everything moves without noticable resistance, glue the bottom steering mount to the chassis.
NOTE: The steering can lock itself a bit after rotating fully to the left/right. This is normal.
Put the biggest gear onto the 2.7mm rod and fit it into the round hole in the chassis. It should smoothly rotate and the steering should work.
NOTE: in case the 2.7mm rod moves too much up and down in the round hole located deeper, you can make the hole tighter by putting a rolled piece of thin plexi or thick paper.Put the two smaller gears on to the 2.7mm rod and temporarly fit them on the chassis. Next, cut the rods as shown in the picture above, take the dashboard and check if all 3 axles fit. if not, cut the axles a bit more and try again until the dashboard sits flush with the chassis.
NOTE: The back side of the dashboard, where the axle holes are, is printed as an overhang. This can cause the surface to be pretty rough, and the gears might have trouble rotating smoothly. to fix this, try gluing a thin sheet of plexi on the surface (don't forget about cutting out holes for the axles).
Take the gears, center console and dashboard and temporarly put them in place. At this point, If you rotate the longest part of the rod or the wheel hubs, the entire steering system should move without much friction. If not, change the position of the dashboard slightly and try again.
This step can be difficult, so take your time with it and don't rush.
If everything works fine, glue the console and dashboard to the chassis.
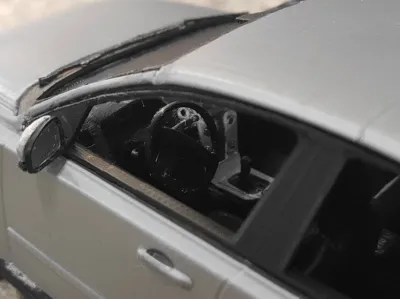
Glue the steering wheel, gauges, silver trim, radio, radio buttons and ignition to the dashboard. Next, glue the front seats to the chassis (the seats should be touching the center console, or else they might not fit inside the body later.
Glue the inner front wheel arches, headliner, sunvisors, door panels and windshield frame to the front of the body. Next, glue the rear view mirror and mirror glass together and connect it inside the windshield frame, rotated slightly to the driver side (see photos above). Finally glue the silver door handles to the door panels (look up V50 interior online for exact placement)
- Carefully glue the body and chassis together.
Rear:
Glue the inner rear wheel arches, headliner, parcel shelf, door panels, rear window frame, chassis and rear seats to the rear of the body. Then, glue the silver door handles to the door panels.
- Carefully Glue the front and rear of the car together.
Details:
- After connecting the two halves of the body, glue the rest of the parts (look at the pictures above for reference): left and right window frames, bottom parts of the bumpers, headlights, taillights, grille, foglights, side mirrors, center stop light (that tiny red line), antenna, wipers, the black bar under tailgate and everything else.
Wheels:
- First glue the rims and tires together. Then, fit two of them onto the front wheel hubs, and if they're rotating freely, secure them in place with the wheel pins. Do the same with rear wheels, except fit them on the rear wheel hubs (the two big round parts).
Good Luck and Happy printing!
Boost Me (for free)
License
You shall not share, sub-license, sell, rent, host, transfer, or distribute in any way the digital or 3D printed versions of this object, nor any other derivative work of this object in its digital or physical format (including - but not limited to - remixes of this object, and hosting on other digital platforms). The objects may not be used without permission in any way whatsoever in which you charge money, or collect fees.
Comment & Rating (4)