2 Piece Body Mount Bushings for Toyota


Print Profile(0)
Description
Summary
Body mount bushings sit between the body and frame on a vehicle and help to isolate the body from the road noise and flexing of the frame. Vehicle frames are relatively flexible compared to the large sheet metal box that is the body and those two components need to move somewhat independently, thus a compliant bushing. OEM bushings are typically cast rubber and over time, they can break down, harden or even fall apart. You may be able to purchase replacement rubber bushings, but polyurethane bushings are more available and seem to hold up over time. On my 1985 4Runner, I had to replace the OEM bushings in 1998 as they were dry rotted and falling apart:
- https://www.4crawler.com/4x4/CheapTricks/BodyLift.shtml#Bushings
Those bushings are still going strong some 27 years later.
Photos:
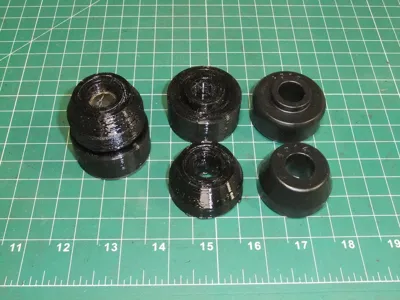
A small 2-piece bushing set, 3D printed on the left, cast polyurethane on the right with a full size and turned down "medium" upper cushion, often used on the 60-series Toyota Landcruisers
A small 2-piece bushing set, 3D printed on the left, cast polyurethane on the right (note bushings inverted for these photos).
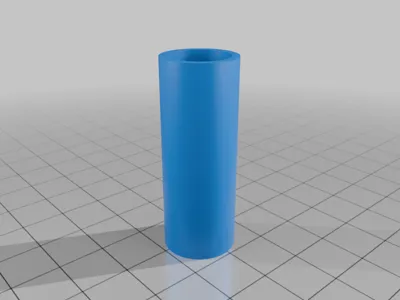
Bushing expansion rings, separate (left), installed on small cushions (center) and some large upper cushions (right). The upper separate ring is 3D printed in TPU, the lower one is cut/faced polyurethane tubing.
Diagram of a generic frame bracket, body mount bushing and in this case a body lift block in place.
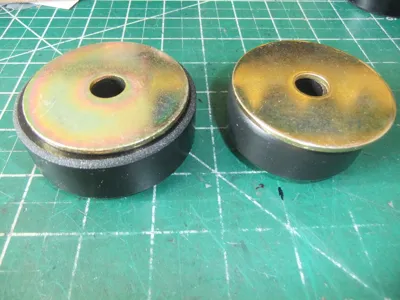
2-1/2" OD top washers on top of an expanded (70mm) and a large (62mm) upper cushion.
- Left to right: Small (45mm), medium (55mm), large (62mm) and extra large (70mm) bushings
These are uncompressed diameters of the upper cushion. These diameters will increase 5-10% as the bushing is compressed with the body weight and bolt clamping force applied. Keep that in mind when comparing a compressed OEM rubber bushing diameter to an uncompressed polyurethane bushing diameter.
By all means, purchase complete bushing kits from Energy Suspension or Prothane. That way, you get all the steel parts along with the cast bushings. These files are not intended to take business away from those companies. Instead, they should increase business by expanding the use of these bushings for other vehicles via end user customization. 4Crawler Offroad was a large volume purchaser of these bushings for this exact purpose:
Energy Suspension:
- Pickup: 8-4101 https://amzn.to/3EARK6r 2 small and 4 large bushings, sleeves and top washers
- 4Runner: 8-4102 https://amzn.to/42IRxse 2 small and 8 large bushings, sleeves and top washers
Prothane: - 4Runner: 18-102 2 small and 8 large bushings, sleeves and top washers
Part numbers will usually have a -ColorCode appended, BL or G for black, R for red, etc.
While it is possible to purchase individual bushing components from Energy, you'll generally need to meet minimum order quantities of ~100 of each item and you'll need to work through a distributor vs. a dealer, BTDT!
Use these files if you need to make missing bushing components, or if you need to adjust the size of a component.
For example, on the 60-series Toyota Land Cruiser models, you'll need a total of 12 body mount bushings. Note that 12 bushings will require at least 2 of the above commercial bushing kits, depending on the mix of sizes needed. Usually there will be 2 of the small (45mm OD) bushings up front, then some number of "medium" (55mm OD) bushings and larger (65-75mm OD) bushings under the rest of the body.
The supplied large bushings in the above kits are around 62mm OD (uncompressed) and can work for the larger locations. But they are too large to fit in the "medium size" retaining cups on the frame brackets.
Options:
- Chuck up some of the large upper cushions and cut them down in diameter on a lathe as shown in this video:
- https://youtu.be/l0UQGVw2548?si=3xRZCZwWaQy3qVcC
Print some custom uppers in TPU, or other flexible filament, at a 55mm diameter.
If you want the larger diameter bushings to match the look of OEM, print some bushing expansion rings to fit over some of the smaller bushings. Or, cut some rings of 2-3/4" x 1-3/4" polyurethane tube (McMaster-Carr) as shown below:
- https://youtu.be/bBEh1Uxcx6I?si=dspQCwiaXf8sn1k4
Then slide those rings over a smaller bushing to make it larger.
Another example is the 55-series Land Cruisers. They need 10 bushings, so a basic 4Runner kit would suffice. But, they often need up to 6 of the larger bushings that are about 1/4" taller than the others, e.g. 1" tall vs. the supplied 3/4". Options:
- Print taller upper cushions as needed
- Print a 1/4" thick TPU washer to stack on top of a cast upper cushion.
In either case, you'll also need either a taller sleeve (cut from some 5/8" x 1/2" tubing) or you could print some lower cushions, 1/4" shorter than normal, to offset the taller upper cushion.
In other words, get creative with the parts you have the parts and the parts you can make. If you don't have access to either a 3D printer or a saw and lathe, you can import the OpenSCAD files into FreeCAD and then export them in a variety of CAD formats and take those to a local machine shop or send them to an on-line machine shop or 3D print farm. These are fairly generic bushings and should be adaptable to other vehicles that use a 2-piece bushing design. Take some basic measurements and edit the OpenSCAD files and see what you can come up with.
Note that machining polyurethane is difficult at best. It is tough stuff, by design. Normal tooling, for cutting or grinding metal, will likely fail. You may need to invest in or make some custom tooling to cut this tough material, so be advised. The other use of these bushing files would be to print samples to make silicone molds with. Then you could cast polyurethane in those molds to make custom cast bushings.
For the washers, the ones in the commercial kits are fairly decent. There is a source for oversized washers in the BushingWasher file, although those only seem to go up to 2" OD in a 3/8" / 10mm hole size. The BushingWasher file can also be used to print compliant washers to replace the factory rubber pads between the bed and frame on pickup models. Use something like 1/8" or 3mm thickness and 1-1/2 - 2" diameter.
For the sleeves, use some steel or aluminum tubing cut to length. The bushing files are set up for 5/8" OD and 1/2" ID tubing, but adjust that as desired. Size the sleeves to be a bit shorter than the stacked height of the upper + lower bushing halves. Shoot for 5-10% shorter, this sets the amount of pre-load on the bushings when you torque down the body mount bolt.
Photo album with more information:
- https://photos.app.goo.gl/RFNGeKu7oe86aQR86
Web pages with more information: - https://www.4crawler.com/4x4/ForSale/BodyLiftKit.shtml#PolyBushings
- https://www.4crawler.com/4x4/ForSale/Docs/BodyLift_HowTo.shtml
If you print and use a set of these bushings, please post a make and provide details on filament brand, print settings, as well as how the bushings worked for you. Also, if you come up with any dimensions for other bushings, drop that in the make post as well. Thanks and happy printing!
Print Settings
Printer Brand:
Type A Machines
Printer:
Type A Machines 2015 Series 1
Rafts:
No
Supports:
No
Notes:
For 3D printed bushing, this article has some good print setting tips:
https://etcnmachining.com/blog/best-infill-for-tpu/
You can adjust the bushing firmness with various filaments and also with infill. Concentric infill is good if you want to make a (nearly) solid part as that lets the filament flow more uniformly. A gyroid infill is good for lower percentages (40-60%) and produces a more flexible, yet strong print.
Comment & Rating (1)