


Print Profile(3)


Description
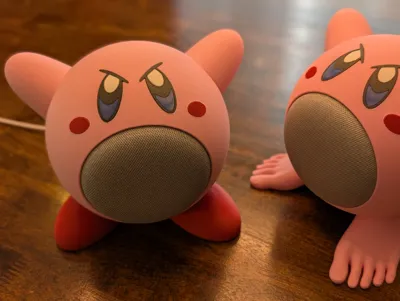
🎮 Kirby-Inspired Google Home Mini Stand
This is my take on Kirby! A fun, functional stand designed specifically for the Google Home Mini (or Google Nest Mini).
✨ Features
- No AMS Required — Designed to avoid waste while keeping things simple.
- Stable Design — Sits firmly on its feet.
- Full Button Access — Volume buttons remain easy to use.
- Cute Aesthetic — Because looking good matters too!
- Kid-approved design – Tested with my toughest critic (my child 😄)
Optional Toes! — Skip the shoes and show the feet instead (special request from my kid… not my idea 😅).
🧰 Materials Required
- Cyanoacrylate glue (e.g., Krazy Glue or equivalent)
- Filaments used in the photos:
- Pink: Bambulab - PLA Matte - Matte Sakura Pink
- Red: Bambulab - PLA Matte - Dark Red
- Black: Bambulab - PLA Matte - Matte Charcoal
- White: Bambulab - PLA Matte - Matte Ivory White
- Blue: Polymaker - PETG - Dark blue
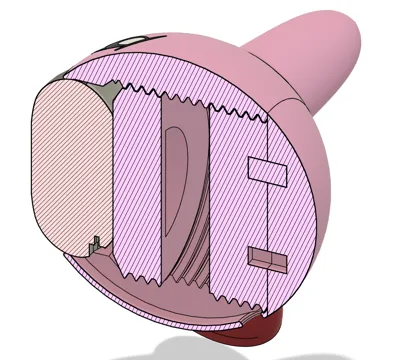
🧩 Assembly Instructions
Note: To differentiate left from right during assembly, check for small dots on the parts:
- 1 dot = Right side
- 2 dots = Left side
1. Print All Parts
Ensure everything is printed before you begin assembly.
2. Glue Time!
- Eyes
Glue the white and blue parts first, then attach the assembled eyes to the body. - Cheeks
Glue directly to the body. The larger part of the cheek should face outward. - Arms
First glue the mounting squares onto the body, then attach the arms. They should point slightly backward. - Shoes
Attach directly to the body. You can also use the feet-only version if you prefer the barefoot look. Back Plate & Screw Pin
Insert the four alignment pins into the back screw, then glue the back panel in place.
One pin is slightly larger — this ensures proper alignment when fully screwed in.
Make sure there's no gap between the screw and back panel once assembled.
🔌 Installing the Google Home Mini
- Unplug the Google Home Mini.
- Insert the device into the stand from the back side.
- Thread the power cable through the rear hole.
- Reconnect the power cable to your device.
- Use the internal screw to secure the Google Home Mini tightly in place.
- Finally, attach and screw in the back piece.
- In the Google Home application, you will need to invert the command.
Select your Google Home Mini > Settings > Audio > Invert commands
📸 Share Your Build!
Once it’s done, show off your print! I hope you enjoy your new Kirby-themed Google Home holder as much as we do 💗
Boost Me (for free)
If you find this creation useful or just to show appreciation for the effort in making this model, please hit the BOOST button!
“Foot” by Teo is licensed under Creative Commons Attribution.
License
You shall not share, sub-license, sell, rent, host, transfer, or distribute in any way the digital or 3D printed versions of this object, nor any other derivative work of this object in its digital or physical format (including - but not limited to - remixes of this object, and hosting on other digital platforms). The objects may not be used without permission in any way whatsoever in which you charge money, or collect fees.
Comment & Rating (218)