CapIt! - Customizable Lens Cap Holder


Print Profile(1)

Description
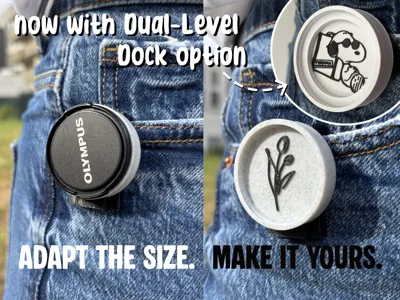
CapIt! – Modular, Personal, and Always Ready — now with Dual-Level Dock option
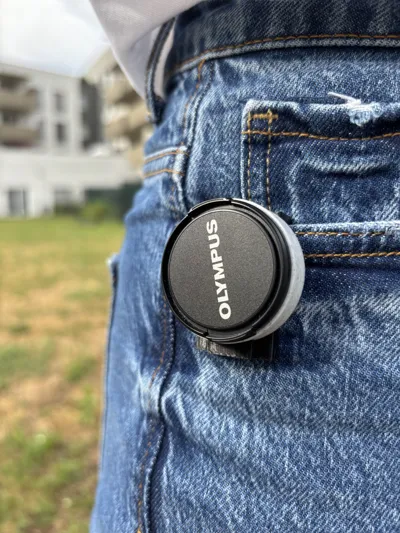
Designed with both function and style in mind, this lens cap holder is a must-have accessory for photographers who want to keep their gear secure and look good doing it.
The system is built in two modular parts:
- Part One is an anchor clip that attaches easily to your belt, strap, or pocket — your base for on-the-go lens cap storage.
- Part Two is a fully customizable lens cap dock, generated to fit any lens cap size. Whether you shoot with one lens or rotate between several, you can print multiple cap docks tailored to each diameter and swap them on the fly using the shared anchor base.
Choose between:
- Single-Level Dock (CapIt) – fits one lens cap size.
New Dual-Level Dock (CapIt v2) – holds two different sizes, eliminating the need to switch docks when swapping lenses—perfect for photographers working with multiple lenses on the go.
This approach means you only need one universal mount and as many cap docks as your lens lineup requires — making it practical, lightweight, and adaptable to your workflow.
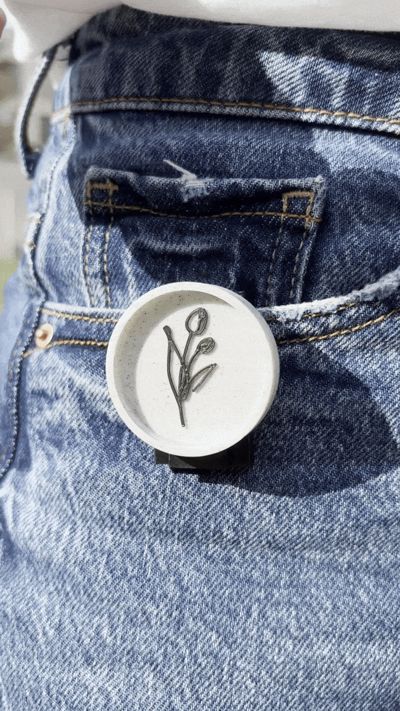
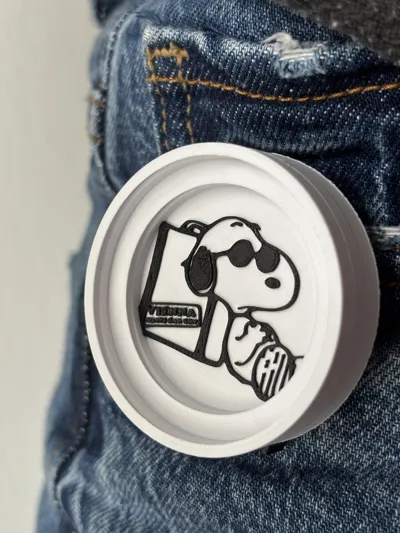
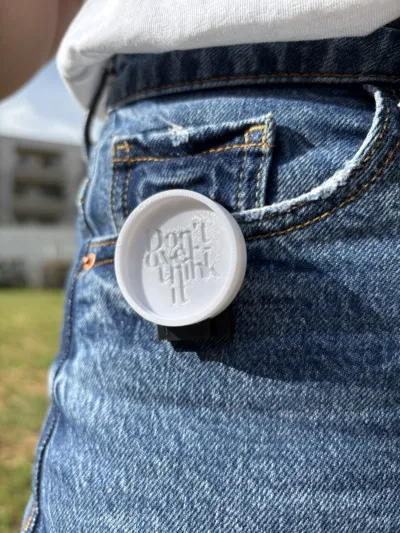
To top it off, the cap holder’s surface includes a dedicated area for custom engraving or aesthetic personalization. Add your logo, a minimalist graphic, or anything that reflects your creative identity — turning a functional item into a stylish part of your everyday look. Even when you're not shooting, this holder looks sharp clipped to your gear or outfit.
Designed for makers who care as much about the tools as the image, this lens cap holder supports the flow of photography — with efficiency, elegance, and a personal touch.
The designs we used are available in the 'Documentation' section.
Boost Me (for free)
Thanks a ton! Unlike most lens cap holders, ours won’t judge your lens size. Boost us if you believe in equal support for all diameters! 😄
🔧 Customize Your Lens Cap Dock
Click the "Personalize" button to tailor your lens cap dock to your specific gear and style. The interface is divided into two sections:
📸 Section 1: Base Configuration
This section ensures your lens cap dock fits perfectly and connects smoothly with the anchor.
- Smaller Lens Cap Size (mm):
Enter the exact diameter of your smaller lens cap (in millimeters). The model will automatically adjust the inner groove to securely hold your specific cap.
Tip: Check your lens cap – the size is usually printed on the front, like “Ø67mm”. - Larger Lens Cap Size (mm):
Enter the diameter of the larger cap (in millimeters), if using two levels. To print only a single-level dock, set the larger cap size to be equal to or smaller than the smaller cap size. - Nozzle Size (0.2mm / 0.4mm):
Select the size of the 3D printer nozzle you’ll be using.
This adjusts the joint tolerance between the dock and the base to ensure a snug but not overly tight fit.
Choose 0.2mm for high-detail prints or 0.4mm for standard setups.
🎨 Section 2: Logo Customization
Make your dock uniquely yours by adding a personal or branded design.
- Use Logo (On/Off):
Toggle whether you want to include a logo on your dock.
Turn it off for a clean, minimalist look. - Logo Style (Extruded / Carved):
Choose if your logo should stick out from the surface (extruded) or be engraved into it (carved). - SVG File:
Upload any SVG file from your computer — such as your personal logo, initials, or a graphic design.
Only SVG format is supported for clean, scalable results. - Logo Size:
Set how large the logo should appear relative to the top surface of the dock. - Logo X Offset / Y Offset:
Fine-tune the horizontal (X) and vertical (Y) position of the logo on the dock’s surface.
Adjust these to perfectly center or place your logo exactly where you want it.
💡 Tip: Extruding only the outlines of closed SVG paths
When importing closed SVG paths, they’re often treated as solid shapes. To extrude just the borders (and not fill the shapes), transform your outlines properly in Inkscape before exporting:
- In Inkscape, select your closed shape(s).
- Convert the shape to a stroke-based path by using either Path → Object to Path or Path → Stroke to Path.
- Remove any filled shapes, keeping only the outline paths.
- Save your SVG with only the outline paths included.
This optimized SVG, when used for 3D extrusion, will produce clean, wall-like outline extrusions—no filled solids.
Documentation (1)
License
You shall not share, sub-license, sell, rent, host, transfer, or distribute in any way the digital or 3D printed versions of this object, nor any other derivative work of this object in its digital or physical format (including - but not limited to - remixes of this object, and hosting on other digital platforms). The objects may not be used without permission in any way whatsoever in which you charge money, or collect fees.
Comment & Rating (17)