ESP32 and LD2410C Radar Case with Mount / Holder


Print Profile(1)

Description
Boost Me (for free)
🛠️ This project took a lot of time, patience, and several rounds of prototyping to get everything just right – from tight component fit to practical usability. If you like it or find it useful, a little boost would mean the world and help me keep creating more! 🙌
This project was created in collaboration with rpishop.cz. A full step-by-step guide in Czech is available in this article, especially useful for Czech-speaking makers.
This is my first MakerWorld project, so be kind 😅
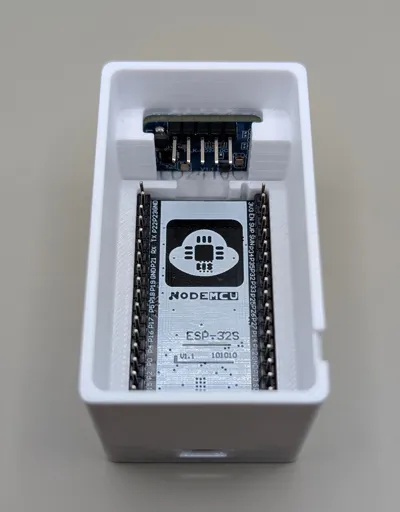
This case is designed for the LD2410C 24GHz presence radar and ESP32 (NodeMCU or classic). It’s a compact and functional enclosure perfect for use with Home Assistant and ESPHome. It was tested with several radar modules and boards, but due to manufacturing variances (extra solder, bent pins etc.), the fit can be tight – it’s not meant for frequent removal.
🔩 Case and Mount Features:
- Fits NodeMCU and classic ESP32 (see print profiles and pick the right one for you)
- Mount allows 360° rotation and 25° tilt in both directions
- Designed to be printed without supports (optionally you can use a brim)
- Can be secured using screws (tested with 3.5mm diameter, 6.5mm head wood screws)
⚡ Wiring (with Dupont cables):
- VCC → 5V
- GND → GND
- TX → GPIO17
- RX → GPIO16
(Check your ESP32 board layout – sometimes TX and RX need to be swapped depending on the configuration.)
Power via USB-C or microUSB, depending on your board. At least 1A power supply recommended.
🧩 Assembly
Start by inserting the ESP32 board into the case. It's a tight fit, so don't worry if it takes a little bit of force. If you're using a NodeMCU-style board, it can later be removed using a bent hex key. For classic ESP32, you might need small pliers and some patience to carefully remove it by pulling on the pins.
Next, insert the LD2410C radar module into the front slot. Once everything is in, close the case with the top cover.
As for the mount, begin by sliding the threaded ring over the ball joint. Once it's in place, screw it into the base. Then snap the square holder (with the ESP32 case) onto the joint. Again – a little bit of force is expected here to secure everything tightly.
💡 Use case:
This project is meant for indoor presence detection using the LD2410C radar in a smart home setup with Home Assistant. The whole thing takes about 2 hours to print and is beginner-friendly.
🛠 Optional:
You can also find an ESPHome YAML config here, ready to flash via ESPHome Web or ESPHome Dashboard.
Make sure you edit this fields to your own values from HA/ESPHome:
api:
encryption:
key: ""
ap:
ssid: "Fallback Hotspot"
password: ""
ota:
- platform: esphome
password: ""
🔗 Tested hardware:
I’ve tested this design with the following components (linked for reference):
- Radar module: LD2410C – 24GHz presence radar (AliExpress)
- ESP32 NodeMCU: Typical compact ESP32 board (AliExpress)
- Classic ESP32 (longer): Standard ESP32 DevKit board (AliExpress)
- Cables : Jumper wires in different colors (AliExpress)
- Connectors: 2.54mm Dupont female connectors (AliExpress)
- Crimping Pliers: SN-28B or similar for Dupont (AliExpress)
You can also use pre-crimped cables instead of making your own – just make sure they’re the right length for your setup.
🤝 Joint mechanism credit:
The tilt joint mechanism was borrowed and modified from this great project:
https://www.thingiverse.com/thing:4739696/files
License
You may create derivative works based on this object, provided that all such derivative works are published exclusively on the MakerWorld platform and include proper attribution to the original creator. You may not share, upload, host, distribute, or publish this object—or any derivative work of this object—on any other digital platform, marketplace, or distribution channel. Commercial use of this object and any derivative works is strictly prohibited. This includes, but is not limited to, selling, renting, sublicensing, or using the object in any context in which you receive monetary compensation or other financial benefits.
Comment & Rating (20)