Gold Sluice Box V1.5


Print Profile(1)

Description
This is a changed version of the project i've been working on: Gold sluice box V1, in this changed version there are multiple parts that allow for this to be an all in one sluice box, there are 9 different parts. the parts will be listed below in order of the print plate number.
1. The gold sluice box V1 (the original)
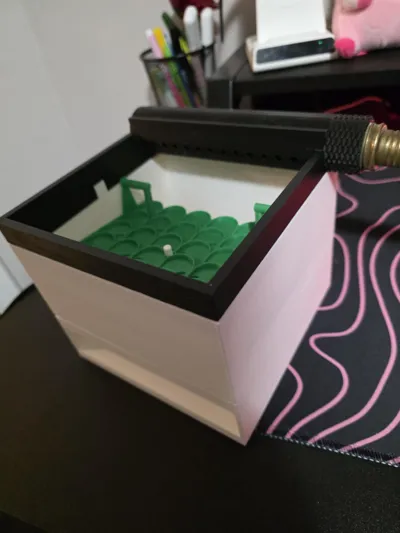
2. The gold sluice box V1.5 (Altered version with mat locks, MUST have a calibrated printer.) (recommended)
3. The vortex sluice mat (this is the original for V1 based off of nimmermehr's design here) (optional but recommended over using V1.5 mat due to gravels possibly getting stuck on pull tabs, but harder to remove from cube, Print with 100% infill)
4. Gold sluice hose input (This allows for hose connection to the sluice box) (optional but recommended as it feeds water to the sluice box)
5. The bottom of the box drain attachment (to allow gravels to exit the sluice box, can possibly feed it into another sluice if wanted) (optional)
6. The vortex sluice mat V1.5 (This is an altered version of the sluice mat based off of nimmermehr's design here, the pull tabs are for ease of getting the mat out of the box, Print with 100% infill) (optional)
7. Dump box (this is just empty walls of the cube, this allows for dumping into whatever you wish, using a gold pan for example) (optional)
8. Gold sluice bottom (This is just to make the bottom of the cube flat) (optional)
9. Big to small conversion (This is ONLY used for if you have a pre V1 cube, this is to connect pre V1 into the updated cubes)
This is used for gold panning out river gravels, paydirt or anything of the sort and should all just slot together perfectly, the purpose of this project was to allow basically anyone who wants to get into gold panning/sluicing an ability to do so without needing to buy possibly hundreds of dollars in sluice equipment.
Setting up is very simple!
1. Print out as many sluice boxes you want (Object part 1 and or 2), and the same amount of gold sluice mats you want (Object part 3 and or 6).
2. Place the gold sluice mat into the box (Make sure the mat is placed in like the images above) and slot the little notch inside the box into the gold sluice mat, if using V1.5 then make sure to slide the mat under the locks first then push it down.
3. Stack them staggering, meaning rotate each box you print 180 degrees on top of each other so the flow goes over all the other mats on your sluice setup!
4. Place the gold sluice hose input on top and make sure it's facing towards the high side of the sluice box (180 degrees of the cube), the hose attachment should be above the drain hole.
5. Completely optional, but feel free to print any bottom (parts: 5,7,8) of the gold sluice box and attach it to the bottom of the whole setup if you wish.
If you have any other questions feel free to send me a message! and enjoy!
Boost Me (for free)
If you'd like to support me feel free to leave a boost! Thank you!
License
You shall not share, sub-license, sell, rent, host, transfer, or distribute in any way the digital or 3D printed versions of this object, nor any other derivative work of this object in its digital or physical format (including - but not limited to - remixes of this object, and hosting on other digital platforms). The objects may not be used without permission in any way whatsoever in which you charge money, or collect fees.
Comment & Rating (30)