


Print Profile(1)

Description
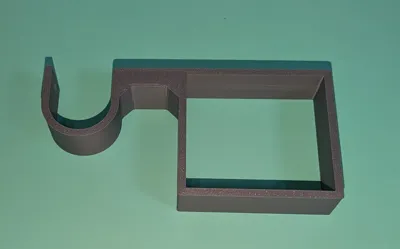
This part allows you to hang curtains on top of miniblinds without putting any holes in your wall. Some apartments will charge very high fees far exceeding the actual cost of patching the holes as another form of profit. Don't lose any of your deposit because you put holes in the wall to hang curtains.
To use this part you need to remove any valance that is attached to the headrail (typically by a plastic clip). Remove the headrail from the mounting bracket and slide one of these onto each end and put the headrail back in place and you now have hooks for a curtain rod. You can only use two of these on a headrail, so you will need to use your best judgement based on curtain weight and the strength of the curtain rod if this is an appropriate solution for very wide windows. Once in place there are screw holes for an M4 screw (intentional tight fit to hold secure, put some muscle into it) to steady against the headrail and to steady a curtain rod, but neither is necessary but recommended if you frequently open and close the curtains.

Headrail sizes can vary by manufacturer, but I have included pre-sized parts for the most common measurements, but you will want to verify size before printing as there is no official standard that all manufacturers adhere to.
Miniblinds sold as 1", 2" low profile, 2", and 2.5":
1" with a headrail measuring 30mm high x 30mm deep
2" low profile with a headrail measuring 38mm high x 57mm deep
2" with a headrail measuring 51mm high x 57mm deep
2.5" with a headrail measuring 54mm high x 70mm deep
If your headrail is slightly smaller that is not a problem but you may opt to use the M4 screw to steady the part against the headrail. If yours is larger, it will not fit and you will need to customize the part in Fusion 360 (free version works fine). When you take the headrail down you may notice on the ends that they are not even -- typically this means the curtains were cut down to size and the machines for that are not high precision machinery, so you may need to take this into account for sizing of your part.
When hanging curtains where you do put holes in the wall the curtain rod brackets are on the outside of the window opening. Since these brackets attach to the headrail it can not go any farther out than the headrail holders attached to the walls. For that reason the best curtains to use with this setup are the ones with built in grommet style holes, or curtains that hang on rings. When using either of these you can place 1 or more holes or rings (depending how far out you extend the curtain rod) on the curtain rod but on the outer side of the bracket so that the curtain will lay and cover the same as it does with a traditional hang. Thread most of the curtain onto the rod, set it in the brackets and then thread the rest onto the rod on the outside of the bracket. (see pic below) The sleeve type (used in my cover photo, foolishly) is the worst option and can only achieve the same look it you are willing to cut the curtains in the back sleeves.

To customize the part open the .f3d file in Fusion 360. You get this by selecting the download STL/CAD Files option in MakerWorld, where it will show up. In the top menu bar, select SOLID then at the bottom of the menu bar click MODIFY and pick the option to Change Parameters. Here you will enter the height and depth of your headrail. You can also increase or decrease the distance of the curtain rod hook if your curtains have deep folds (if your curtain has a larger distance between holes or hooks) as well as the overall width of the printed part. Enter the desired values and click OK. From the File menu at the very top select Export, set the type to STL and select a location to save the file and select Export.

Printing: No special requirements beyond 3 walls for strength
Comment & Rating (2)