Search models, users, collections, and posts

Dummy 13 - 1150%

Remixed by

Print Profile(2)

All
P1S
X1
X1 Carbon
H2D Pro
H2S
P2S
H2C
X2D
A2L
A1
H2D

0.2mm layer, 3 walls, 15%-10% infill
Designer
459.7 h
36 plates
4.7(11)

0.2mm layer, 2 walls, 15% infill
Designer
241.6 h
36 plates
5.0(6)

Open in Bambu Studio
Boost
917
1627
238
96
1.6 k
161
Released 

Description

Dummy 13 - 1150% Scale
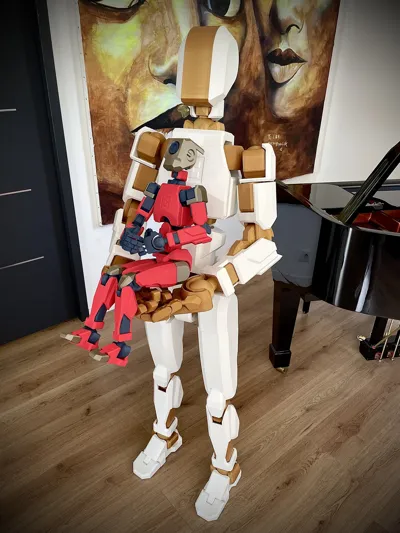
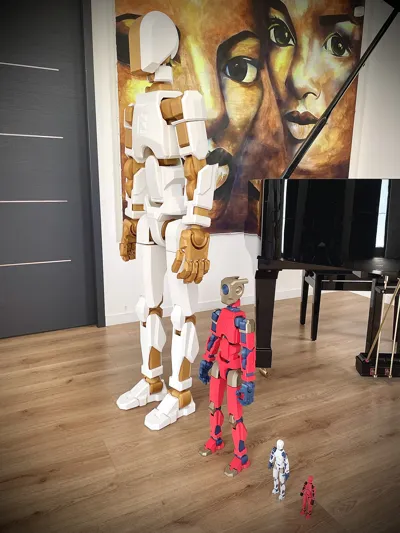
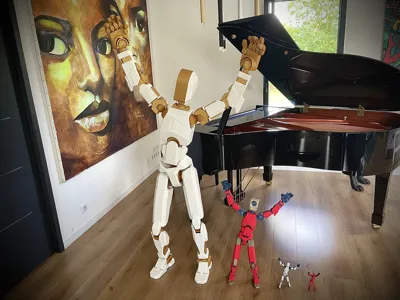
Height: 1.57 m — Weight: 12 kg

This is a complete set of printable parts to build a Dummy 13 at 1150% scale. This is based on the work of:

  • @soozafone (100%)
  • @zwillia121 (1000%)
  • @vasichkin (500%)

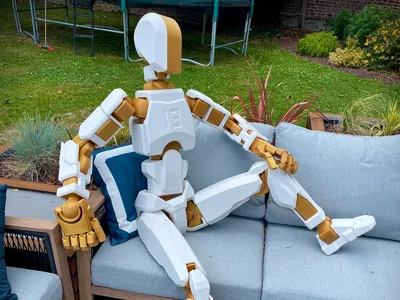
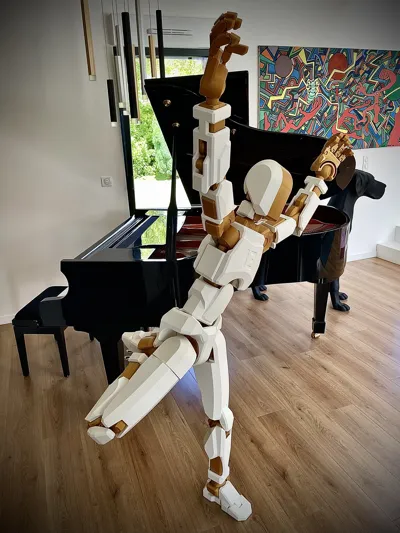
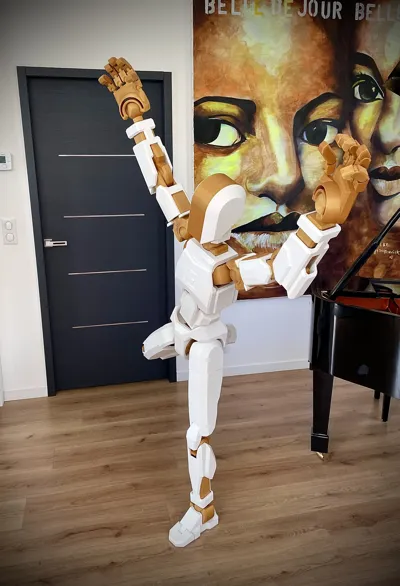
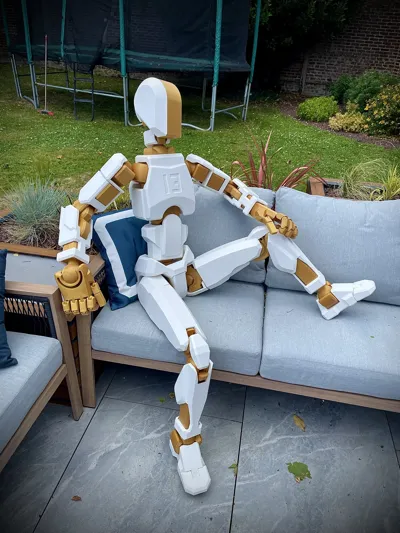
The model is fully functional, as shown in the photos. Although finding the balance point can be tricky, once it's found, the figure holds poses very well.

(As far as I know, this is the only Dummy at this scale capable of achieving these kinds of poses.)

I had to combine parts from the 1000% and 500% versions, making numerous small modifications to ensure proper tolerances at this scale.
The hands and fingers were heavily modified to improve joint friction and to give the thumb a more natural position.

The skeleton is printed entirely with Fuzzy Skin, which significantly improves joint performance. It also prevents the cracking issues some users have experienced when Fuzzy Skin is applied only locally. Although this increases print time, I didn’t break any parts during assembly.

Most joints have been flared to make assembly easier.

Assembly Method:

I soaked the female parts in hot water (64–66 °C) for 1 minute, then immediately inserted the joints.
⚠️ Important: If you're using PLA for the armor (as I did), be very careful with the assembly order — PLA won’t tolerate this heat. If your armor is printed in PETG or another heat-resistant material, you're good to go.
The only joint I couldn’t assemble using hot water, with PLA armor, was the abdomen-to-torso connection — for this one, I used a hairdryer.
As for the fingers: do not heat them, assemble them directly.


Recommended Materials:

  • Skeleton: Use PETG, ASA, etc. — do not use PLA
  • Armor: I used PLA for aesthetic reasons, but other materials will work just as well, if not better

Provided Print Profiles:

  • Skeleton (PETG): Fuzzy Skin, 3 walls, 15% infill
  • Armor (PLA): No Fuzzy Skin, 3 walls, 10% infill
    (You can reduce the armor to 2 walls to save filament, time, and weight. I avoided it in white because it looked too transparent for my taste.)

Filament Usage & Print Time:

  • Skeleton: 6.2 kg — approx. 220 hours of printing
  • Armor: 6.9 kg — approx. 120 hours of printing

Possible Improvements:

The knees and hips could use a bit more friction in my opinion. You might be able to improve this by increasing the Fuzzy Skin settings from 0.1/0.1 to 0.2/0.2 (not tested).


Comment & Rating (238)

(0/1000)

Boosted
Pinned by Designer
Everything printed flawlessly using your profiles! great job man thank you!!
(Edited)
The designer has replied
designer
7
Reply
Super! Pretty blue :)
Show original
0
Reply
bro I came across your comment and I want to ask you how much plastic you used
0
Reply
Boosted
Replying to @popalumpa :
little over 12kg, (12 rolls) total
0
Reply
I am 8 and have printed the Skelton in PETG and have just started the frame in PLA (exactly as you did). 😀 You said in comments that it was a bit more involved than the basic instructions when using PLA. Have you got any full instructions for assembling this please? I want to do everything in the right order. I can’t wait to finish this and put it all together.
The designer has replied
20
Reply
Hello you are 8 years old I am very impressed I am trying to create assembly instructions for you I will do it as quickly as possible
Show original
1
Reply
assembly instructions are on your personnal chat . chears
0
Reply
Thanks heaps. I gave you another boost for helping me with your speedy response. I’ll try to post a pic when I am finished. I am so excited to get this completed and hope to take it for a visit to school when I am done. Thanks again.
designer
2
Reply
My printer keeps making spaghetti on the shins. How do you fix that or how do you add supports?
(Edited)
The designer has replied
0
Reply
Hello , are you talking about armor piece or skeleton piece ? If you don’t change the orientation of my file it should be an easy print !
0
Reply
The armor
0
Reply
Replying to @Spitfire313 :
I did not change the orientation of the file
0
Reply
Finally finished - I am so happy. I have called him Preston. I did break a couple of parts (just reprinted them) - think my Grandad was a bit strong when he helped put Preston together. 😂 Love him sooo much. ❤️Thanks so much.
The designer has replied
designer
7
Reply
Hello, it's magnificent! Thank you for sending a photo of the finished Preston, that makes me extremely happy. I hope he enjoys school 😁. Just out of curiosity, what part broke? It might be a difference in filament strength. (If I may say so, the hands are upside down: the flat part is supposed to be the top of the hand 😉)
(Edited)
Show original
2
Reply
Replying to @Spitfire313 :
Hi again, the two breaks were the tibia and the wrist to the elbow one. they only broke when putting the armour on as it was pretty tight. It was all good the second time as we put a little bit of cooking oil on to help push the armour on. 😀 I have not been game to change the hands over as I am afraid 😦. Preston may have to be a bit special. 😂 Thanks again
2
Reply
did you use supports? I don't see any populated in the file when opening
0
Reply
I'm so sorry, but could this part be my fault?
The designer has replied
0
Reply
We are applying heat... But it's too difficult to insert. Do you happen to have a manual or something? I'm disassembling and assembling it, breaking it and removing it again...
0
Reply
Humm looks weird . did you put some heat before joinning them ?
0
Reply
Replying to @Spitfire313 :
I used a heating gun. However, it broke when it touched the armor.
0
Reply
This was an awesome build. Every piece printed without any problems. Printed on X1 with PETG. It's name is "Genneut". (Gender Natural) Thank you for your work.
(Edited)
The designer has replied
designer
2
Reply
Amazing , thanks for your feedback ! very nice print and picture . he is so scary with red eyes :) tanks again !
0
Reply
Where’d you get that Mandalorian helmet?
0
Reply
lil scary
1
Reply
:)
The designer has replied
4
Reply
Woww impressive , nice Mods !!!
0
Reply
Thank you another day or 2 be finished. Installing leds and printing head.
0
Reply
10 THOUSAND GRAMS OF FILAMENT??!!!
2
Reply
what are u exepecting from a size-human dummy 13?
0
Reply
Replying to @macix42 :
it human size but ok
0
Reply
Boosted
Love the model...Thanks! All printing ok, but having a weird artifact issue, anyone else? It looks almost like a weird seam line but its not. Slicer does not show a seam there. This is happening on many of these prints.
(Edited)
The designer has replied
0
Reply
Hello Gizmodified The photo is not of very good quality but I am almost certain that the problem comes from the position of the seams which with the fuzzy skin option becomes random I have exactly the same type of defect on my skeleton parts but it is not a problem since they remain hidden in the joints On the other hand I think you are printing armor parts with the PETG Fuzzy print profile which is normally intended for skeleton parts and not for armor This leads to several disadvantages The appearance of this unsightly seam An increase in print time and the amount of plastic used A heavier weight of the parts which risks causing problems for keeping the dummy 13 in position For armor parts you should use the PLA Armor profile If you still want to print them in PETG I can prepare a specific profile adapted for the armor Have a good day
Show original
0
Reply
Boosted
Replying to @Spitfire313 :
Got it, i'm using the default downloaded profile for 3 walls and petg. Printing the whole thing in PETG. The fuzzy skin helps alot in making the white petg less translucent.
0
Reply
Replying to @gizmosf :
Yes I understand the transparency issue with PETG, that's why I ended up printing the armor in PLA. But why not fuzzy PETG for the armor. I hadn't thought of that, though it would indeed create unsightly seams. I think in Bambu Studio you can force the seam placement, to be done piece by piece then. Good luck and I would appreciate a finished photo with a 100% fuzzy print 😉
(Edited)
Show original
0
Reply
High five haha 😂. Hips and 1 leg of frame remaining. Send pics once finished. Also it's going to be terminator ya haha.
designer
4
Reply
Boosted
Really impressed by how much work you put in to make everything function so well! I haven’t printed it since I have a Bambu A1 — would it be possible to share a profile for the A1 too? Size shouldn’t be an issue.
The designer has replied
0
Reply
Hello I am currently traveling but I will try to look at that when I get back Have a good day
Show original
1
Reply
Hello, I just published a profile for the A1, have a good day!! and happy printing :)
Show original
1
Reply
Boosted
Replying to @Spitfire313 :
Thanks a lot, really appreciate it! The boost is yours :)
0
Reply