Air pump from small angle grinder


Print Profile(1)

Bill of Materials


- Cordless Jauhi angle grinder x 1: Search it on Aliexpress
Description
💥 Donations can be made here: https://boosty.to/prosmp/donate
💥All our contact information here: https://hipolink.me/prosmp
YouTube channel: https://www.youtube.com/@prosmp
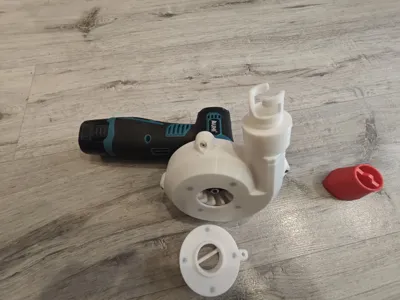
I got tired of inflating my SUP and inflatable boat with a hand pump, so I made a pump from a small cordless Jauhi angle grinder from Aliexpress (the picture is clickable)

Now it is much faster and easier to inflate the SUP. It takes around 30 seconds to inflate or to fully deflate my 3,5m long SUP. However, this is not a high-pressure pump. After the initial pumping, you need to additionally pump it with a hand pump to the required pressure. Most likely, this pump can be attached not only to the Jauhi grinder, but I have not checked (mine was the cheapest). If you want to use a different grinder, look at the photos of the cutting disc protection mount. It should look like the one on the photo:

The pump looks like a small turbine that is attached to the grinder instead of the cutting disc and protective cover. In addition to the turbine itself, I made several attachments that will fit different types of valves. There are attachments that need to be “screwed” into the turbine, there are TPU attachments that need to be tightly put on the turbine. If none of the attachments fit your needs, you can model it yourself. For this purpose, the project includes two adapter models, on top of which you can model the tip you need.
In addition to various inflating nozzles, there is a deflation nozzle. I planned that it would be attached to the shell with magnets (this makes it easier to print the shell). You can print it without magnets, but then it will fall off the pump. Cavities for 5x2 mm round magnets are made in the model of the upper half of the turbine shell and in the model of the deflation nozzle. Pauses are made on the necessary layers in the project so that you can put the magnets in the cavities. Try not to mix up the polarity.
Assembly:
1. remove the cutting disc and the protective disc cover from the grinder.

2. Take the lower part of the turbine shell and attach it to the grinder with a clamping ring and screws. Tighten the screws.

3. secure the turbine fan instead of the disc. Tighten the bolt.

4. fasten the upper part of the turbine shell to the lower part using 2.6x8mm screws
5. Enjoy 🤘😉
In addition, this pump can be used to blow on coals in a barbecue grill.
__________________________________________________________________________________
Я устал накачивать свой САП и надувную лодку ручным насосом, поэтому сделал насос из маленькой аккумуляторной болгарки Jauhi. Теперь САП получается накачать намного быстрее и проще (примерно за 30 секунд).
Однако, это не насос высокого давления. После первоначальной накачки надо дополнительно накачать ручным насосом до требуеиого давления. Скорее всего, этот насос можно закрепить не только на болгарки ЯУХА, однако я не проверял. Если хотите использовать другую болгарку, посмотрите на фотографии крепления защиты режущего диска. Она должны выглядеть как на этой фотографии:
Насос выглядит как маленькая турбина, которая крепится к болгарке вместо режущего диска и защитной крышки. Кроме самой турбины я сделал несколько насадок, которые подойдут для различных типов клапанов. Есть насадки, которые надо “ввинтить” в турбину, есть насадки из ТПУ, которые надо плотно надеть на турбину. Если ни одна из насадок не подходит к вашему клапану, то можете смоделировать самостоятельно. Для этого в проекте есть две модели переходников, на которые сверху можно смоделировать нужный вам наконечник.
Помимо различных насадок для надувания, есть насадка для сдувания. Я планировал, что она будет крепиться к кожуху на магнитах (это облегчает печать кожуха). Можно обойтись и без магнитов, но тогда она будет сваливаться с насоса. В моделе верхней половины кожуха турбины и в моделе насадки для сдувания сделаны полости под цилиндрические магниты 5х2мм. В проекте на нужных слоях сделаны паузы, чтобы можно было положить магниты в полости. Постарайтесь не перепутать полярность.
Порядок сборки:
1. снимите режущий диск и защитный кожух диска с болгарки.
2. Возьмите нижнюю часть кожуха турбины и прикрепите его к болгарке прижимным кольцом и саморезами. Туго затяните саморезы.
3. закрепите лопости турбины вместо диска. Затяните болт.
4. закрепите верхнюю часть кожуха турбины к нижней с помощью саморезов 2.6х8мм
5. пользуйтесь 🤘😉
Помимо накачивания всякого, этот насос можно использовать, чтобы раздувать угли в мангале.

💥 You can leave a donation here: https://boosty.to/prosmp/donate
💥All our contacts on one page: https://hipolink.me/prosmp
YouTube Channel: https://www.youtube.com/@prosmp
Our Telegram channel: https://t.me/prosmp
VK Group: https://vk.com/pro_smp
License
You shall not share, sub-license, sell, rent, host, transfer, or distribute in any way the digital or 3D printed versions of this object, nor any other derivative work of this object in its digital or physical format (including - but not limited to - remixes of this object, and hosting on other digital platforms). The objects may not be used without permission in any way whatsoever in which you charge money, or collect fees.
Comment & Rating (0)