Storage Box for Automatic Card Shuffler and Dealer


Print Profile(2)


Bill of Materials


- Card Shuffler+Dealer x 1: https://amzn.to/4k2kTaG
Description
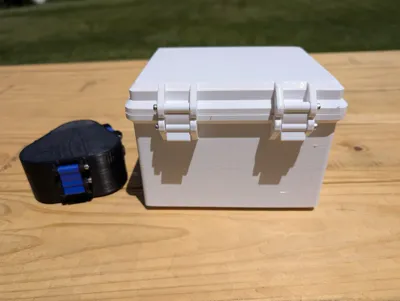
A storage box to safely carry and protect an electronic card dealer machine, which is white-labeled by a number of different brands on Amazon.
These machines shuffle and automatically dispense cards, and work really well for game nights. They just have one major flaw: they're rather hard to transport safely. They have a shape that puts various weak plastic parts out at angles where they can get bumped and easily damaged.
Wanting to transport mine to a few game nights, I wasn't satisfied by carefully packing them into the bottom of a bag, so I made this rugged case to carry them.
The case is a minimum of 2.5mm thick in all areas, so it should provide fairly strong protection. The machine fits very snugly inside, with no movement (apart from the card needle rocking around) when closed.
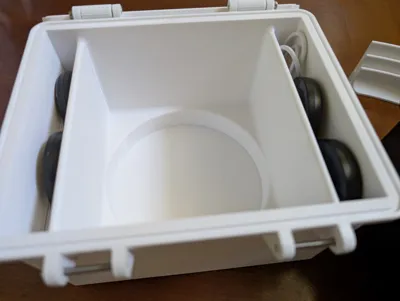
Storage slots are provided for the manual and a USB cable.
There are two variants of the main box, one without deep side pockets, and one with. The deep side pockets on the one with are able to store 4 pucks, if you stagger them, as well as a manual, charging cord, etc. The variant without the deep pockets can store a charging cord and manual, but not pucks. You can store the dealer buttons in the card area of the shuffler, or in a separate “puck box” that I've made. If you want to store the pucks in the side pockets, check out the puck sled I made for them.
This is a large, heavy print, that requires a decent amount of dimensional accuracy. Make sure your printer and filament are tuned properly, and that you have adequate filament before starting.
Hardware and Assembly
Printing the bottom and top should be fairly straightforwards. There is a 3rd plate for a TPU gasket, that makes the box water resistant.
You can print this on any BBL printer, not just the H2D. I've confirmed that the dimensions should fit on all printers they have for sale. The fit is tight on the A1 Mini, but it is possible
Once printed, you will need 6 M3x30 screws. I've added them to the MakerWorld BOM below, but you can use any similar screw.
All screws face “outwards”, the inside holes are small enough the screw should engage with the plastic and tap its own threads.
- Put one screw through both of the bottom's latch slot, this is where the latch will snap onto.
- Attach the top to the bottom using the hinge, with a screw through each.
- Attach the latches to the top, again, using a screw
- Optional: install the TPU gasket in the slot of the bottom part of the box.
License
You may create derivative works based on this object, provided that all such derivative works are published exclusively on the MakerWorld platform and include proper attribution to the original creator. You may not share, upload, host, distribute, or publish this object—or any derivative work of this object—on any other digital platform, marketplace, or distribution channel. Commercial use of this object and any derivative works is strictly prohibited. This includes, but is not limited to, selling, renting, sublicensing, or using the object in any context in which you receive monetary compensation or other financial benefits.
Comment & Rating (19)