Outin Transit: case with modular storage


Print Profile(4)


Description
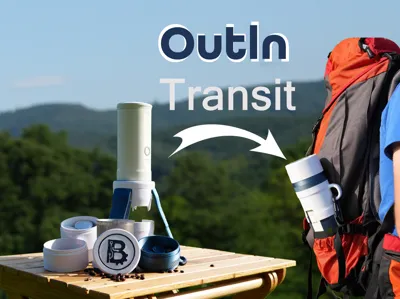
Outin Transit
The Story
It all started during a road trip — in, you guessed it, a Ford Transit. With hours to kill, a friend and I began brainstorming ideas. Through that design process, the Outin Transit was born! Simply put, it’s the most portable protective Nano case that includes both a stand and modular storage currently available.
Back home, I poured countless hours into prototyping, CAD (this is my first major modeling project), and printing. Early versions were printed in PETG, and later tests included both PLA and PETG. For durability, I recommend PETG — all designer profiles use it — although PLA should work in theory as well.
Design Considerations
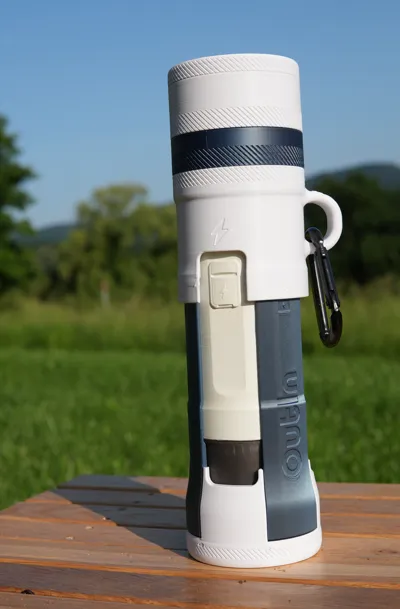
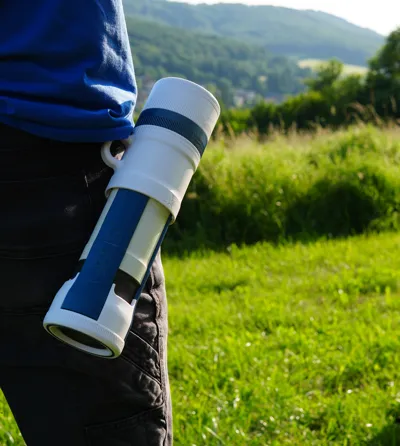
The Outin lineup — especially the Outin Nano — is designed to be the most portable functional espresso machine on the market. That same emphasis on portability and functionality was my top priority while designing the Outin Transit.
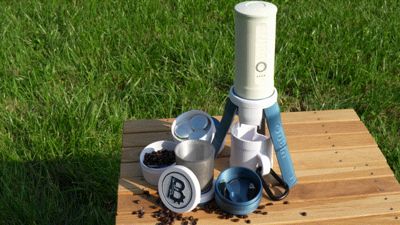
The case is intended to offer protection and added features without significantly increasing the Outin's form factor. It is an all-in-one system that fits into a backpack’s bottle pocket and adapts to each user’s setup — with everything you need for the perfect shot (or several) in the wild.
Features
- Protection without adding significant bulk to the original product
- Built-in stand twist unlocks from top section, with fold-out tripod legs: secure and stylish
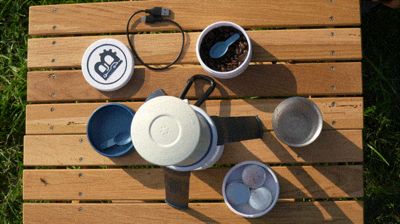
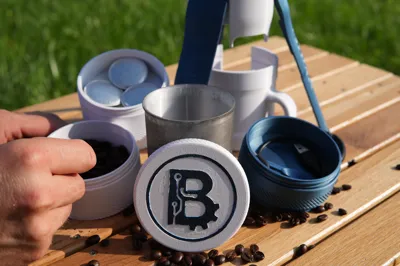
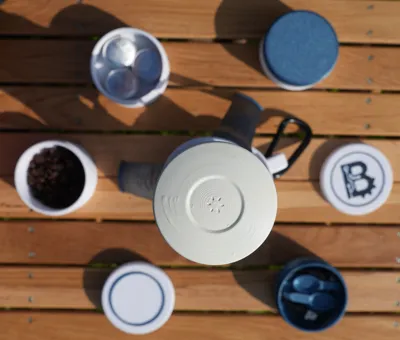
- Modular containers with mix-and-match options for size, type, and lid — or just print a lid for a clean cap
- Capsule container (3 Nespresso capsule compatible)
- Beans/grounds container
- Utility container (for charger, scoop, spoon, sugar, etc.)
- 3 lid types: coaster, plain, custom (Powered by MakerWorld-Make My Sign (https://makerworld.com/makerlab/makeMySign))
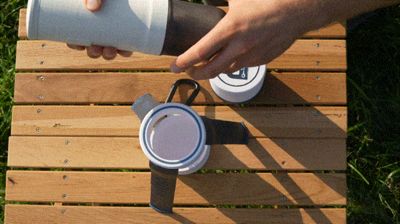
- Mug for sharing a shot (also works as a coaster for the Outin Nano)
- Coasters built into the mug and container cap
- Comfortable carry handle, carabiner-ready
- Anti-roll protection — the handle design prevents the Transit from rolling off surfaces
- Two-color printing (no AMS needed) for a sharp, stylish finish
- Designed for 3D printing with minimal supports and carefully calibrated brims and seams
- Printer Compatable can be printed on any Bambu printer: accessible to all
- Simple assembly using super glue and scrap filament for hinge pins
- No additional parts no waiting on an order of magnets or screws to arrive, print it, build it, use it!
Boost Me (for free)
I'm new here; want to help out? Give a boost, you'll probably be the first 😉.
Assembly (see video for more detail)
- Remove supports from mug/cap and stand legs
- Trim any overhanging filament from the leg hinge
- Snap the legs into the stand and insert filament through the hinge pin holes
- Trim the filament flush or melt into place with a soldering iron
- Glue the large ring into the groove on the stand
- Insert the Outin Nano into the upside-down stand
- Hold the legs against the Nano body with one hand, then place the mug/cap on top
- Align the arrows on the mug with those on the stand legs
- Twist right to lock, left to unlock (follow the arrows) — the first few times will be quite stiff as the tabs deform slightly. This is normal. Simply hold the legs firmly, and twist the cap back and forth until it locks
- After a few uses, it should lock with a satisfying click and unlock easily
- Note: If printing in PETG, you may need to trim the locking tabs slightly. Be careful not to over-trim, as this will weaken the lock.
- Glue the coaster ring into the slot in the mug/cap (purposefully raised)
Modular Container Setup
- Choose your containers and decide the order to stack them
- Take the bottom container (the one that attaches directly to the Transit)
- Screw the connector ring into the bottem container — add a few drops of glue for a permanent bond (optional, but recommended)
- Stack additional containers as desired
- Select a lid:
- Plain lid — attach directly
- Coaster lid — glue the coaster ring in place (purposefully raised)
- Custom lid: Powered by MakerWorld-Make My Sign (https://makerworld.com/makerlab/makeMySign)
- Use pliers to remove the support material from the cutout
- Open the custom insert print profile and click on the customize button to open in Makerlab Make My Sign
- Double check parameters: 65mm circle, 2mm thick, face-down printing (face up printing works as well, but will not be flush) Customize with text, shapes, or SVGs, then export as 3MF and print (AMS needed)
- Glue the insert into the custom lid cutout
Done!
Congratulations — your Outin Transit is built and fully customized. Now it’s ready for the road. Take it on your next adventure, stay rugged, and stay caffeinated
License
You shall not share, sub-license, sell, rent, host, transfer, or distribute in any way the digital or 3D printed versions of this object, nor any other derivative work of this object in its digital or physical format (including - but not limited to - remixes of this object, and hosting on other digital platforms). The objects may not be used without permission in any way whatsoever in which you charge money, or collect fees.
Comment & Rating (66)