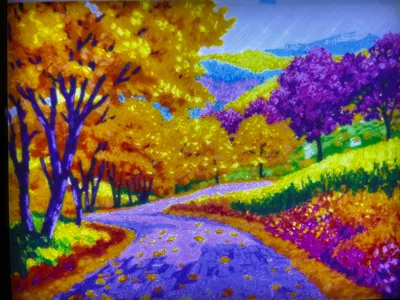
Autumn Road Color Lithophane


Print Profile(2)


Bill of Materials
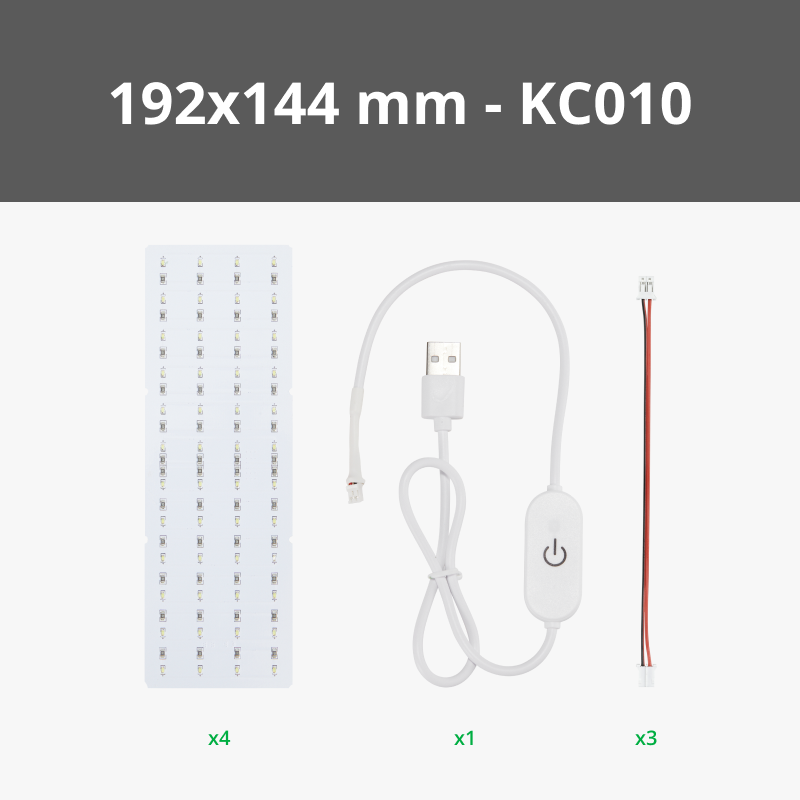

- Lithophane LED Backlight Board Kit x 1:
- PLA Basic CMYK x 1:
Description
Boost Me (for free)
Enjoy this autumn scene? Boosts encourage me to keep designing printable art that looks stunning backlit.
Warning: MakerLab isn't letting me upload the .2mm print profile due to slicing volume limitations
Update: The .2mm profile can only be accessed by manually downloading. In your browser, on the green drop-down menu under the print profiles, select “Download STL/CAD Files,” and download the file shown there to your computer. My apologies for any inconvenience.
Vibrant Autumn Lithophane – Framed & Backlit
This vibrant autumn landscape lithophane was designed for multi-nozzle flexibility and ease of printing. I’ve included slicer profiles for both 0.2 mm and 0.4 mm nozzles. The lithophane itself is recommended for a 0.2 mm nozzle to preserve detail, while the separate frame print profile prints best with a 0.4 mm nozzle for strength and speed.
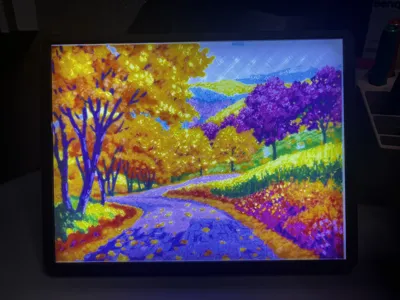
Note: I used a transluscent PLA filament instead of white - which is why the filament lines and led lights kind of stand out in the photos - and I actually think just the standard white will look nicer.
Assembly Instructions (Summarized from the official guide):
- Prepare the LED kit to match the frame size. This setup uses 4 LED boards. Maker's Supply materials linked below.
- Connect the LED boards using the PH2.0 cables with the ports facing up.
- Thread the USB power cable through the appropriate frame hole based on vertical or horizontal orientation.
- Secure the LED boards into the small clips inside the frame. Flatten the wires to ensure a flush fit.
- Insert the lithophane carefully into the slot, making sure it’s aligned evenly.
- Power on and touch the switch to activate lighting. Long press to adjust brightness.
The full Lithophane Installation Guide V2 PDF is included in this post for reference.
Powered by MakerWorld-Make My Lithophane (https://makerworld.com/makerlab/makeMyLithophane)
Documentation (1)
License
You shall not share, sub-license, sell, rent, host, transfer, or distribute in any way the digital or 3D printed versions of this object, nor any other derivative work of this object in its digital or physical format (including - but not limited to - remixes of this object, and hosting on other digital platforms). The objects may not be used without permission in any way whatsoever in which you charge money, or collect fees.
Comment & Rating (0)