Tall Jap Lantern Tea light


Print Profile(1)

Description
Several folks have been asking for tea light size so I have remixed the existing lanterns(2) and will be publishing 9 more in tea light size shortly.
A Brief History:
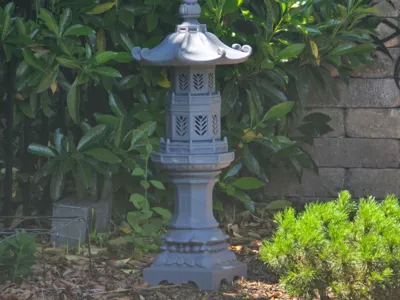
Traditional East Asian stone lanterns, known as Tōrō, originated in China and spread throughout Japan, Korea, and Vietnam, becoming iconic fixtures in gardens and temple grounds. My own fascination with these beautiful structures began during a truly inspiring visit to Gibbs Gardens in Georgia.
A little more information on the specific parts of the lanterns that I found interesting.
Stone lantern components:
A. Hōju/hōshu (宝珠, lit. 'jewel')
The onion-shaped part at the very top of the finial.
B. Ukebana (請花)
The lotus-shaped support of the hōju, together symbolizing the element of Kū (空) or sora, translated as aether, space, void or consciousness.
C. Kasa (笠)
A conical or pyramidal umbrella covering the firebox. The corners may curl upwards to form the so-called warabide (蕨手), symbolizing 風 Fū or kaze, the element of wind or air.
D. Hibukuro (火袋, lit. 'fire sack')
The firebox where the fire is lit, symbolizing the element of 火 Ka or hi, meaning "Fire".
E. Chūdai (中台, lit. 'central platform')
The platform for the fire box, symbolizing the element of 水 Sui or mizu, meaning "Water".
F. Sao (竿, lit. 'post')
The post, typically oriented vertically and either circular or square in cross-section, possibly with a corresponding "belt" near its middle; occasionally also formed as a sideways coin or disk, as a set of tall thin lotus petals, or as between one and four arched legs (in "snow-viewing" lanterns); absent in hanging lanterns.
Kiso (基礎, lit. 'foundation')
The base, usually rounded or hexagonal, and absent in a buried lantern (see below).
Kidan (基壇, lit. 'base platform')[6]
A variously-shaped slab of rock sometimes present under the base; together the post, base and platform symbolize the element of 地 Chi (sometimes ji) or tsuchi, meaning "Earth".
The lantern's structure is meant to symbolize the five elements of Buddhist cosmology. With the sole exception of the fire box, any parts may be absent. For example, an oki-dōrō, or movable lantern (see below) lacks a post, and rests directly on the ground. It also may lack an umbrella.
The Stone Lanterns, 11 to date, with a couple more coming soon.
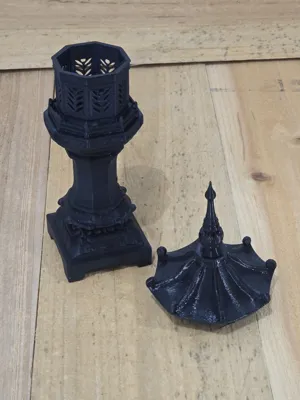
From pictures to 3D Prints: I was able to get to approximately 50% with the Bambu 3d tool but then had to spend many hours cleaning up reshaping creating windows in the firebox that would allow light and slicing into usable parts. For those of you that are like me and new to all this manipulate the angles of you prints, sometime standing them at 45 deg can produce some better prints and less filament waste due to supports.
Having already printed two larger lanterns at approximately two-thirds of their original size for my garden, I'm now at a crossroads for my next full-scale project. To help me decide, I've embarked on a fun new phase: printing several tea light sized versions of various designs. This allows me to see which ones really "pop" before committing to another large-scale print. If a clear favorite doesn't emerge, I might just let the community decide based on popularity!
Designing for Prototype & Efficiency:
These smaller lanterns are scaled to be under 20cm tall, roughly 10% of a full-sized Tōrō. This size is perfect for fitting an electric tea light snugly inside, and it keeps the filament usage around a sensible 100g per print – ideal for quick prototyping and experimentation.
Printing Notes & Recommendations:
For these initial tea light prototypes, I opted not to use fuzzy skin on the outer surfaces. This decision was purely to save print time during this iterative design phase. However, if you're aiming for that truly realistic, aged stone look in your final prints, I highly recommend enabling fuzzy skin. Just a heads-up: if you go that route, remember to use modifiers around the window openings to prevent any print issues in those delicate areas. Also with all the various shapes I decided that at this point it was more important to keep the shapes and use supports that to chop up the parts and lose some of the features. Setting the Top Z to .25 makes for easy release. As far as filaments I used PLA that I was able to get on sale for around $10 US for 1K, this made the experiment a little less costly. For the larger ones coming I will return to PETG since they will go outside.
I hope you enjoy exploring these designs as much as I have enjoyed creating them. I'm always happy to entertain requests or suggestions for upscaling any of these into larger versions as the next step in this printing adventure!
Comment & Rating (10)