ISOP Golf Tee - The Bland Variant


Print Profile(1)

Description
Golf Tee - In Search of Perfection
Recently, I've begun a new project focusing on the simplest of objects: the humble golf tee. I imagine that you're thinking, it's a tiny piece of plastic, how hard can it be? Well, friend, for a man with a brain the size of a hamster, the answer is… quite difficult.
I started out using factory made golf tees like a dope. I've been 3D printing for over 5 years and I didn't think to print these? Again, hamster brain. So I put that hamster on its wheel and let it turn. Unsurprisingly, it ended up being extremely basic. You'd think I would have been able to distill it down into a single, perfect model. Unfortunately, you'd be wrong.
Over the course of my extensive testing I've come to the realization that you just can't have everything. As much as I wish you (and I) could, the Rolling Stones didn't sing “You Can't Always Get What You Want” for no reason. And it's for this reason that I was unable to release a single, comprehensive model. Fortunately for you, I'm willing to share all my awful attempts and let you decide in what area you want to compromise.
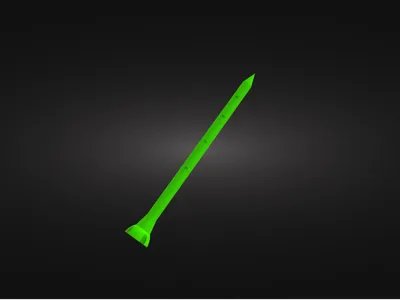
The Bland Variant
Here I present to you, what I refer to as the bland variant. I eyeballed a tee and then copied its dimensions. Sure, it's simple but what great things aren't? (Pretty much everything). I did throw in a few frills that I've determined to be a necessity on my entire line of golf tees. Due to a lack of creativity, I'm going to copy these across all my variants so if you've read these on one, you might as well skip ahead. I'll try to remember to bold when I start blathering in a unique way.
- The size. This tee is lengthy. If you don't want to make all the other golfers jealous, I've included a shorter, more average sized version.
- The markings.
- 1 ½" - Low tee for irons and perfect for Par 3s
- 2 ⅛" - Irons, hybrids or a low profile wood
- 2 ¾" - Drivers
- 3 ¼" - Girthy Drivers
- The way they cup your balls. I cannot overstate how unique this is. Normal tees will hold your balls but do they do it tenderly? These are perfectly conformed to the exact size of your balls.
- Fore! No, I didn't have another feature but felt the need to make a weak golf joke.
Phew! I remembered and now you can continue reading my (amusing to me but likely no one else) editorial. From here on I'll provide my recommended print settings and whatever else I decide to drone on about.
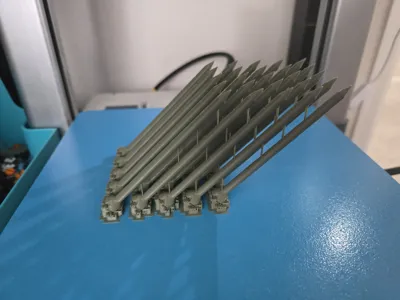
I've set this model at a 45 degree angle so that it requires a very minimal amount of supports right at the base and built in supports to help with the pretty extreme overhang. I understand that this can be a difficult orientation for some people to print*. Unfortunately, I've found that this is almost essential to have any kind of strength for your tees. You can print them upright if you want but they still require supports in the section that cups your balls. Printed straight up I've yet to have one last more than 2 solid hits. If you're the type that consistently breaks your tees anyway, this might be a fine option for you. Printing them at a 45 degree angle more than doubled the amount of punishment that these can take. If you really want to not have to worry, feel free to check out my Chonky Variant. (insert link here at some point)
*Ignore this section if you don't want to see me shill a product. I can't recommend CryoGrip plates more highly. I've been using one for about 6 months and it's a game changer. If you're unfamiliar with them they're quite possibly the greatest improvement to printing since I switched to Bambu. I'm unaffiliated with them but right now they're only $15 on Amazon after a 30% and 20% coupon. I recently saw them at RMRRF and their demonstration was printing a ~8mm square that was tilted at a 45 degree angle. It was about 100mm tall when I saw it and it was only supported by the 8x8mm square adhered to the build plate. Unpaid endorsement end.
Boost Me (for free)
If you have some boosts that are about to expire, I like chunky lemon milk.
License
You shall not share, sub-license, sell, rent, host, transfer, or distribute in any way the digital or 3D printed versions of this object, nor any other derivative work of this object in its digital or physical format (including - but not limited to - remixes of this object, and hosting on other digital platforms). The objects may not be used without permission in any way whatsoever in which you charge money, or collect fees.
Comment & Rating (2)