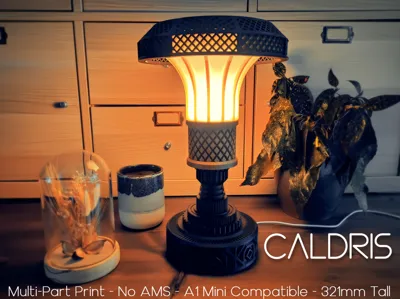
Caldris - Industrial Deco Lamp


Print Profile(2)


Bill of Materials

Description
Membership
Want to sell this lamp?
Caldris is a Art Deco/Gothic/Industrial fusion of styles to bring light to you quiet place of contemplation. Using the Maker Supply LED Lamp Kit, you can create this mysterious and alluring illumination piece. At 321 mm Tall, this Lamp makes a nice feature to a bedside table, or prominent statement on a desk.
The Caldris Lamp can be printed on all printers, including the A1 Mini - However, to make it fit on the smaller build plate of the A1 mini, the Lid was cut into 5 interlocking parts. If you're planning on using a printer with a larger build plate, you can print the Lid as a single part. Supports are required only for the Lid, I use tree supports as they break away easily and can worm their way through gaps to get to where they're needed. All other parts do not require supports.
Assembly:
Fit the LED holder onto the base - Glue is not essential but is recommended.
Next, thread the LED Lamp Kit through the hole running down the centre. USB plug end first, followed by the switch then sit the LED in the LED holder. If you intend on keeping the LED in the Caldis permanently, then I recommend gluing the LED in place. If it falls out of the holder, it will be difficult to re-sit it properly.
Fit the Diffuser into position over the LED. Glue is not essential but is recommended. Note, If you opt to glue the diffuser in, you will no longer have access to the LED, it will be stuck in the lamp.
Finally, place the Lid on top of the lamp, glue is recommended. If you have opted to print the Multi-Part Lid - Follow the guide below.
Assembling the Multi-Part Lid:
If you've opted for the multi-part lid - Begin by making two halves of a ring. The segments should slide together nicely and glue is recommended but not essential.
Next, bring the two halves together as shown in the photo above and twist to make them lock together.
Finally, bring the central piece in to lock the whole lid together as one - Glue is again recommended.
Boost Me (for free)
💡💡💡💡💡 LAAAAAAAMP 💡💡💡💡💡💡
License
You shall not share, sub-license, sell, rent, host, transfer, or distribute in any way the digital or 3D printed versions of this object, nor any other derivative work of this object in its digital or physical format (including - but not limited to - remixes of this object, and hosting on other digital platforms). The objects may not be used without permission in any way whatsoever in which you charge money, or collect fees.
Comment & Rating (16)