Ornamental Torch/Sconce Holder


Print Profile(2)


Description
I made a handful of CairnFocus3d‘s Tealight sconces but didn’t really care for any of the holders. I drew up my own that was supposed to look like a wood plank with decorative metal trim, added some fake wrought iron nails and a chain to hold it. I broke things up so they can all be printed in strong orientations as to not be fragile, but a few seconds of assembly is required.

I went through a few revisions on the final shape of things and my color choices 😅
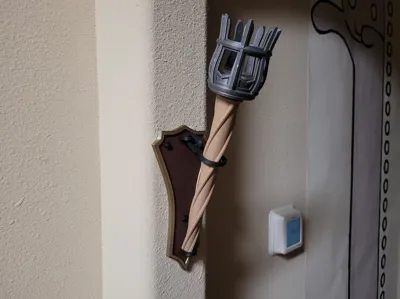
Shimmy the torch through the large chain opening and rest it's point on the U link poking out from the bottom of the holder. It'll be a little unstable at first, but will not fall and if the holder is hung level it will rest perfectly upright.

It can be mounted either by adhesive tape or with a pair of nails/screws via the keyhole mounts on the back of it. These have a little support in them, but it is easily removed with a pair of pliers. Just yank it out 😁

The screw holes are exactly 4" apart.
When there is not a torch in the holder, the chain flops flat to be less obtrusive.

Printing Considerations
There are a few options for printing, regardless of your printer.
Plate 1 “Body Mono Color” prints just the body in a single color. Useful if you don't have an AMS or want to paint it. This works in conjunction with Plate 3.
Plate 2 “Full Multi Color” is the one-and-done multicolor option, but it also incurs the most filament swaps.
Plate 3 “Chain only” is just the chain and nail heads.
Plate 4 “Body Two-Tone” is the body in two materials, to be used in conjunction with Plate 3.
Material 2 (grey) is used in the single color version.
Material 1 (rosewood) is the face of the body with Material 3 (iridium gold) for the trim.
Material 4 (matte black) is used for the chain and nail heads.
It is my suggestion to print plates 3 and 4, as this requires only five total material changes. While only one will fit on an A1 Mini plate, you can print multiples on larger printers.
Assembly
No matter how you print it the chain pieces will need to be assembled.
- Snap the 0 link in to the large link
- Hang the 0 link in to the shorter of the two U links
- Insert the U link in to the top holes in the body, securing the assembly
- Insert the longer U link in to the holes at the bottom of the body
- With very small dots of CA glue, secure the nail heads in the little recesses in the face (no particular order, they're identical)
I did not need glue to hold my U links in place, it is a very snug fit.
Side note: I've added a fifth plate to the large-format printers profile. It has all the parts laid out to be printed by object, but enabling this feature will break the profile as it will only list as available X1 printers. If you wish to do this, click the setting nut for plate 5 then change “Print Sequence” to “By Object”.

License
You shall not share, sub-license, sell, rent, host, transfer, or distribute in any way the digital or 3D printed versions of this object, nor any other derivative work of this object in its digital or physical format (including - but not limited to - remixes of this object, and hosting on other digital platforms). The objects may not be used without permission in any way whatsoever in which you charge money, or collect fees.
Comment & Rating (6)