AMS REPLICA FOR BMCU


Print Profile(4)


Description
Boost Me (for free)
A BOOST TO THE MODEL WOULD BE APPRECIATED SO AS TO HAVE FEEDBACK AND HAVE SUPPORT FOR FUTURE UPDATES, MODS AND ADDITIONS FOR THE AMS LITE BMCU,
THANKS SO MUCH <3
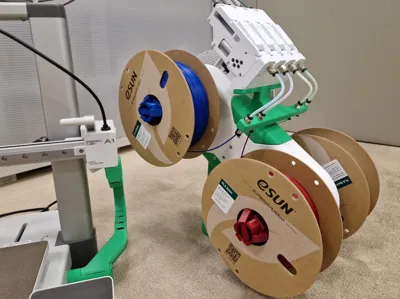
AMS LITE REPLICA FOR BMCU
After extensive design and testing, the AMS Lite replica for bmcu is finally here!
UPDATE!!
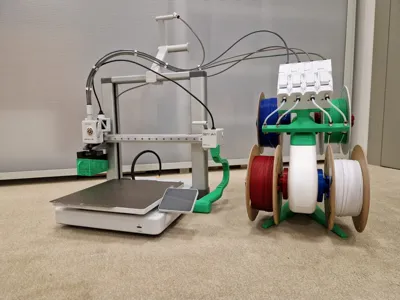
I FINALLY UPLOADED THE PRINTABLE MODEL WITH BAMBULAB A1 MINI WITH THE DEDICATED PRINTING PROFILE, MAKE SURE TO SELECT THE CORRECT PROFILE FOR YOUR PRINTER DURING THE DOWNLOAD
Features:
-Compact spool holder for bmcu 370x
-Only few parts needed for assembly
-Compatible with original ams spool rotary
I found on makerworld a project for a spool holder compatible with the original ams that was right for me, you have to print a pair of green spool holders, and a pair of orange spool holders, below I leave the link to the reference model:
https://makerworld.com/en/models/424607-alternative-rotary-spool-holder-for-ams-lite-liao#profileId-328034
materials list:
-N° 8 ptfe tube connector
-N°14 3x16 self-tapping wood screws ( N°18 3x16 self-tapping wood screws for a1 mini version)
-N° 2 2.5x20 self-tapping wood screws
-N° 4 ptfe tubes 130mm/(13cm) long
Instructions:
- Print all the model in the file and all the rotary spool holder
Take the upper ams, and lower ams parts and n°6 3x16 self-tapping wood screws

fit the 2 components together and fix them with the 6 3x16 screws in the side holes as in the picture
N.B. please make sure that the orientation of the two pieces is as in the photo, the slots in the pins for the spool holders must be one square and one hexagonal on the same side
take the ams stand and n°4 3x16 self-tapping wood screws and assemble it with the previously assembled part
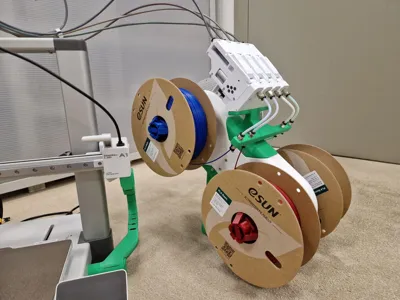
N.B. make sure that the orientation of the previously assembled ams upper structure is as follows:
looking at the ams from the front, the hexagonal joint must be in the upper right part and the square joint must be in the upper left part (as in the original ams)
N.B. For the ams stand for bambulab a1 mini assemble the upper stand and the lower stand with n°4 3x16 self-tapping wood screws, the assembled result must be the same as the stand shown in the photo


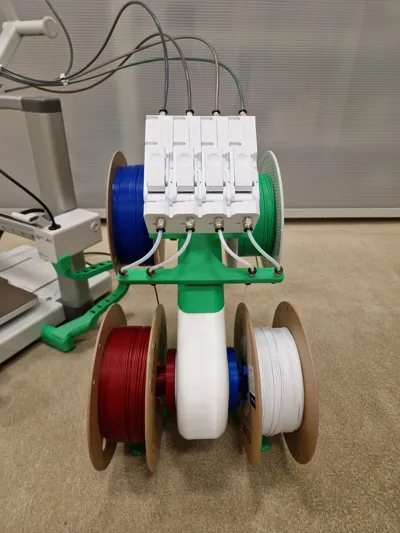
take the bmcu support and screw n°8 connectors for the ptfe tube in the 4 holes, 4 in the upper part and 4 in the lower part


Screw the BMCU to the BMCU support with n°2 2.5x20 self-tapping wood screws using the holes provided on the support and on the BMCU


size n°4pcs of ptfe tube long 130mm/(13cm)

install the 4 ptfe tubes in the respective connectors between the support and the bmcu

Install the bmcu-support block on the previously assembled ams structure with n°4 3x16 self-tapping wood screws

- install the 4 spool holders as described in the guide in the link to the model that I left you previously

Install the filament spools with the following orientation

connect the bmcu to the printer and have fun with your new ams!!

License
You shall not share, sub-license, sell, rent, host, transfer, or distribute in any way the digital or 3D printed versions of this object, nor any other derivative work of this object in its digital or physical format (including - but not limited to - remixes of this object, and hosting on other digital platforms). The objects may not be used without permission in any way whatsoever in which you charge money, or collect fees.
Comment & Rating (636)