Dayou (new 12V) powerful battery fan


Print Profile(10)


Description
20260516
The previous store seems to have closed and moved Let's see if this is correct I also bought one to test If there are installation problems, I will modify the design directly


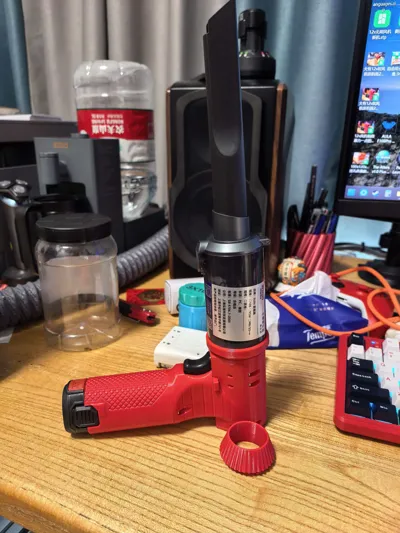
By the way, the trigger switch has forward and reverse rotation, so this device is designed for both blowing and vacuuming
This vacuum module, just put it in and twist

20260109
I made a matching rack for the printed 5mm IKEA board

This is the general installation process ▶︎Tang Zhuzhaolao records a good life on Douyin 20251217 - Douyin
20251217
Added the vacuum module, I've wanted to make such a small vacuum cleaner with a trigger switch for a long time


2025/12/16

For the 40mm motor, buy the "Zhongli" one above (Motor link glimpsed from here 40MM Stepless Speed Regulation Powerful Fan Adapted for Dayou 12V New Battery From 3Q's qqq MakerWorld: Free 3D Model Download) It has a trigger, forward and reverse, and seemingly over-discharge protection, which just makes up for the problem that the Dayou 12V battery itself seems to lack over-discharge protection Perfect~
(For now, ignore the vacuum motor, I'll work on the vacuum cleaner separately when I have time)
These are the parameters provided by the seller:

As usual, two power pick-up plates, M4*8 screws, nuts, several 3mm self-tapping screws The installation process is similar to before, and also a bit like the 20v model
It can be printed in one go, the one below is the actual print result:


====================================================================================================

This is the general installation processhttps://v.douyin.com/_SUyEnNDSTk/ cN:/ O@K.jc 06/05


Printed using PETG If you want it lightweight, the default strength of the design is not very high, please adjust according to your needs
For the power pickup part, you need two M4x8 screws, two nuts, and two small metal plates https://e.tb.cn/h.6EOTvuSfH2eY4nu?tk=VwKOVOhBly5 CZ009
Several M3x8 or longer self-tapping screws
The wiring for power can be twisted onto the screw heads or soldered
ATTENTION! Do not reverse the 12V positive and negative poles of the driver board, it will burn the board
Brushless motor seller link https://e.tb.cn/h.6EVwmKUD0pIxRo9?tk=V2DwVOhvQhn HU287 For specific wiring, refer to the seller's description
The one below is made with 4056 The advantage is that it can be placed like this for blowing, haha


For the brushless version, I made a vacuum nozzle interface, which looks like this The suction power is not very strong, don't expect too much But it can still be used to vacuum desktops, printer interiors, keyboards, and similar items


2025-07-06
The nozzle of the brushless version has been modified It is detachable There are two types, one is narrowed, and one is straight
Haha, I actually don't know if the rifling inside the nozzle is useful There's nothing to test with.....

2025/07/14
The rear cover of the brushless fan has been optimized by this guy @@user_3367727871 雷曼 replacing it will make it quieter I simply integrated the print profile and included his design
20250920
Heard from a friend in the comments that the airflow wasn't strong enough, so I bought another motor online to test and made one with a knob for power adjustment It will be a little more powerful than the previous one
The knob needs to be removed first, then installed later The ESC can be directly pushed in, and once it's full with the wires, the motor can be pressed on


Documentation (7)


License
You may create derivative works based on this object, provided that all such derivative works are published exclusively on the MakerWorld platform and include proper attribution to the original creator. You may not share, upload, host, distribute, or publish this object—or any derivative work of this object—on any other digital platform, marketplace, or distribution channel. Commercial use of this object and any derivative works is strictly prohibited. This includes, but is not limited to, selling, renting, sublicensing, or using the object in any context in which you receive monetary compensation or other financial benefits.
Comment & Rating (0)