Shelly Mini - Most Compact Case EVER


Print Profile(2)


Description
⚒️ No 3D printer? No time to source components?
I just opened my own e-shop where you can buy physical, ready-to-use versions of my models! Designed with passion, printed and assembled with care ⚙️.
📦 Shipping across the EU: 👉 Get it at NautilusForge.shop
Boost Me (for free)
Like this model? A free Boost is always appreciated! It supports the time that goes into designing and testing. Thank you so much! 😊🙌
Check out that variation for more information and pictures about use and wiring recommendation!
 |
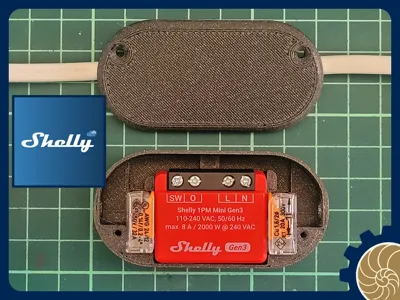
A extremely compact casing for the Shelly Mini Gen3
Since I bought the first Shelly 1PM Mini Gen3 I wanted to find a “elegant”-ish /discrete replacement for the manual switch of table top lights and other appliances where the switch is manual and on the power cable itself.
Finally found the time to design to my liking.
Hope it helps !
Design:
- As COMPACT as possible while staying within what I consider safe (wink wink at your own risk).
The switch case is 7 CM x 3.5 CM x 2 CM ! - Reset button and LED Indicator is still accessible/visible from the outside.
- No support, so inserts
- Cabling is still very easy to do properly and close.
PRINT:
- No Support
- 0.2mm layers or 0.3mm layers
- up to 0.6mm Nozzle is fine
- PLA is preferred over PETG, for rigidity
Material Needed:
- 1x Shelly 1PM Mini Gen3 (other model from the family should fit too)
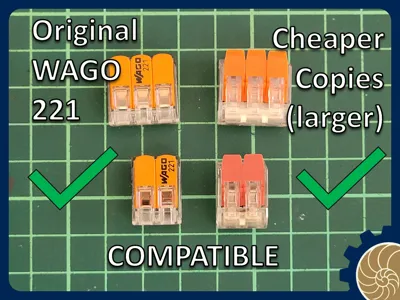
- 2x WAGO 221-413
- 2x small screws. (I used 12mm * 2.5mm with a 5mm head diameter)
To install:
/!\ Disclaimer: I'm not electrician, just a hobbyist, please double check everything on your side regarding the wiring. This is more a “how-I-did-it" guide rather that a “how-to”. That being said:
- Insert Shelly in the case
- Cut and Strip as indicated in the pictures. At least 8 cm from each side, then use the cut wires to complement the rest of the circuit.
- Do your WAGO wiring directly in the case. (See doc diagram below)
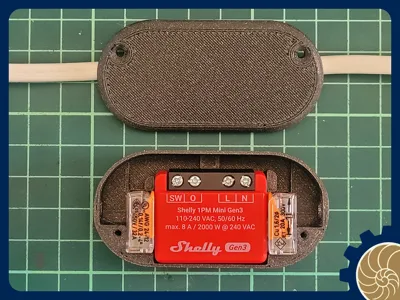
I show mine in a picture, please double check properly with manufacturer docs, Especially if you are using another Shelly model. Use one WAGO for Neutral and one for Ground as you will not be using the switch input. - Now that the WAGO wiring is done, insert the WAGOs in their slots as shown in the pictures.
- ZIP Tie both cables properly
- Close the case with its lid, should be SNAPPY!, add the 2 screws.
Annex:
Here are some docs from Shelly website:
 |  |
Hope it helps !
My other shelly cases remix/designs:
 | |
 |  |

Membership
☕ NEED MORE FROM THIS MODEL? Buy me a coffee and request specific tweaks! | 🌍 WANT TO SELL PRINTS? Join my Commercial Tiers for instant worldwide rights. | Your support keeps this hobby alive! 👉
License
You shall not share, sub-license, sell, rent, host, transfer, or distribute in any way the digital or 3D printed versions of this object, nor any other derivative work of this object in its digital or physical format (including - but not limited to - remixes of this object, and hosting on other digital platforms). The objects may not be used without permission in any way whatsoever in which you charge money, or collect fees.
Comment & Rating (7)