IronWave Spark - Clipsal Corrugated Metal Plate


Print Profile(2)

Bill of Materials

Description
These models are part of the Corrugated Iron Collection - there's a set of closely related backing plates here - IronWave Switch Plates - 16x76mm Corrugated Metal - also for switches and outlets, 1 and 2 gang.
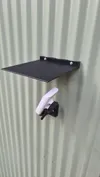
The IronWave Spark Back Plate is designed to attach the Clipsal Iconic Outdoor Twin Switched Outdoor Socket Outlet ( O3025-XW ) to a corrugated iron wall. It's an alternative to the Clipsal 450VC-WE / 450VCWE Mounting Block.
Metal + 240V Electricity, what could possibly go wrong? Well a lot less if you use this backing plate :)
Since the outdoor sockets have a flat back mounting, if you are trying to mount a recessed switch or socket then I have a generic 120x120 mm square plate here - IronWave Switch - Corrugated Metal Switch Plate
Product Link
Clipsal Iconic Outdoor Twin Switched Socket Outlet
Alternative
See - IronWave Switch
Design Considerations
Corrugated iron is an iconic Australian building material, but poses some challenges when using it on structures as vertical walls. This backplate is designed to be used with a twin socket outdoor power-socket.
- Cabling Access - A single central penetration allows cabling to pass through to the back of the socket. Ample space has been provided to allow for inaccuracies in the penetration location.
- Socket fixings - Four pilot holes (98 mm horizontal spacing, 51 mm vertical spacing) secure the socket to the backing plate.
- Wall fixings - Two holes, positioned above and below the center, accommodate metal roofing screws to attach the plate securely to the ridge of the corrugated iron. The recess keeps the head of the screw from fouling with the back of the socket. You can also use longer metal screws through the 4x Socket back plate holes then through my backplate into the wall.
- Corrugations - The design has two plates, one for ridge and another for valley penetrations - re the electrical cabling.
- What are the yellow cylinders for? - These modifiers instruct the slicer to generate 100% solid concentric infill at their intersection with the model. Don't worry, the yellow cylinders are not physically printed. The 100% infill enhances the strength around mounting points where screws are used. While the entire plate could be printed with 100% infill, this would result in unnecessary plastic waste.
Corrugated iron is formed by rolling metal sheets through a series of rollers are designed with grooves that press the metal into the characteristic corrugated shape. The process is not mm precise particularly in the vertical and there are many factors from the manufacturing, brand, design and installation that can make changes to the height in particular. You may find you need to scale either the height, width or both - if a perfect fit is needed.
Corrugation Height Changes:
To measure the corrugation height, follow these steps:
- Place a ruler flat across the corrugations.
- Use a caliper's depth gauge to measure the distance to the base of the corrugation. Don't forget to subtract the thickness of the ruler.
- Alternatively, you can use a second ruler to measure from the underside of the top ruler to the base.
The corrugation height for this model is 16 mm. To adjust the backplate for a different height, use the scaling formula below:
Scaling Formula:
( Desired Height ÷ 16 ) x 100 = Scaling Factor percent - Deselect ‘uniform scale’ to apply only to Z.
Example Calculation:
For a desired 17 mm height:
(17 mm ÷ 16 mm) x 100 = 106.25 - Z-axis scaling

Corrugation Width Changes (pitch):
The typical (Australian) peak-to-peak distance is 76 mm (3 inches). However, this can vary slightly depending on the manufacturer and the specific profile of the corrugated sheet. You can scale X/Y by the same amount to change this.
( Desired width / 76 ) x 100 = Scaling Factor percent - Deselect ‘uniform scale’ and apply only to X (if you don't mind changes to the aspect ratio of the model) or X and Y if you want to maintain the relative dimensions.
In practice, for this model, over the distances you will be printing - 1 peak it's unlikely to be a problem.
Material Choice for Printing
PLA will work, but because metal conducts heat - and especially if the installation is outdoors - I recommend PETG‑HF for any areas exposed to direct sunlight. PLA is generally fine when the part is shaded (such as under a verandah or inside a shed), but realise prolonged heat approaching 50 C / 122 F can cause deformation.
In the Bill of Materials, I’ve selected Black and White PETG‑HF to match the colours the socket is typically sold in. Grey
Nerds note: If you think you saw some bubbles on the cover photo, well spotted. This was due to the outer layers of a roll of filament being too wet. As the moisture turns to steam this can cause bubbling. Electricians that arrive on site unannounced are reluctant to wait 5 hours for filament to dry.
License
You shall not share, sub-license, sell, rent, host, transfer, or distribute in any way the digital or 3D printed versions of this object, nor any other derivative work of this object in its digital or physical format (including - but not limited to - remixes of this object, and hosting on other digital platforms). The objects may not be used without permission in any way whatsoever in which you charge money, or collect fees.
Comment & Rating (10)