Guitar Bridge Repair Soundhole Clamp - M6 + More


Print Profile(1)

Description
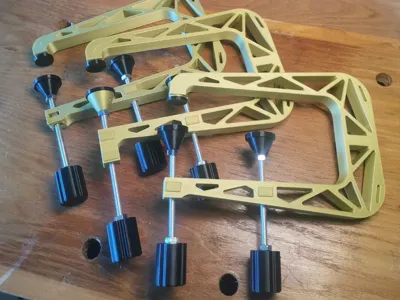
I have tested these clamps on a real bridge repair - they work as intended! The only downside is M6 thread is a lot finer than normal screw clamp threads, so it takes a fair bit of twizzling - bare that in mind if working with hide glue, for example.
A brief search led me to believe 1/4-20 was comparable to M6 - unfortunately, it is not. Baking soda and superglue worked for the nut in the body on the original model, but I had no results with the clamp end caps on M6 thread. One of the wingnut wings also broke off through the layer line. I am a big fan of captive hardware so I remade the clamp from the ground up following the trussed pattern and dimensions of the original, adding in captive hardware. It got me to figure out how to do vertical insert nuts and I am happy with the result!
Some people might be intimidated by adding captive hardware to prints - so I have broken the process down as well. I admire designs that are 100% printed but there are many cases where just adding actual hardware can improve how a tool works and how reliable it is… Especially when making a tool for real-world use.
BoM
- 11x M6 Hex Nuts
- 2 lengths M6 threaded rod (cut to 95mm and 105mm)
Instructions - Tested on Bambu Lab A1
- PLA 2 clamp pads, 2 clamp handles, 1 clamp body, 1 bridge caul, 1 brace caul
- I believe PETG will flex too much - PLA is a great choice
- Gyroid infill for clamp body (great all-rounder)
- Triangles infill for pads, handle, cauls (#1 for strength perpendicular to layer orientation)
- All at 20%
- TPU 2 clamp pad feet, 1 bridge caul foot
- I used 95A, I'm still learning TPU - don't make it too dense and avoid triangle infill as its too stiff and pointy I think
Gcode provided but for reference @ 0.2 layer height:
- Pause print at layer #45 (or just before the bridging layer that will cover the hole) to insert M6 nut into each handle
- Pause print at layer #53 (or just before the bridging layer that will cover the hole) to insert M6 nut into each clamp pad
- These are a tight fit - make sure you press the nuts in so they are below the last layer printed! You may need to use a dowel or something to press the nuts in - depends on your printer's accuracy
Add the vertical nuts to the clamp body, using the clips provided to press them in (ensure correct orientation - they should only fit in one direction), the clips should also snap in to place.
Superglue TPU pads to their corresponding parts, or add cork / foam if not using TPU
Cut your threaded M6 rod. Add a handle and then use another M6 nut and tighten this down against the handle (10mm spanner). Thread this through the clamp body, then add an M6 nut, and finally the clamp pad. Tighten the loose nut up against the pad + repeat for the next clamp arm. You are done.

Comment & Rating (7)