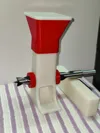
Mini Poop Shredder V3


Print Profile(3)


Bill of Materials


Description
Download my newest model here! ;) https://makerworld.com/en/models/2964414
This is V3 of my Mini Poop Shredder line!🎉 I have done a complete redesign of the past versions making this print nearly indestructible and much easier to use! This design now features…
- Compatible with all drill bits from 5mm to 20mm (¼ inch to ¾ inch)
- Indestructible design because it prints on its side. No more layer-line break
- New dovetail connecting mechanism. No glue needed!
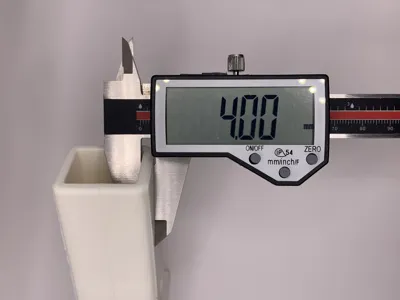
- 4mm thick chute vs. the old 1mm chute.
- New plunger type for much easier shredding.
- Assembly tool https://makerworld.com/en/models/1454668-assembly-tool-for-mini-poop-shredders#profileId-1515850
- Screw-In mount https://makerworld.com/en/models/1454669-screw-in-mount-for-mini-poop-shredder-v3#profileId-1515851
Assembly and usage guide is down below! :D ⬇️ Tip: Print in a filament 1 step up in strength from what you are shredding! (Shredding:PLA Print:PETG. Shredding:PETG: Print:ABS. Etc)
Looking for a fun, quick model to print? Please feel free to check out my newest model! It uses less than a gram of filament! https://makerworld.com/en/models/1542478-mini-spinning-top-working#profileId-1619063
Assemble guide. Scroll to the bottom for instructions on how to use it.
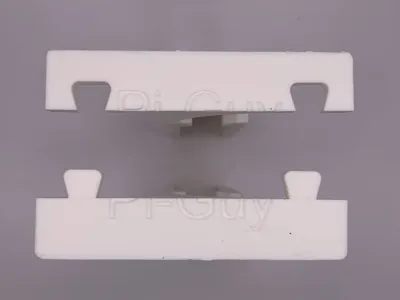
Step 1: Take the 2 main body pieces and slide them together at the dovetail joints.

Step 2: Grab the funnel and slide it on top of the two body pieces. This may be a hard fit depending on your filament. Don't be afraid to use some force!

Step 3: Using the assembly tool, https://makerworld.com/en/models/1454668-assembly-tool-for-mini-poop-shredders#profileId-1515850 hammer the bushing onto the drill bit just enough to cover up the grooves. This is essential for not letting any filament scraps escape! Also, make sure to install it in the right direction according to the pictures. If it is too loose, you can put masking tape over the drill bit to have a more snug fit.


Step 4: Slide the drill bit into the shredder body. The direction does not matter.

Step 5: Once again using the assembly tool, https://makerworld.com/en/models/1454668-assembly-tool-for-mini-poop-shredders#profileId-1515850 hammer on the other bushing making sure to be careful not to hammer it too far so that it jams up.


Step 6: Slide in the plunger and your shredder is complete! Congratulations!

Usage guide.
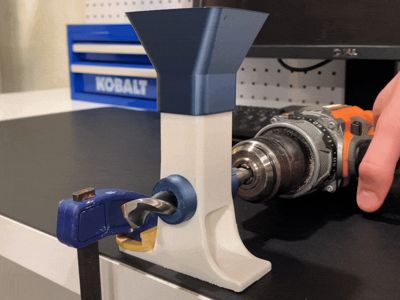
I highly recommend using my screw-in mount https://makerworld.com/en/models/1454669-screw-in-mount-for-mini-poop-shredder-v3#profileId-1515851 for this in order to have a very strong attachment for the shredder. If you don't have anywhere to screw it in, use a clamp. Put the drill bit in a drill and make absolute sure that the drill is going the right direction (clockwise) so that the sharp part of the drill bit comes in contact with the plastic. I also recommend placing the drill on the correct side so that when it jerks, the force is exerted on the ledge and not your hand.

Membership
If you’d like to support me, consider joining my Support Tier Membership! For just $3 a month, you’ll be making a huge impact on my work. Your contributions help me keep creating, improving, and innovating! 😁
No AI is used in this model. All of my models are made by me in Fusion 360.
License
You shall not share, sub-license, sell, rent, host, transfer, or distribute in any way the digital or 3D printed versions of this object, nor any other derivative work of this object in its digital or physical format (including - but not limited to - remixes of this object, and hosting on other digital platforms). The objects may not be used without permission in any way whatsoever in which you charge money, or collect fees.
Comment & Rating (448)