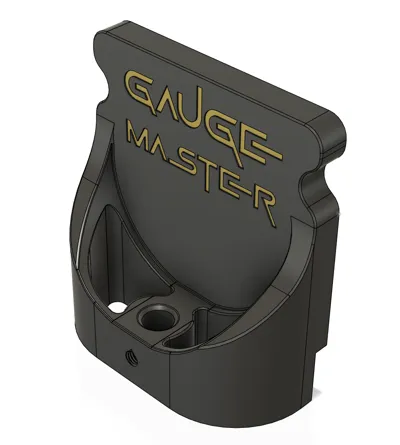
H2D Gauge Master - the perfect dial gauge holder


Print Profile(2)


Bill of Materials


- Dial gauge x 1: The dial gauge diameter of the shaft is 8mm, if you have another dial gauge with a different diameter, please contact me so I can adjust the model to fit your dial gauge.
- H2.0 hex wrench x 1: or comparable tool for loosening and adjusting the screws on the H2D print bed
Description
!GERMAN BELOW!
This is the final, refined version of thepreceding model.
Boost Me (for free)
Thank you very much
🧰 Requirements
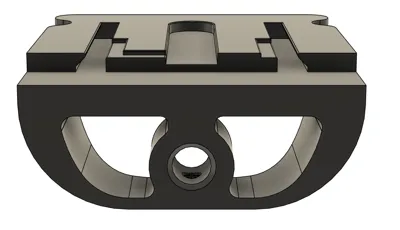
- 1× Gauge-Master (designed for the Bambu Lab H2D, compatible with the print head rail system)
- 1× Dial indicator (ideally with an 8 mm shaft diameter)
- 1× 2.0 mm hex key
- 1× M4 screw (optional)
- 1× Screwdriver (optional, for securing the M4 screw)
🔗 Please consult the Bambu Lab Wiki article beforehand to familiarize yourself with the manual bed leveling process.
⚠️ IMPORTANT:
The manual dial indicator method using the “Gauge-Master” is incompatible with the G-code guide in the Bambu Lab Wiki!
Do not use the Wiki's G-code file with this model!
The Wiki article serves solely as an introduction to fundamental bed leveling principles.
📝 Step-by-Step Guide
Manual Bed Leveling with Gauge-Master & Dial Indicator
- Remove the build plate
- Loosen the seven bed adjustment screws (do not fully remove – see Wiki)
- Power on the printer
- Perform a homing cycle to ensure proper axis referencing
- Lower the bed using the touchscreen to provide sufficient clearance for Gauge-Master installation
- Remove the print head cover
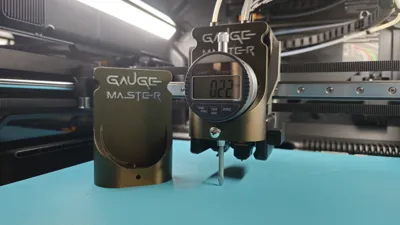
- Install the dial indicator:
- Insert the dial gauge into the “Gauge-Master”
- Slide the “Gauge-Master” onto the print head rails
- Gently raise the bed until the dial gauge tip lightly contacts the surface
- Zero the dial gauge indicator
- Restart the printer to deactivate the motors
⚠️ From this point, avoid all bed or toolhead movements via the display, app, or PC!
🔧 Manual Leveling Commences
- Manually move the print head to each of the bed's four corners
- At each position, record the dial indicator reading
- Adjust the corresponding bed screws until all readings are consistent
- Finally: Securely tighten all seven bed screws evenly to maintain the adjustments
📤 Concluding Steps
- Lower the bed
- Remove the Gauge-Master and dial indicator
- Reinstall the print head cover
- Initiate the complete calibration process (select all checkboxes) from the main menu under Calibration
-------------------------------------------------------------------------------------------------------
DEUTSCHE Beschreibung
-------------------------------------------------------------------------------------------------------
Dies ist die finale und verbesserte Version des Vorgängermodells.
Boost Me (for free)
Thank you very much
Voraussetzungen
- 1× Gauge-Master (entwickelt für den Bambu Lab H2D, passend für die Halteschienen des Druckkopfes)
- 1× Messuhr (ideal mit 8 mm Schaftdurchmesser)
- 1x Inbusschlüssel (H2.0)
- 1× M4-Schraube (optional)
- 1× Schraubendreher (optional, zum Festziehen der M4-Konterschraube)
🔗 Lesen Sie bitte vorab den Artikel im Bambu Lab Wiki, um sich mit dem manuellen Bett-Tramming vertraut zu machen.
⚠️ WICHTIG:
Die manuelle Messuhr-Methode mit dem „Gauge-Master“ funktioniert nicht mit dem im Bambu Lab Wiki hinterlegten G-Code-Guide! Verwenden Sie keinesfalls die dort bereitgestellte G-Code-Datei in Kombination mit diesem Modell!
Der Wiki-Artikel dient lediglich als Einführung in das Grundprinzip der Bett-Nivellierung.
📝 Schritt-für-Schritt-Anleitung
Manuelles Leveln mit Gauge-Master & Messuhr
- Druckplatte entfernen
- 7x Druckbettschrauben lösen (nicht komplett herausdrehen – siehe Wiki)
- Drucker einschalten
- Homing durchführen, um sicherzustellen, dass alle Achsen korrekt referenziert sind
- Druckbett absenken über das Touchdisplay, um Platz für den Einbau zu schaffen
- Abdeckung des Druckkopfs entfernen
- Messuhr einbauen
- Messuhr in den Gauge-Master einsetzen
- Gauge-Master in die Schienen des Druckkopfes führen
- Druckbett vorsichtig anheben, bis die Spitze der Messuhr berührt wird
- Messuhr auf Null stellen
- Drucker neu starten, um die Motoren zu deaktivieren
⚠️ Ab jetzt keine Bewegungen über Menü/App/PC!
🔧 Manuelle Nivellierung
- Druckkopf manuell zu allen vier Ecken des Betts führen
- An jeder Position den Messuhrwert ablesen
- Stellschrauben entsprechend justieren, bis die Werte gleichmäßig sind
- Zum Schluss: Alle 7 Schrauben am Druckbett gleichmäßig und vorsichtig anziehen, um die Position zu fixieren
📤 Nachbereitung
- Druckbett erneut absenken
- Gauge-Master und Messuhr entfernen
- Abdeckung wieder montieren
- Starte nun den vollständigen Kalibrierungsprozess (alle Haken setzen) im Hauptmenü unter Kalibrierung
⚠️ Wichtige Hinweise
Nur manuelle Bewegung nach dem Neustart und während der Nivellierung / Justierung
(Keine Steuerung über Display, App oder PC → Gefahr von ruckartigen Bewegungen und Messfehlern)
- Langsame, sanfte Bewegungen für präzise Ergebnisse
- Kompatibilität: Nur für Bambu Lab H2D und Messuhren mit 8 mm Schaft
- Sicherung: Optional kann vorne eine M4-Schraube eingesetzt werden, um die Messuhr in der Halterung zu fixieren
📌 Zusätzliche Tipps
Regelmäßige Überprüfung:
Nach Transport oder Wartung kann eine manuelle Kalibrierung nötig sein, auch bei ab Werk kalibrierten Geräten
Boost Me (for free)
Thank you very much

License
You shall not share, sub-license, sell, rent, host, transfer, or distribute in any way the digital or 3D printed versions of this object, nor any other derivative work of this object in its digital or physical format (including - but not limited to - remixes of this object, and hosting on other digital platforms). The objects may not be used without permission in any way whatsoever in which you charge money, or collect fees.
Comment & Rating (84)