9mm Ammo Box – Dispenser (6x12 Capacity)


Print Profile(2)


Bill of Materials


- Steel ball 4mm x 1:
Description
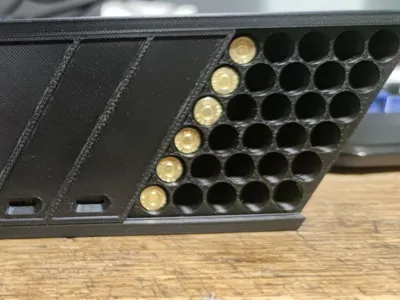
This is a highly functional ammo box for 9mm rounds, made specifically for shooting competitions like field shooting (fältskytte). The box holds a total of 72 rounds (12 rows × 6 rounds).
What makes this box unique is the indexed sliding lid that moves in both directions and clicks into place at each row. Each indexed stop exposes exactly six rounds, making it incredibly easy to pour out a full shooting series directly into your hand – perfect when you're on the clock.
Purpose-built for shooters who value speed, organization, and convenience.
I also have a model for .38 special https://makerworld.com/en/models/1487188-38-special-ammo-box-dispenser-6x12-capacity
Boost Me (for free)
Please consider boosting me, it takes alot of filament when testing and designing theese :)
🖨️ 3D-printed parts:
- Base
- Lid
- Bearing adapter
🧷 Non-printed components:
- 1× steel ball, Ø 4 mm
(Used for the detent mechanism to provide click feedback) - 1× compression spring, approx. Ø 5.55 mm × 17 mm long
(Pushes the steel ball up into the lid detents) - 1× M3x14mm hex head screw
(Locks the lid in place)
🛠️ Assembly Instructions
- Insert the spring into the spring pocket located in the center section of the box base.
- Press the steel ball into the bearing adapter.
- Place the bearing adapter on top of the spring.
- Carefully slide the lid into its tracks from either side, compressing the spring and ball assembly so it fits underneath the lid.
- Slide the lid to the center position.
- Insert an M3x14mm screw from the bottom of the box.
- Tighten the screw slowly until the lid no longer moves freely, then back it out slightly so the lid slides smoothly but stays in place.
- Test the sliding action – the lid should click firmly into place at each row, exposing six rounds per stop.
License
You shall not share, sub-license, sell, rent, host, transfer, or distribute in any way the digital or 3D printed versions of this object, nor any other derivative work of this object in its digital or physical format (including - but not limited to - remixes of this object, and hosting on other digital platforms). The objects may not be used without permission in any way whatsoever in which you charge money, or collect fees.
Comment & Rating (4)