Search models, users, collections, and posts

Dual Aux Fan for H2D (Secondary cooling system)

Print Profile(4)

All
H2D
H2D Pro
P1S
A1
X1
P1P
X1 Carbon
X1E
H2S
P2S
H2C
X2D
A2L

Original design: supportless - 2 plates
Designer
7.3 h
2 plates
5.0(3)

Alternative: single piece tilted with support
Designer
8.6 h
1 plate
5.0(1)

Lower part only (for P1/X1/A1)
Designer
2.6 h
1 plate

Correct aux position - Stabilized single piece print no glue
8.8 h
1 plate

Open in Bambu Studio
Boost
85
196
32
10
81
29
Released 

Description

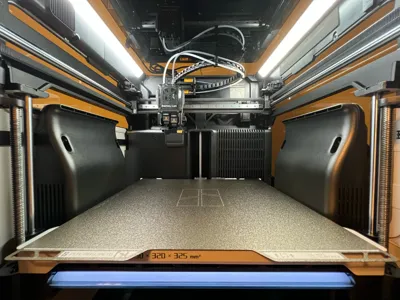
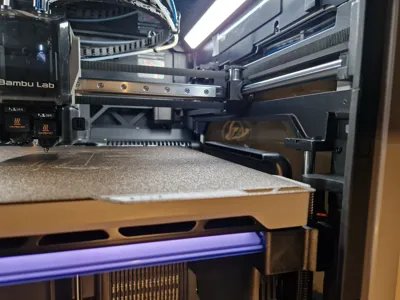
Due to the large size of the Bambu Lab H2D plate, a single fan on the side does not work efficiently over the entire surface. For this reason I introduced a second fan blowing from the opposite side in order to properly cool the right side of the plate as well. An improvement in print quality is evident.


WHAT YOU NEED:

  1. Auxiliary Part Cooling Fan for H2D 
  2. Printed parts (2 plates) - AVOID PLA OR PETG
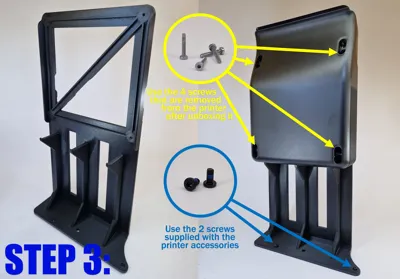
  3. x4 screws removed from printer during umboxing
  4. x2 M3x6 screws included in printer accessories
  5. Basic electrical skills
  6. Double-sided adhesive (optional)
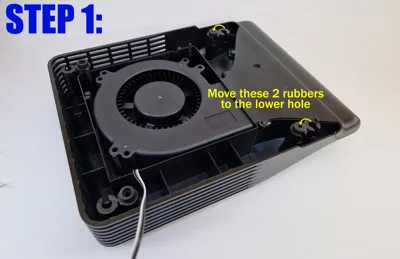
 

INSTRUCTIONS BELOW:


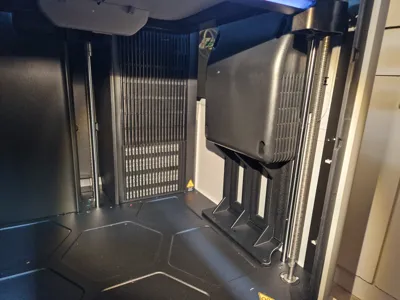
Note: To improve stability, it's suggested to use a piece of double-sided tape to fix the printed frame to the printer glass


ELECTRICAL CONNECTIONS:

  1. PROFESSIONAL WAY

    Buy some JST GH connectors and create the following Y-connector:

  2. BRUTAL WAY:

    Cut the fan cable and connect the individual wires in parallel to the original fan cable respecting the colours.

CABLE MANAGEMENT:

  1. Pass the cable in the back panel as show below:


  2. Open printer's back panel and pull the cable. Organize the cable using the original locks until the printer's motherboard


  3. Connect as previously shown. Aux fan connector on the motherboard is the following:


THE DESIGNER OF THIS PROJECT DOES NOT TAKE ANY RESPONSIBILITY IN CASE OF ELECTRICAL DAMAGES


Boost Me (for free)

Please, support my work if you like it!

Comment & Rating (32)

(0/1000)

Thanks! Working well for me. I printed mine in PAHT-CF. Glued the two parts with epoxy. I wired my own splitter so I didn't have to modify any original parts. I got my JST connectors from Amazon (20Pairs Micro JST GH 4Pin 1.25mm Male Female Connector, GH1.25 Terminal Connector Wire Cable 15cm 28AWG / https://www.amazon.com/dp/B0C2ZNY92M?ref=ppx_yo2ov_dt_b_fed_asin_title&;th=1). Be warned, soldering wires to the female connectors is tedious and challenging, so get pre-wired ones if you can. I used 26AWG 4-conductor cable for the long run from the second fan to the back of the printer (https://www.amazon.com/dp/B08XBJTGLJ?ref=ppx_yo2ov_dt_b_fed_asin_title). It was easy to shove into the existing cable organizers. My secondary fan receives only a PWM signal from the main board. It gets its power directly from the main power supply (+V and -V). The TACH wire for the second fan is unused, as it is unnecessary.
The designer has replied
designer
2
Reply
Nice work! Exactly what I've done. Thanks for sharing
1
Reply
which is the tach wire?
0
Reply
Replying to @Levaxx :
1
Reply
Hi, nice design. Why to glue the parts and not just print at once?
The designer has replied
1
Reply
The original idea was to make just one single part, but it's too big for the builtplate unfortunatly
1
Reply
Replying to @nyx_nk :
Hi, don't know your name. Thanks for the hint, did not have that issue on my mind. Are you able to give me the file when both parts are at once, I want to try to print with support, then it would fit. I hate glued products :-D Thanks Oli
1
Reply
Replying to @Olli :
It doesn't make much sense to me. With just a few drops of glue (or adhesive tape) you have a supportless print. Tilting it to fit everything into a single plate consumes a lot more material for the supports. But if you prefer it that way, I upload a profile with one piece. You can download it
1
Reply
Printed with Bambu ASA-CF and it came looking like it was straight from the factory! The model was made very well, with fillets added in just the right places to reduce and eliminate benchy hull lines. I'm waiting on the JST connectors before putting everything together and installing it though.
designer
1
Reply
For electrical connection, it's probably wiser to make a splitter instead of just splicing them together. Two way splitter where new fan connection gets power directly from the 24v psu and only the pwm signal from the board. The new fans tach does NOT need to be connected, which can lead to odd fan speed changes. You can look here https://makerworld.com/en/models/23658-bambu-lab-p1-x1-dual-aux-fan-bentobox-7-28-updated#profileId-45932 for how the splitter can be made (again, do not connect the tech wire that the diagram shows for the new fan). Connector appears to be a jst gh 1.25mm
(Edited)
designer
2
Reply
Great idea and design. Any chance you might shed more light on the way to connect it electrically? I've checked Bambu "replace aux fan" manual and it is like taking half of the printer apart. Thanks.
The designer has replied
0
Reply
Just remove the back panel and move the cable there
0
Reply
Boosted
This is exactly what I was looking for! I just printed some light diffusers out of transparent PETG in spiral vase mode, and since I'm impatient, I tried to print with "slow down printing for better part cooling". Mistake! The entire right side of the object came out looking like it had been in a fire. It was immediately obvious that the aux fan only properly cools items from the left side, and the right side of your print is going to overheat. "Second fan" I thought: Sure enough, someone (you) with more skill and time than me has already figured out the problem and created a PERFECT solution! Thank you again.
0
Reply
is this mod also compatible with the H2S
Show original
0
Reply
This looks like a good upgrade.
0
Reply
Love the wiring set up, thx! Has anyone tried using this same wiring setup for a auxiliary / second exhaust fan? Looking at installing a second HEPA 14 w/charcoal filter but that level of restriction requires an extra fan...I was planning on adding manually controlled extra fan, but I'd love the idea of just having a second stock fan that is mirroring the factory installed fan.
0
Reply
name of the fork wires?? cant find any
0
Reply

License

This user content is licensed under a Standard Digital File License.

You shall not share, sub-license, sell, rent, host, transfer, or distribute in any way the digital or 3D printed versions of this object, nor any other derivative work of this object in its digital or physical format (including - but not limited to - remixes of this object, and hosting on other digital platforms). The objects may not be used without permission in any way whatsoever in which you charge money, or collect fees.