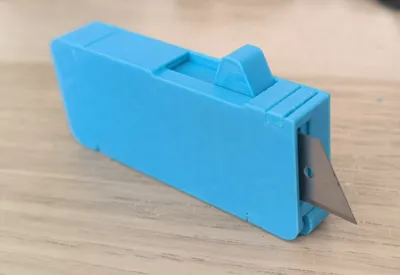
OTF double action utility knife - fully 3D printed


Print Profile(1)

Description
A functional out-the-front (OTF) style knife designed entirely for 3D printing. It features an internal spring-loaded blade mechanism. No glue or screws are required for assembly.
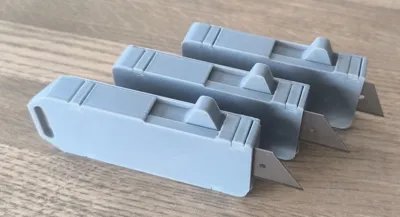
Three versions of the knife are available:
One for 50×19 mm utility blades
One for 60×19 mm blades with a lanyard hole
One for 60×19 mm blades without a lanyard hole
Each version is tailored to its specific blade size and design. However, the assembly process is identical for all models.
A guide wheel beneath the blade provides optional support for smoother sliding. For proper assembly, please follow the instructions provided below.
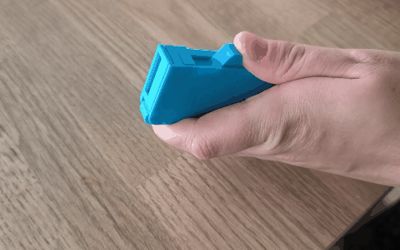
Note: It should be printed on a smooth build plate – this is essential for the internal mechanism to function reliably. If an impact occurs during blade deployment (e.g. the palm), the blade will automatically disengage to prevent injury. If the blade disengages, simply pull it out slightly until it locks back into place. The knife will then function normally again.
An ideal and fun tool for opening packages or boxes.
Assembly instructions:

Inserting the Blade
Insert the utility blade between the blade holder and the blade guide as shown in the illustration.
Make sure the locking notches of the blade fit precisely into the guide slots.
Select the model based on the length of the trapezoidal blade – 50 mm or 60 mm, with a height of 19 mm.
The blade must have a notch on the top side to lock into the holder.

Inserting the Assembly into the Slider
Insert the assembled blade holder and guide into the slider body as shown.
Ensure the correct orientation – the cutting edge must face forward.
Then insert the spring into the slider groove to secure the internal assembly in place.
Apply a small amount of grease along the inside of the guide edge (see red arrows).
This will help the mechanism move more smoothly until it has fully worn in.

Placing the Assembly into the Housing
Insert the entire assembled unit (blade, holder, spring, and slider) into the main housing.
Make sure the guiding rails align correctly and that the parts move smoothly inside the housing.
The orientation must match the illustration – the blade should point forward inside the housing.

Inserting the Lock and the Wheel
Insert the lock and the guide wheel into their corresponding positions inside the housing.
Make sure both components are correctly oriented and snap securely into place.
These components interact with the internal mechanism and must move freely without obstruction.

Closing the Housing – Installing the Cap
The last and most delicate step is attaching the cap to the housing.
The cap is held in place by four snap-fit tabs located at the corners. These tabs are beveled only on the bottom side, which makes the cap easier to remove, but more difficult to install.
To install the cap:
- Align it carefully with the housing.
- It is recommended to place the knife flat on a table during this step, to keep internal parts in position. Otherwise, the internal latch may become dislodged, and the cap will not fit properly.
- Use a small tool (e.g. a flathead screwdriver or similar) to gently flex the tabs outward as you press the cap into place.
- Once fully seated, release the tabs. The assembly will lock together securely.
The cap may need to be removed later for blade replacement. To do so, use the same tool to gently lift the locking tabs.
License
You shall not share, sub-license, sell, rent, host, transfer, or distribute in any way the digital or 3D printed versions of this object, nor any other derivative work of this object in its digital or physical format (including - but not limited to - remixes of this object, and hosting on other digital platforms). The objects may not be used without permission in any way whatsoever in which you charge money, or collect fees.
Comment & Rating (5)