Search models, users, collections, and posts

Nintendo Switch Steering Wheel

Print Profile(1)

All
A1
H2C
X1E
H2S
X1
X2D
H2D Pro
X1 Carbon
H2D
P2S
A1 mini
P1S
P1P
A2L

0.2mm layer, 2 walls, 15% infill
Designer
1.4 h
1 plate
4.7(19)

Open in Bambu Studio
Boost
318
456
123
15
364
236
Released 

Bill of Materials

Maker's Supply Kits and Parts
Select all
608ZZ (2PCS) - EA027

Description

PLEASE READ ME !!!


Firstly I would like to say quick thank you for checking out my model, so thank you!

Please note most of my models are made in Nomad Sculpt by hand and are my own renditions (Fan Art) unless stated otherwise.


Model info: 

Summary

READ!!!


DONT FOGET THE 608 Bearing


NOTE: it has come to my attention someone stole this file and has uploaded it as their own here is the linke from 2021 when i created and upladed the file to thingiverse https://www.thingiverse.com/thing:4965126


So this is a remix of the very well known steering wheel for the Xbox and Playstation by Pixel2 go check his designs out!! https://www.thingiverse.com/thing:3049220


So Basically I became infatuated by this device, I printed several out for various xbox pads and my brother etc, A week or so ago I stumbled on a rally game for my Nintendo switch, which got me thinking I wonder if there is a wheel for the switch... Butttttt as its hand held most people just use it as is and I couldn't see one. The switch itself is quite wide and obviously no room for a wheel on the screen, I hated the idea of the ones you put the joy cons in to so it got my brain ticking.... Theeeen I had a light bulb go off, I remembered the controller mount the switch comes with for use with the TV, so my journey began.

Firstly I Created the Mount for the switch screen to Mount it on the controller which was not as easy as I thought, This Will also available in my designs Soon I will add the link when I get chance as I am uploading this first.

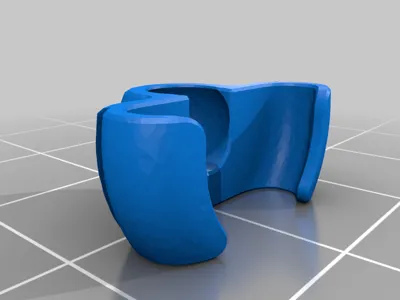
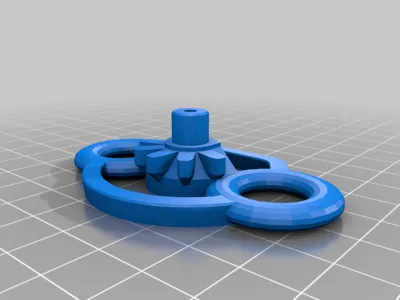
Secondly I Loved his designs so much but I just wanted a few little changes and an addition for a better immersive experience and I think I found the perfect addition (the gear stick) I altered his wheel and made the outer circles (thumb bits) more of a donut shape for comfort as I found the originals start to rub, I also changed the the size of his thumb stick mount to fit the switch, and I took the bearing fitting and added it to a custom frame I designed (many failed attempts).

I finally settled on this design and fitting it all fits very snug please enjoy this print and think of the countless Failures and hard work I put in before you beast me for something you don't like and instead if there are any issues please comment and if you have any suggestions I would love to get feedback .

Print Settings

Printer Brand: 

Creality


Printer:                      

Ender 3


Rafts: 

No


Supports:                      

Yes


Resolution: 

.16 - .22


Infill:                      

30% min I would say


Filament: Esun PLA Silk
Green                    
                        

Notes:                     

you can print it as a complete with supports but for best quality print separately because only the frame and gear shifter require supports, the one in the photos is a mix of both seperate and complete print as some minor adjustments were made surrounding the 608 bearing in the last build (an idea of the quality) 

I printed this at 210 witch bed temp 65 and a skirt with supports set at 10% density. 0.4m distance print speed 55 and .22 layer height takes around 2-3 hours depending on setting for the complete set

Post-Printing

Requires 608 Bearing

Boost Me (for free)

Please like, share, follow and BOOST, doing this allows creators such as myself to keep on making, Designing 3D models not only takes a substantial amount of time but also takes lots of material when test printing and causes extra wear and tear on our machines. BOOSTS are FREE and may not mean much to you but to us they are valuable and realy do help, so if you can please do :)

TIPS


  • Print using most types of PLA for best results.

  • Always allow build plate and print to cool down before removing.

  • Please ensure a clean print bed, when models dont adhere to a build plate its usually user error.

  • Please as always remove  supports with care

  • Use sprue cutters to help remove supports

  • If you accidentaly break something save fillament and use some CA glue instead of throwing a project out and reprinting.

  • Remember this is a hobby! Have fun, be kind and support your favourite designers with likes, follows and boosts

  • Once again thank you for taking the time to view and hopefully print this model.


Additional info:


Any BOMs (non printable parts/ bills of material) will be attatched below.


Thank you for viewing my model :)

Comment & Rating (123)

(0/1000)

Pinned by Designer
Check it out in action here! https://youtu.be/1P8LBiVM35k?feature=shared If you dont have a bearing check out this one it should work well https://makerworld.com/models/407405
(Edited)
The designer has replied
0
Reply
what game is that you are playing in the video? i would like to know and maybe play it, and is it free??
0
Reply
Replying to @Adrian08 :
The game is Rush Rally, I think it's only a couple of pounds like £3.99 or something, it was not very expensive at all.
1
Reply
Replying to @Munchylad101 :
ok thank you!!!!! that steering wheel works perfectly!!!!!!
designer
1
Reply
Print Profile
0.2mm layer, 2 walls, 15% infill
I am giving 4 stars for now. Some parts do not fit. I put a screw to hold the steering wheel and the bearing, and I bent the rod that moves the left steering analog stick
(Edited)
The profile uploader has replied
Show original
profile
1
Reply
all of the required components were listed in the description, leaving a bad rating because you didn't read the description is not exactly fair, also if parts are printing out bent that is a user error not a profile error most likeley caused by a draught, this profile has been tried and tested by many users and by my self and works flawlessly, please refrain from leaving bad ratings down to user error, the rating has been reported.
0
Reply
I apologize for the 3 stars, maybe I will try to reprint. But the fact is that the print came out perfect, but 1 piece did not fit and I had to bend it a bit. Regarding the bearing, I used a steel one and to avoid gluing it, I simply secured it with a screw from underneath. My review was only for the steering rod which I modified by bending it a bit to the right to keep the steering straight. For now I am correcting the stars and giving 4, in the meantime I will try everything again. In the photo, the piece that doesn't fit. I bent it where I made the red mark. I am sorry again for the 3 stars. I understand the work behind a project
(Edited)
Show original
0
Reply
Replying to @user_428101283 :
Thanks for the update, I have no idea why the steering rod did not fit I have never known this to be an issue with anyone including myself, did you use my profile or make your own adjustments? I appreciate constructive feedback and didn't mean to come across harsh, I get alot of ratings that people either havnt read the description and complain about missing parts or they mess things up there side like bed adhesion and blame the profile, it is quite frustrating at times. what printer are you using?
0
Reply
How about an instruction manual mate! Also where is the middle but which holds it all together. Really do not recommend to print. How are you meant to connect the main wheel!
(Edited)
The designer has replied
designer
2
Reply
if you used my profile it's all there. assembly is pretty simple but if I get time I'll do a step by step in the picture you sent this is exactly how it is assembled the "middle" bit is a 608 bearing as stated in the description 🙂 they are common bearings used in fidget spinners and skate board wheels. The photo you provided shows the print is successful and printed well I don't understand your frustration. that said I am sorry you are having trouble.
(Edited)
0
Reply
if you do not have a bearing available there are plenty on here to print as a temporary measure l.
0
Reply
Print Profile
0.2mm layer, 2 walls, 15% infill
works well with printed bearing
The profile uploader has replied
profile
3
Reply
Thank you for the rating hope you enjoy the wheel :)
0
Reply
which printed bearing did you use
(Edited)
profile
2
Reply
Replying to @swimdog14 :
this one https: https://makerworld.com/models/495515 but the same designer has even better one
(Edited)
profile
3
Reply
Print Profile
0.2mm layer, 2 walls, 15% infill
dosnt work to well with a printed bearing plan to try a metal bearing soon. parts printed and fit together good
(Edited)
The profile uploader has replied
profile
2
Reply
That is because you have used a 3D printed bearing, there is too much play in them causing your issue (flexing wheel), if you use a real bearing you can drive 1 handed fine. Sorry you had a bad experience 😔
(Edited)
0
Reply
You can add some CA glue in the middle if the bearing which may help with the play in the wheel, though I'm not 100% sure as never used a plastic bearing myself, Metal bearings are solid and won't move up and down they will only rotate keeping the wheel in a fixed position :)
(Edited)
0
Reply
Replying to @Munchylad101 :
Ok thanks for explaining! I'll try it with a metal bearing.
(Edited)
profile
1
Reply
works well
The designer has replied
1
Reply
Thank you so much for the boost, when I get some spare time I'll have a look at making a round wheel for you. are you thinking like a Momo type wheel?
0
Reply
Replying to @Munchylad101 :
momo wheel it is!
0
Reply
hey sorry I haven't had chance to make the circle wheel yet however I have seen this momo wheel which I think will fit https://makerworld.com/models/1113428
0
Reply
I used a 3d printed bearing and works great, the rack that turns the joystick is angled down if not using an extension on the joystick but does not affect the steering. great model!
(Edited)
The designer has replied
1
Reply
hope you enjoy it, It just adds a little bit of extra fun, I used mine all the time when I had my switch
0
Reply
make one for the switch 2!!!!!!
The designer has replied
1
Reply
I don't own one so can't do the measurements and testing required!
0
Reply
Replying to @Munchylad101 :
I KNOW BUT I WANT ONE SO BAD DO YOU KNOW SOMEONE WHO COULD MAKE A MODEL FOR ME OR HAS THE MODEL
0
Reply
Replying to @user_4101986899 :
If I can find the measurements I could try but like I say without the actual console to test on it would be difficult, also I don't know anyone who owns one either sorry
0
Reply
Print Profile
0.2mm layer, 2 walls, 15% infill
The gear rack is not properly alined. I love the concept tho
The profile uploader has replied
profile
1
Reply
Thanks for the great rating:) if you dont mind me asking, which switch are you using? this model was designed for the original switch V2 not the LED one and from all the feedback I have had the gear rack fits perfect on V2, however I have had one other person whith this issue and it appears to be that he had a newer switch (The LED) so it could be that they have altered something on the Joy cons. if it is that you have a newer switch could you tell me if the gear rack is too long or too short please and an appoximate guess how much its out by? as I would like to add an option for the newer model switch but don't own one so I can't see what needs adjusting. again thank for the fantastic rating and even more the feedback :)
(Edited)
0
Reply
Replying to @Munchylad101 :
i am using the OLED one which probably explains it
0
Reply
Replying to @Roosprints :
ahh OK yes this must be the case, can you explain if it is too short or too long at all? this way I can add the track to fit the LED model too :)
0
Reply
why does yours say it came out after the other one?
The designer has replied
1
Reply
its because I only recently got a bambu A1 and only just linked my account only to find my design had been stole check out my original link
0
Reply
Is that the exact size?
The designer has replied
designer
1
Reply
yes it's for original switch and switch V2 not led but some people have managed to get it to work with led by warming up the track/gear part and bending out slightly. this is made ready to print and clip on to the controller that comes with the switch. don't forget you need a 608 bearing either but one or print and alternative :) hope this helps
0
Reply
Replying to @Munchylad101 :
Tysm
designer
1
Reply
Replying to @Munchylad101 :
Thank you. I’m going to do a 4th attempt with more density because my last one broke instantly. Does this work with PLA?
designer
1
Reply

License

This user content is licensed under a Standard Digital File License.

You shall not share, sub-license, sell, rent, host, transfer, or distribute in any way the digital or 3D printed versions of this object, nor any other derivative work of this object in its digital or physical format (including - but not limited to - remixes of this object, and hosting on other digital platforms). The objects may not be used without permission in any way whatsoever in which you charge money, or collect fees.