Starlight 4S


Print Profile(2)


Description
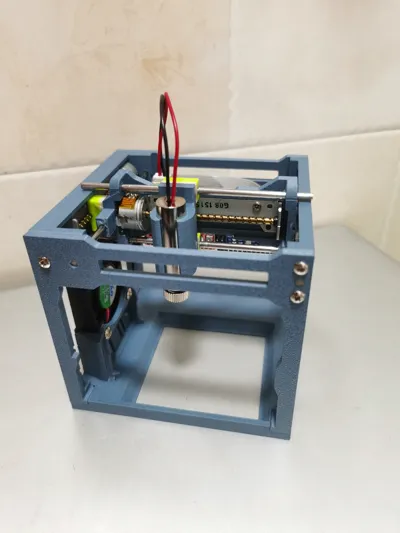
Open Source Starlight Series Mini Laser Engraver - Starlight 4S
Note: Not compatible with Starlight 4 and 4PRO models, and the circuit boards are not interchangeable. This is because the motors from the previously open-sourced Starlight 2, 4, and 4PRO were taken by others, making it impossible for many who wanted to replicate them. Therefore, a new version designed for a new motor model has been released. To maintain aesthetics and ease of assembly, new models and matching circuit boards have been designed to allow more people to replicate the mini laser engraver and experience the joy of DIY. This remains a low-cost solution
Boost Me (for free)
Thank you for your support
Model print files are open source. Apart from the 3D printed model, all related open-source materials are available on the Lichee Open Source Hardware Platform. Circuit boards can be prototyped for free at Jialichuang. Create a beautiful mini laser engraver yourself for a low cost of 80 yuan
Disclaimer: (Starlight 4S is my last completely free open-source project. No charge will be made for any materials or solutions. For subsequent projects, a small fee of a few yuan will be charged per set of materials. This decision was carefully considered, as the time and effort invested in the design phase, subsequent maintenance and updates, and the development of future projects all require some modest financial support. I believe charging a few yuan for some future materials is not excessive. I recall spending over two hundred yuan on materials alone and reviewing extensive documentation when I first started researching how to make a mini laser engraver. Now, after multiple iterations and updates, I have designed a solution to create an exquisite laser engraver for just tens of yuan. A few yuan for materials can help you avoid many detours and save a lot of unnecessary expense. I hope the effort and dedication put into this can be understood by everyone. Thank you! Subsequent material solutions and some kits will be available in my Bilibili workshop: 流浪的星星-dy and my Xianyu account: 流浪的星星. To avoid impersonation, please note that I am the one with more followers. This is my original design, and commercial use without permission is prohibited)
Assembly videos are uploaded on both Douyin and Bilibili. It is recommended to watch on Douyin for higher content density. Douyin username: 流浪的星星; Bilibili username: 流浪的星星-dy
Douyin link for assembly video: https://v.douyin.com/E-t43AS1d24/
Douyin link for videos on flashing firmware, focusing, and basic software usage: https://v.douyin.com/EQQOf4cCma0/
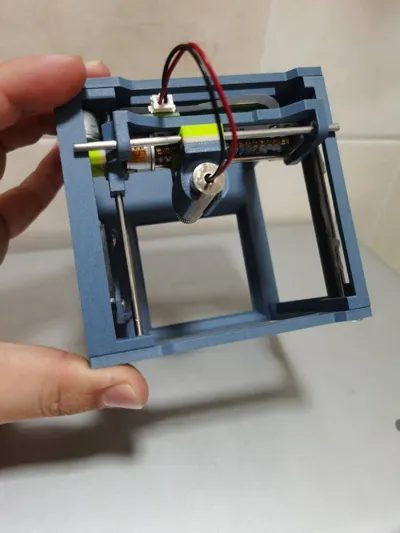
Model printing parameters: Layer height below 0.15mm is recommended. Slow down the printing speed. Common materials like PETG and PLA are suitable. I usually use PETG for printing due to its better toughness. Other parts can be printed with your usual settings (0.2mm layer, 3 walls, 15% infill, 3 top/bottom layers). A hollowed-out laser head version has been added for better heat dissipation. Choose based on your needs
The holes in the sliders for the optical shafts need to have internal burrs removed. It is recommended to ream them with a 3.1mm twist drill bit to ensure a smooth finish
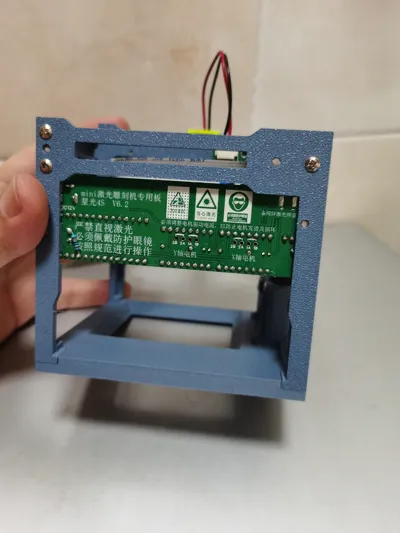
I will provide an accurate list of components. Everyone can also explore the circuit principles on their own; they are intuitive and simple (you can also directly choose a pre-made main board; detailed solutions refer to the Lichee Open Source Hardware Platform. MakerWorld only publishes open-source model files)
Regarding the component list for the circuit board, since some components were not found in the component library, the BOM is inaccurate. I will provide an accurate component list. Everyone can also explore the circuit principles on their own; they are intuitive and simple. A detailed list is uploaded as an attachment
1. PCB prototyping, one large board
2. PCB prototyping, one small adapter board. FR4 double-layer. For other options, just choose the free ones. A file with two boards combined has been uploaded; it can be printed on one sheet, but check if the PCB manufacturer's rules allow it. This is up to your understanding
3. FPC connectors: 4-pin 1mm, for bottom flip cover, quantity 1; 4-pin 1mm, for top drawer, quantity 1; 6-pin 1mm, for bottom flip cover, quantity 2
4. XH2.54 terminal blocks: 2-pin SMD horizontal mount, quantity 1; 2-pin plug-in bent pin, quantity 1
5. 2.54mm straight female header 1*8P × 4, 2.54mm straight female header 1*15P × 2 (about 0.1 yuan each)
6. Through-hole electrolytic capacitors: 16V 100uF 5*7mm × 2 (a few cents each), 16V 470uF 8*12mm × 1
7. DC female jack 5.5*2.1 pure copper × 1 (a little over 0.1 yuan each)
8. 1/4W plug-in resistors: 47Ω one, 100K two (unit price 0.01 each, but usually sold as 100 for 1 yuan)
9. N-channel switching MOSFET model IRFZ44N × 1, TO220 package (0.4-0.5 yuan each)
10. Three-terminal regulator model L7805 × 1, TO263 package (0.5 yuan each)
The above are all the components required for the main board, costing around 3 yuan
IV. The following are other parts required to assemble the mini laser engraver
1. Arduino Nano development board × 1, Atmega328P chip (9-12 yuan each, free shipping)
2. A4988 stepper motor driver × 2, unit price 3-3.5 yuan each, two cost 7 yuan. You can buy an extra one as a spare, as some drivers may be non-functional upon arrival (you can buy related electronic components from one supplier to save on shipping costs. Wholesale components usually have lower unit prices but do not include shipping. This will not be elaborated on below)
3. Data cable, about 0.5 yuan each. Some development boards are sold with data cables, decide for yourself
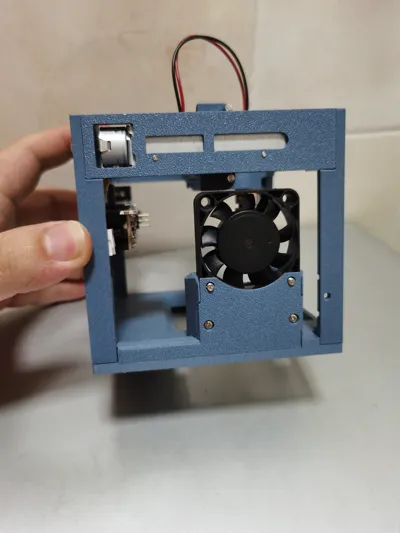
4. 4010 cooling fan, any 12V silent fan will do
5. Motor cable: FPC flat flexible cable, 1mm pitch - 6P, reverse, 15cm long
6. One set of printed frame (STL model files uploaded. Those with a printer can print it themselves; material cost is a few yuan. Those without a printer can refer to my handmade version tutorial, or contact me for the frame, complete loose parts, and finished products. PS: A humble source of income for crafters)
7. Matching screws - Starlight 4S matching screws: M2*4 six pieces, M2*6 two pieces, M2.5*8 ten pieces, M2.5*10 four pieces, M3*6 two pieces, M3*14 two pieces, M3 nuts two pieces (worth a few mao)
8. Miniature stepper motors × 2, 58mm long lead screw, 3mm pitch. Many dismantling factories on Xianyu sell them for about 2 yuan each, but none include shipping. They are disassembled from Samsung computer optical drives. You can find many by directly searching for "Starlight 4S matching motor" (no affiliation!). Currently, there are listings for 3 for 12 yuan including shipping. Discuss details yourself
9. Stainless steel optical shafts, 3mm diameter, 10cm long. 50 pieces can be bought for 7 yuan, but only 4 are needed for one assembly. I stock kits long-term, so I buy in bulk. You can also look for retailers
10. Grease (butter-like substances might work too, but I use 3D printer grease. Perhaps other lubricants would also work, it won't be smooth without lubrication)
11. 12V 2A power supply (around 5 yuan each). The power input port should be 5.5*2.1 or 2.5 to match the DC female port on the main board. Using 2A is a consideration for inaccurate power ratings; if accurate, 0.5A would be sufficient
12. Laser head 5V 250mW, 12mm diameter (around 26 yuan each including shipping. TB, Sanwu Electronics has 5V heads. No affiliation, just for convenience)
13. Laser safety goggles (buying one separately costs about 3 yuan. Buying in bulk makes them about 1 yuan each. Search for dark green welding glasses. Darker color is recommended for better protection. You can find them on PDD for 2-3 yuan with free shipping. Do not buy them with the laser head, as the glasses they provide are not good)
All materials included, the total cost for replicating a complete set is approximately 80 yuan. The software is also open source, and all materials are shared for free, with no other paid content
Due to platform requirements, I can no longer provide a QQ chat group, as it is considered traffic diversion. Please follow video platform accounts for tutorials instead!
It is recommended to download the model from MakerWorld so I can earn some points, haha, feels like begging t.t
Here's about my kits: Tutorials are recorded for free, software is open source, and materials are shared without charge, with no other paid content. I recommend everyone to DIY, it's more cost-effective and more fun
My Xianyu username is: 流浪的星星, and my avatar is  . My Douyin and Bilibili avatars are also the same. To prevent impersonation, please note that I am the one with more followers. I have kits for some of my designs there (e.g., Polaris Mini 2, Starlight series). Considering that many parts are fragmented, I can also provide some parts kits if needed later. No more explanation, this is just a crafter's humble way of survival...
Open-source content, if there are any omissions, please contact me for corrections. Thanks a lot
Update log:
- May 21, 2025, updated to version 250521 ---- enhanced the strength of the hollow chuck; optimized the clearance for the circuit board installation position, and also designed a 4S dedicated circuit board soldering auxiliary mold to assist in soldering plug-in components, found in another project: https://makerworld.com.cn/zh/models/1248619-xing-guang-4sdian-lu-ban-han-jie-fu-zhu-mo-ju#profileId-1333452
- June 8, 2025, modified the fitting clearance for the open-source circuit board installation position. This was due to the addition of an EN pin pull-up resistor on a later version of the circuit board. I changed the position of a large capacitor, overlooking the impact this would have, which led to model interference in this area. The model fitting clearance has been optimized. For already printed models, you can trim the model or the solder joints on the back of the circuit board to install the circuit board. My apologies!
License
You shall not share, sub-license, sell, rent, host, transfer, or distribute in any way the digital or 3D printed versions of this object, nor any other derivative work of this object in its digital or physical format (including - but not limited to - remixes of this object, and hosting on other digital platforms). The objects may not be used without permission in any way whatsoever in which you charge money, or collect fees.
Comment & Rating (6)