Search models, users, collections, and posts

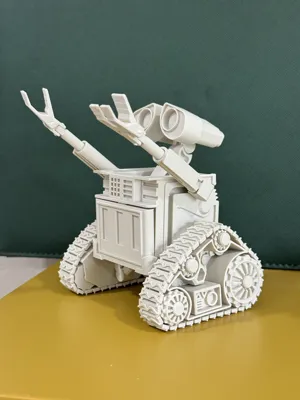
Wall-E Articulating Model

Print Profile(5)

All
A1 mini
H2D
P1P
P1S
X1E
X1 Carbon
A1
X1
H2D Pro
H2S
P2S
H2C
X2D
A2L

0.16mm layer, 2 walls, 25% infill
Designer
12.5 h
3 plates
4.5(109)

0.16mm layer, 2 walls, 15% infill
14 min
1 plate
4.7(14)

0.16mm layer, 2 walls, 25% infill
12.8 h
5 plates
4.0(5)

0.16mm layer, 2 walls, 95% infill
1.3 h
1 plate
5.0(1)
Click to see more

Open in Bambu Studio
Boost
3739
8658
212
190
4.8 k
1.2 k
Released 

Description

Articulating model of Wall-E Robot.

Has range of motion for - Eyes, Neck, Arms, Legs , tracks etc.


The joints are primarily for posing, and not meant to be functional at this point.

Designed in Blender for now, plan on doing this in Fusion in the future to improve articulation further.


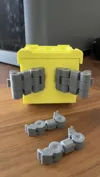
Assembly instructions:

  • Requires one 3mm nut to hold the eyes.
  • Will need glue to reinforce connectors for Legs/Torso, and also to cap the gears in leg assembly.
  • Hands are hinged using extra pieces of filament itself.
  • Tracks would need to be looped, connected, and then glued on to the gears.
  • Neck should fit into the Torso with a bit of a force

Comment & Rating (212)

(0/1000)

Boosted
I love this wall-e
The designer has replied
designer
37
Reply
Thank you so much for printing. Great job with the coloring. Love the attention to detail, with the eyes, rust etc.
2
Reply
How was this color achieved
Show original
0
Reply
Replying to @user_581780980 :
i think he painted it
0
Reply
Boosted
Superb. Thank you
The designer has replied
Show original
designer
20
Reply
Great job with the coloring. nice to see that you also designed accessories, as well as the plant. hope it fits inside its storage , compacted chamber. :-)
4
Reply
Simply perfect For information on track assembly, remove two links to avoid gluing them And perhaps I missed something, but consider a neck mount to the body Thank you again and keep up the great work
The designer has replied
Show original
designer
12
Reply
Thank you so much for the compliment, and also the feedback. I added two extra chain links, just in case… They can be removed as you mentioned. I wanted to have the gears, and chain-link, hands more functional, but will need a different approach, I will consider redesigning in a CAD software.
1
Reply
Thank you comment section, very helpful tips and files to complete this one.
11
Reply
The original designer likely did not complete this design, primarily lacking a connecting structure between the neck and torso. I designed a connecting piece, which has been uploaded; you can print it separately if needed. Wall-E’s two forearms repeatedly failed to print correctly, resulting in a spaghetti-like mess; I finally resolved this by printing them individually and upright. Two segments need to be removed from the treads to fit perfectly onto the wheels—no glue required. I used screws as the joint axles, with good results. Finally, the connection between the torso and the wheels feels rather fragile; I wonder if it could be made sturdier
Show original
6
Reply
hi I can’t see your neck piece anywhere?
0
Reply
Replying to @user_2746483784 :
This model's third print profile is
Show original
1
Reply
Replying to @Hume_Hu :
I see the print configuration, but I can't download it. When I click on STL/CAD, I only get the 3mf file
Show original
0
Reply
Boosted
Print Profile
0.16mm layer, 2 walls, 25% infill
He looks fantastic! Made the tracks out of TPU. Not the easiest print, but final product came out great.
8
Reply
It turned out really cool! Thank you!
Show original
4
Reply
where did u get the stl file for shoe plant . can u share it . did u make it urself or is it part of this file
2
Reply
Replying to @user_544883543 :
I think its with the "desk buddy" version
(Edited)
0
Reply
turned out great will use it as a business card holder
4
Reply
Print Profile
0.16mm layer, 2 walls, 25% infill
neck needs something to attach to body. over all cool print i used glue to keep things together the belts are maybe a link or 2 too long
The profile uploader has replied
1
Reply
Thanks for printing. The neck should snap into the body with some force, and then hold. Will add to the setup instructions. Agree, the belt is perhaps 1-2 links too long.. I was being cautious, as the blender model did not give me an accurate path size calculation.. And it's easy to remove a few links. (just as we do with watch straps) :-)
(Edited)
1
Reply
Replying to @sumeetsaxena :
thx great print. I want to print a bigger one.
0
Reply
I didn't know how to attach the neck in the same way either, so I was reading the comments.
Show original
0
Reply
Print Profile
0.16mm layer, 2 walls, 25% infill
I added brims to the parts to help with plate attachment and everything printed perfectly! definitely took some effort to put together but absolute worth it :)
0
Reply
how did you achieve the weathered look
0
Reply
Replying to @JohnsonEJ27 :
I used a dry brush and some brown acrylic paint( I added some orange to it) and lightly dabbed and swiped it on and smudged with my finger before it fully dried. I also used a ton of different browns, oranges and yellows to get the old looking look. the trick is to use less paint than you think you need and a really old ratty brush for it
(Edited)
1
Reply
Replying to @Sully_303 :
Wow, thank you for the directions! I've asked other people questions like this and they just said "I used brown paint"
0
Reply

License

This user content is licensed under a Standard Digital File License.

You shall not share, sub-license, sell, rent, host, transfer, or distribute in any way the digital or 3D printed versions of this object, nor any other derivative work of this object in its digital or physical format (including - but not limited to - remixes of this object, and hosting on other digital platforms). The objects may not be used without permission in any way whatsoever in which you charge money, or collect fees.