Laser Alignment Helpers for Snapmaker A350T


Print Profile(1)


Description
🛠️ Laser Alignment Helpers for Snapmaker A350T – Modular Corner Tools
Because lining things up just right shouldn’t be guesswork. 🔥💡
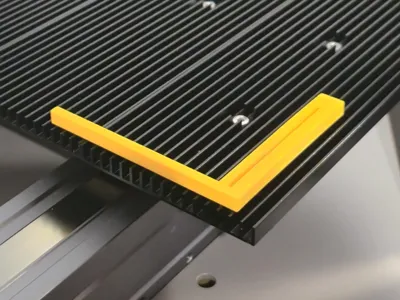
I designed this set to help with laser cutting or engraving, especially when you want clean corners and accurate placement on your Snapmaker A350T. Whether you’re doing small projects or using the full work area, these helpers keep things neat and square.
📦 What’s Included:
✔ One fixed corner plate – designed to be placed in either the bottom-right or top-left of your Snapmaker laser bed.
🔁 Want it mirrored for the other corners? Just mirror the model in your slicer!
💡 Want full plate coverage? Print 4 of them.
🧪 This is a two part, use filament bits to allign them together, and glue the parts.
✔ Two + One movable 90° corner tools:
- One compact version
- One larger version
These fit snugly into the laser bed’s groove grid, so you can move and align your material freely across the work area while maintaining perfect right angles.
One small one to press against the workpice.
🎯 These corners also let you reuse those otherwise useless silicone stopper plugs to help pin everything down. Works great and keeps things stable!
🖨️ Print Tips:
✔ The plate prints without supports
⚠️ The two movable corner tools do require supports
✔ PLA, PETG, ASA – all work well
✔ Print one of each, or a full set depending on your needs
🛠️ Note: Even if the model worked perfectly on my end and looks flawless in the photos—remember, this is 3D printing 😄
Printers, settings, and materials vary, so some post-processing may be required.
Holes may be a bit tight—have a small drill bit ready just in case. Some sanding, trimming, or light glue work may be needed.
🧠 Why This?
Tired of nudging material into place? Want to speed up setup for laser work? This is the solution I made for myself—and now I’m sharing it with you!
📢 Feedback & Requests
Need one with markings? Want a version for another machine or custom dimensions? Let me know—I love improving these!
🔗 Check out my other designs: JustCallMeDaddy on MakerWorld
📸 Show Off Your Prints!
If this helps you streamline your laser projects or keep things neat and square, I’d love to see it in use!
Happy printing! 😊
License
You shall not share, sub-license, sell, rent, host, transfer, or distribute in any way the digital or 3D printed versions of this object, nor any other derivative work of this object in its digital or physical format (including - but not limited to - remixes of this object, and hosting on other digital platforms). The objects may not be used without permission in any way whatsoever in which you charge money, or collect fees.
Comment & Rating (5)