Search models, users, collections, and posts

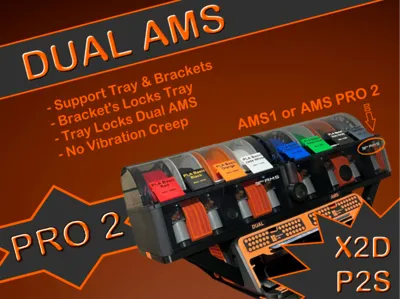
Dual AMS PRO 2 Riser System

Print Profile(2)

All
P1S
H2S
H2C
P1P
X1 Carbon
P2S
H2D
A2L
H2D Pro
X1E
X1
A1
X2D

Print profile for AMS Riser by @maCyo42.
Designer
28.8 h
9 plates
5.0(89)

Print profile for the BLV Riser by @benlevi
Designer
29 h
9 plates
4.9(10)

Open in Bambu Studio
Boost
646
2257
511
188
1.6 k
717
Released 

Description

Boost Me (for free)

If you appreciate the time and effort I have put into designing this then please share your boost. Thank you for downloading and printing my system.


This DUAL AMS system is for the X2D and P2S printers only. 

For the X1C and P1S use this model 

DUAL AMS for X1C & P1S


____________________________________________________________________________


PLEASE ENSURE YOU SELECT THE CORRECT PROFILE FOR THE RISER


1: For AMS Riser V3 for P2S by maCyo42 use the first print profile labelled accordingly.


2: For BLV AMS Riser V4 by @benlevi use the second print profile labelled accordingly.


____________________________________________________________________________


This Dual AMS System can accommodate both the original AMS and the AMS PRO 2 (if you have one of each) or even if you have x2 AMS PRO 2‘s (lucky you!).


I wanted to mount my two AMS above the riser due to workspace limitations and the solutions available on Makerworld had their issues such as not securing the AMS's which were prone to vibration creep & danger of actually falling off!


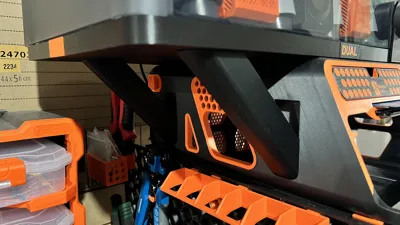
This solution creates a tray that the two AMS sit within and so cannot fall off. The tray has square holes which nestle snuggly onto the top of each bracket (I decided against using 3 brackets to allow for a spool holder due to my concerns over structural stability - if you choose to omit the rear left bracket so as to mount a spool holder, I take no responsibility if the tray warps / breaks). With the tray secured snuggly onto the tops of the brackets the tray cannot move and therefore neither do your AMS's.


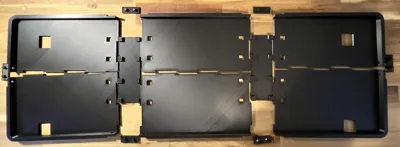
The tray is composed of 6 pieces (rear left, rear middle, rear right, front left, front middle and front right) which interlock with dovetail joints. These are quite snug (0.1mm allowance) which you can glue if you choose but this isn't necessary as these joints are not what holds this together. There are two plates each with 8 pegs which lock all the tray pieces together. Apply a little superglue (I used Gorilla Gel as it's easier to work with) at the base/edge of each peg then press the tray pieces onto these. These two plates are designed to accommodate the 2.5mm dip from the Risers top edge so that the tray's weight (and of course that of the 2 AMS's) is spread over the brackets, the Riser's edge lip and the Riser's main body (the central part of the top of the riser which is 2.5mm below the rim of the Riser). 


Finally, both to help secure all tray pieces together and also for aesthetics there are 6 clips which attach to the outside edge of the tray pieces. You can print these clips in whatever colour matches the theme of your setup (black n orange for me) or simply keep same colour as the tray & brackets. There are two clips with text on each “DUAL” and “AMS”. You can of course change these by changing the ‘Process’ settings in Bambu Studio from ‘global’ to ‘objects’, clicking on plate 8 with the two clips which will select the plate on the settings pane for you to alter. Right click on “AMS” or “DUAL” and select ‘edit text’.


PLATE 7 REQUIRES SUPPORTS 

If you use my profile (recommended) you need change nothing, however if you choose to use your own print profile ensure supports “normal(auto)” is ticked for plate 7 only.


__________________________________________________________________________________


 BED ADHESION PROBLEMS OR DIFFICULTIES WITH FITTING PIECES TOGETHER


A few community members report 1: bed adhesion problems or 2: having to file down the edges of the clips to fit. 


These issues are resolved if you follow usual best practice for FDM printing.

1: Bed adhesion is improved by adequately cleaning your build plate with simple soap and water. This will resolve most issues and is all that is needed for this print. 

(When printing with materials that shrink e.g. ABS, PA6 then addition of glue to the build plate and warming the chamber prior to print solves that issue.)


2: Adequately dry your filament either in a dedicated drier or in the chamber of your printer (see Bambu Wiki). Moist filament causes poor print quality and reduced accuracy. This tray uses tight tolerances - 0.1mm so needs dry filament.


The above recommendations are not simply petty requests by me for this print, they are good practice guidelines for every community member to follow to ensure good quality prints without unnecessary failures.


__________________________________________________________________________________


My print profile has been carefully tweaked for best balance between strength and filament use. The Filament profile “Tuned PLA Basic” reduces the chamber fan to reduce the risk of warping when printing large objects so please use this profile.


A BIG thank you to the many community members that have provided such amazing feedback, questions, suggestions etc. which have helped to improve this system and motivate me for more projects 🙏🙏🙏🙏


Happy printing and please post your photos. We love to see your setup 👍


My other models:

-

-

-

-

-

-

-

-


Comment & Rating (511)

(0/1000)

Hey Checking to see how everything fit, before gluing everything, and I have a huge gap between the riser and the holder. Almost like the brackets are to long. Anybody knew what I have done wrong?
The designer has replied
0
Reply
I’ve had someone else ask a similar question and it turned out that he hadn’t cleaned out ALL the supports left in the riser bracket cavity. Double check that the riser bracket cavity is completely clear of bits and check whether the AMS bracket is FULLY SEATED into the riser bracket cavity. let me know how it goes
1
Reply
….also double-check that there are no remaining bits of support left on the AMS brackets
1
Reply
Replying to @monkeylurv :
All supports are cleared and inserted fully. I am starting to think it's riser. It's the BLV from benlevi. Maybe the mounting slots are placed higher on that model?
1
Reply
Print Profile
Print profile for AMS Riser by @maCyo42.
love this just got done printing and put together. I moved the support arms to work with my model drop slides. Will up load mod profile if ok with you. already got the ok to upload the slide drop.
The profile uploader has replied
profile
2
Reply
Awesome. 🙌 I would love for you to upload your mod 👍🏻🙏 Looks great BTW
0
Reply
Replying to @monkeylurv :
thank you. I'll up load the mods together. that way they can print both.
0
Reply
here is the mod profile. both mods are the the profile. the support arm and drop hsw bracket. https://makerworld.com/models/2210536?appSharePlatform=copy
0
Reply
Boosted
Fits perfectly!! 100% RECOMMENDED.
The designer has replied
designer
3
Reply
Thanks heaps for great feedback and boost 👍🏻 🇦🇺
0
Reply
Awesome colour scheme BTW!
0
Reply
Boosted
Replying to @monkeylurv :
I'm going to change that panda touch holder cus that green came with the machine and the rest of the colours weren't arrived yet😅
designer
2
Reply
I love this riser system Fits my new AMS 2 units perfectly. Added extra storage below (with minor mod to the 3d print for the other ams drawer).
The designer has replied
designer
5
Reply
Look at that! That is siiick! Nice one 👍🏻
0
Reply
@xaudiblex can you share the STL for the added storage
0
Reply
Replying to @fsunugent :
designer
1
Reply
Boosted
I am loving the look. Just have to order a second AMS. Quick question. is there supposed to be a gap between the Mount and the riser? I know once I put the second AMS on it the gap will close but I was expecting the Mount to sit flush on the riser. I confirmed the brackets were seated. I love it, just making sure I am not missing something.
The designer has replied
designer
2
Reply
Great question 👍🏻and you win the prize of spotting this intentional design 🏆 The arms are designed to be 1mm out of position with the tray's holes such that when weight is applied to the tray the bracket's slight movement into the tray's hole causes tension at the bracket's base so that there is no wiggle or movement and the structure is set securely. It was a small design choice to ensure everything holds together snug without movement or stress. You will note that when the bracket attaches to the riser it is snug but has and needs a little wiggle room so as to slide it into place. This design choice takes up that wiggle and secures it nicely so there is no lateral movement. Hope my lengthy explanation makes sense but I felt very happy to speak to a design choice that has not been spotted before 👏🏻
(Edited)
6
Reply
Boosted
Replying to @monkeylurv :
Awesome response and greatly appreciated!! Can’t wait to get the second AMS and put it to use! Glad it is on purpose with purpose!
designer
1
Reply
Boosted
Replying to @EaglyRare :
Second AMS arrived and now the project is complete!!
designer
3
Reply
printed out perfect with zero issues, thank you 😁
The designer has replied
designer
3
Reply
Love the colour scheme 👍. Glad you like it. Thanks for the great feedback and boost. Much appreciated 🙏
0
Reply
Replying to @monkeylurv :
thanks bro named the printer donatello! glad you fw the color scheme 😈😁
designer
1
Reply
link for bottom drawers??
0
Reply
Print Profile
Print profile for AMS Riser by @maCyo42.
Love this print; was comforted that it aligned to the latest v3 ams riser from macyo. was trying to find compatible storage shelves to put under the AMS that I could slot with this; do you have any suggestions?
The profile uploader has replied
profile
1
Reply
Replying to @monkeylurv :
thank you! i actually printed this out, and it didn’t fit into the dual holder; am i doing something wrong?
0
Reply
Replying to @DayOneDead :
When you say it didn’t fit. What didn’t fit and where?
0
Reply
Print Profile
Print profile for AMS Riser by @maCyo42.
Had warping Issues using PETG on my X2D. Perhaps adding some shallow surface grooves in a grid would alleviate?
The profile uploader has replied
profile
1
Reply
Warping is where the print lifts off the plate at the corner. Your image shows normal shrinkage and perfect adhesion to the plate giving this bend that you’re showing. The solution to the print NOT being bent as you show in the image is to let it cool-down in the printer for a few minutes and then remove from the build plate. If you remove the build plate from the printer while it’s still hot and leave it to cool externally it will cause that shrinkage bend
(Edited)
0
Reply
Replying to @monkeylurv :
That picture is how I was able to get a successful print using a Supertack Cool Plate. My previous 2 attempts using a textured PEI plate failed due to warpage. Unfortunately I did not take pictures of those two attempts, but I attached this picture to illustrate the root cause.
(Edited)
profile
1
Reply
Replying to @VintageSini :
Futher clarification. I went to my trash and pulled the 2 failures out to attach this photo. I was printing using Bamboo Labs Basic PETG on my X2D. Up until this print, I have had no failures with 120 Hrs of printing other models and this print looks perfect unitl the top layers print and pull the corners away from the PEI bed. I solved it using a Supertack Cool Plate, but I think that the combination of large footprint and X2D's autocooling blowing across the top of the part caused this problem.
(Edited)
profile
1
Reply
Great job. Fits perfectly. Kind of wish I would have planned it out a little better and printed out green brackets, maybe I'll replace later. Really holds both AMS really well. Thanks.
The designer has replied
designer
2
Reply
Thanks heaps for the great feedback and the photo. Your setup looks sweet!
0
Reply
hello. can you guide me the files for the whole set up for my p2s? thx.
0
Reply
Replying to @user_1467641218 :
I can try. I used V3 AMS Riser by maCyo42 @ https://makerworld.com/en/models/1937075-ams-riser-v3-for-p2s-x2d?from=search#profileId-2080071. That's just the riser. Then I used the platform from here. Just make sure to read over the instructions and notes and also double check you are printing the correct files for the printer you want to mount on. A note of my own, I didn't use any screws and currently haven't had any issues. Also I used the TPU for AMS and it seems to work fine. The print will take a little time so if you have a .6 hotend I would think about using that for the big prints.
designer
1
Reply
what's the overall length of the finished product? trying to see if it will fit on my current setup after moving my filament dryer.
The designer has replied
designer
1
Reply
You have the same Sunla 4 filament dryer as me 👍🏻 I'm at work at Mo so will give dimensions later when back home.
0
Reply
Replying to @monkeylurv :
much appreciated, picking up my second ams tomorrow! very excited, appreciate the reply!
(Edited)
designer
1
Reply
The overall width with dual AMS 2 is 740mm
1
Reply

License

This user content is licensed under a Standard Digital File License.

You shall not share, sub-license, sell, rent, host, transfer, or distribute in any way the digital or 3D printed versions of this object, nor any other derivative work of this object in its digital or physical format (including - but not limited to - remixes of this object, and hosting on other digital platforms). The objects may not be used without permission in any way whatsoever in which you charge money, or collect fees.