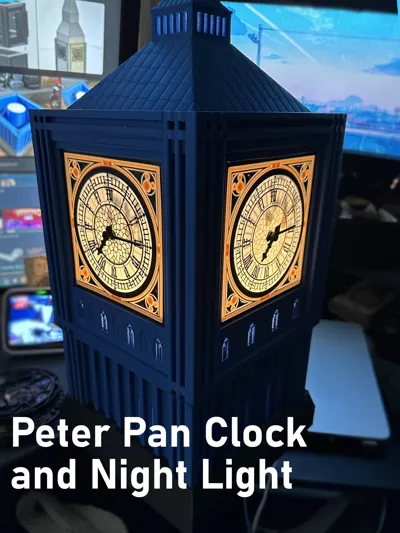
Peter Pan Night Light and Clock


Print Profile(3)


Bill of Materials


Description
Make sure to hit the Follow button for updates and new models!
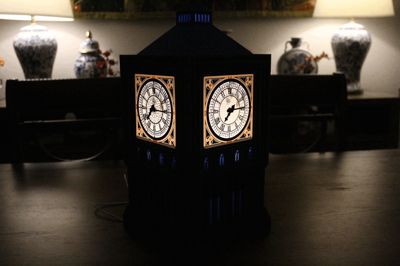
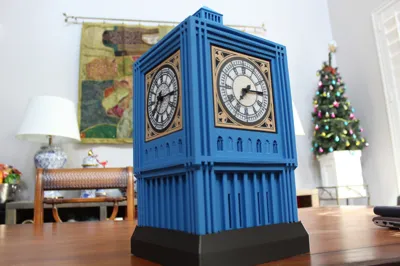
I was inspired by the Tokyo Disney Peter Pan pop corn bucket. I wanted a similar look for a night light, but felt the popcorn bucket was rather flat.

So I made a replica Elizabeth Tower with the silhouette of the 4 kids (Peter, Wendy, Michael, and John) standing on the minute hand when the clock hits 7:15 pm (The children's bedtime).
All pieces assemble without need of pressure EXCEPT the roof.
You'll need the following:
- 1 x LED Lamp Kit from Bambu Labs
- 1 x Clock Components Kit from Bambu Labs (can be optional if you just want the night light)
- Super glue
- Accelerator (optional)
- AMS for the clock face (will eventually get around to making a non AMS version)
- See BOM for all filament
Assembly
- Place the LED Light Kit's puck inside the Base
- Insert the Tower Bottom
- Thread the cable of the LED light kit through one of the bottom slots. It's up to you where you position it.
Insert the Light Puck stand and install the light puck into the center. It should look something like this.

- Place the Registration Pins in the holes of the Bottom Tower
- Install the Tower Top with the assistance of the Registration Pins
- Press fit the Roof into the top space of the Tower Top with a little bit of pressure (You might need to do some sanding depending on your filament).
- Note: I found it easiest to push each corner down little by little, one by one, until they all reached the bottom
- Assemble the clock faces
- Nightlight Only (clock hands are in fixed position and children's silhouette can be seen):
- Print 4 each of the Big Ben clock faces, clock hands, and “Peter, Wendy, John, Michael”s.
- Insert and glue the thicker “pin” into the clock face with the hole within the pin facing you if you're looking straight at the clock face
- Glue the Second Hand in the 3 o'clock or 15 minutes position
- Place the thinner pin into the Hour Hand and snap it into place in the thicker pin
- Glue the Hour Hand in the 7 ¼ position (roughly at the 37 minute mark)
Flip the clock face over and glue the children in place so they appear standing on the second hand or floating (John & Michael are already about to fly)

View from inside showing placement of children
Glue the clock face in place on the Tower by inserting the top first, then swinging the face down into place. Then run your finger along the bottom edge to ensure it meets the tower.


- Nightlight Clock:
- Print 4 each of the Big Ben clock faces
- Print however many clock hands and “Peter, Wendy, John, Michael”s as you prefer
- Follow the steps for the the “Nightlight Only” clock faces for the fixed position hands for as many faces as you have sets of kids printed
- Install the clock components kit in as many faces as you prefer
- Glue the clock face in place on the Tower as above
- Nightlight Only (clock hands are in fixed position and children's silhouette can be seen):
- Plug that sucker in and light it up
- ENJOY YOUR NEW NIGHT LIGHT
Boost Me (for free)
Your boosts help me get closer and closer to my goal of being a freelance 3D artist. Thank you so much! <3
Documentation (1)
License
You shall not share, sub-license, sell, rent, host, transfer, or distribute in any way the digital or 3D printed versions of this object, nor any other derivative work of this object in its digital or physical format (including - but not limited to - remixes of this object, and hosting on other digital platforms). The objects may not be used without permission in any way whatsoever in which you charge money, or collect fees.
Comment & Rating (16)