Search models, users, collections, and posts

Skadis Wall Spacer Connector Kit

IP Report

Print Profile(3)

All
A1 mini
A1
P1P
X1 Carbon
X1E
P1S
H2D
X1
H2D Pro
H2S
P2S
H2C
X2D
A2L

0.16mm layer, 4 walls, 15% infill
Designer
6.6 h
9 plates
4.9(34)

A1 Mini Complex Kumiko Skadis connector
Designer
46 min
1 plate
5.0(1)

Corner connector 0.16mm layer, 4 walls, 15% infill
1.9 h
2 plates

Open in Bambu Studio
Boost
314
1343
81
21
1 k
503
ReleasedĀ 

Bill of Materials

Bambu Filaments
Select all
Jade White (10100) / Refill / 1kg
Black (10101) / Refill / 1kg
Black (33102) / Refill / 1 kg

Description

Ā 

GeckoGrid is now in pre-launch on MakerWorld Crowdfunding.
Follow the campaign to support the launch, get notified when it goes live, and stay updated as new features and stretch goals are revealed.

Ā 

Ā 

Membership

Prefer to stay on MakerWorld? Ā Subscribe here to access MakerWorld-exclusive models, get a commercial license for all MakerWorld uploads, and receive access to my free Patreon tier for updates & news.
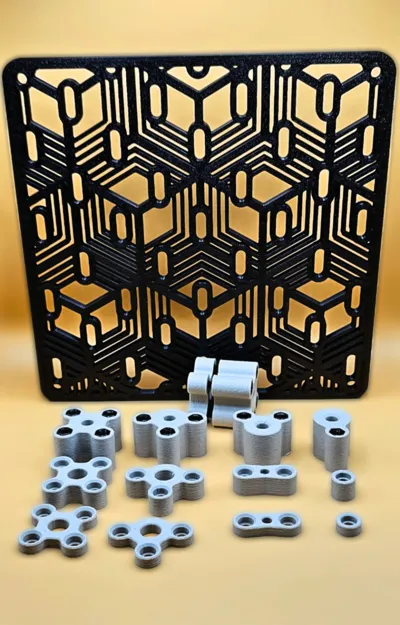
Join

Ā 

Ā 

Ā  Ā  Ā 

šŸ”— Designed to work with my Skadis Kumiko Tile System:
Skadis Kumiko Tile – Lightweight Strength Edition


šŸ“¦ Organized for Easy Printing:
The file includes 9 labeled build plates, each featuring a different spacer or connector type. This makes it easy to select the exact mounting piece you need. Just choose the one that fits your setup and clone as many as required — no sorting or guesswork needed.


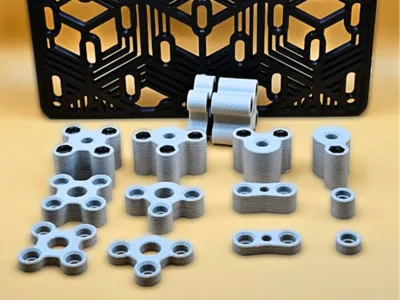
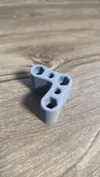
🧱 Skadis Wall Spacer Connector Kit – Modular Mounting System for 3D Printed Skadis Panels

This is a complete wall spacer system designed to work seamlessly with custom 3D-printed Skadis-style panels, especially my Kumiko-patterned variant. Whether you're creating an entire modular wall system or just securing a few panels to your workspace, this kit offers a solid and adaptable solution.


Boost Me (for free)

"It may only weigh 6 grams, but this tiny spacer carries the weight of the whole SkƄdis wall! If you found it useful, a Boost would go a long way!"

šŸ“ Features:

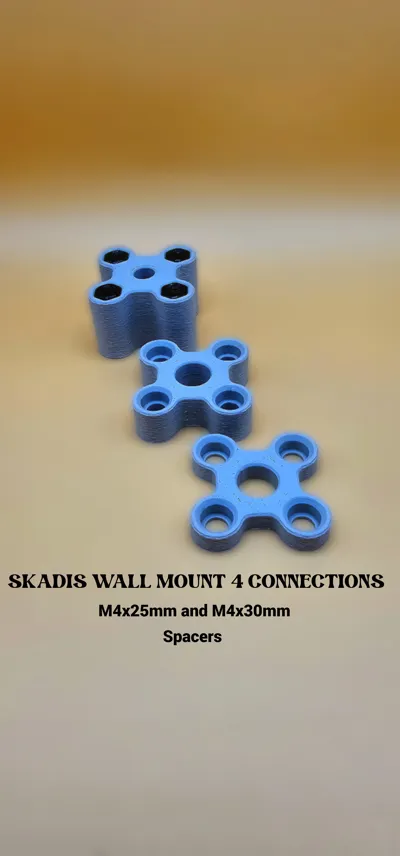
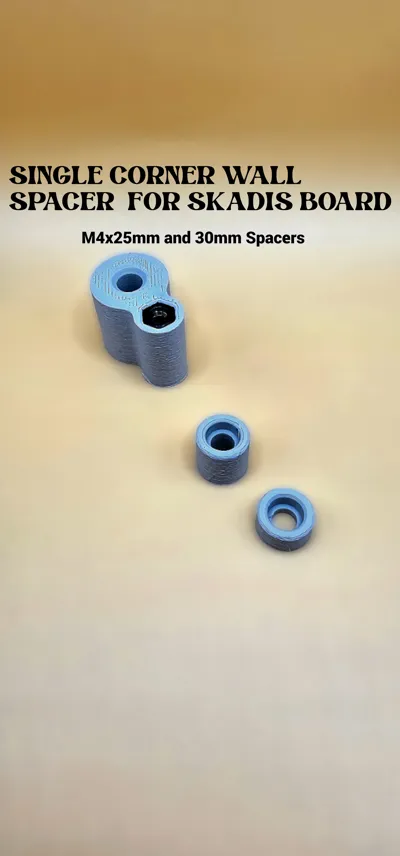
  • 4 connector variants for different use cases:
    • Single Corner Connector
    • 2-Point Inline Connector
    • 3-Point Hub Connector
    • 4-Point Grid Connector
  • Each connector includes matching ring spacers to fit M4x25mm and M4x30mm bolts.
  • Compatible with standard Skadis hole patterns and custom panels alike.

šŸ”§ Practical & Durable:

  • Designed with 4 perimeters and gyroid infill for an ideal strength-to-weight ratio.
  • Prints cleanly without supports.
  • Fuzzy skin enabled on the exterior surfaces for an improved matte finish and a more refined look.

šŸ› ļø Easy Installation:

  1. Insert an M4 nut into the back of the connector.
  2. Use the included spacer rings depending on your bolt size and panel thickness.
  3. Align the panels and fasten the connector, effectively ā€œsandwichingā€ the boards together.
  4. Done! The result is a robust, low-profile wall-mounting setup.

These were thoroughly tested with Kumiko-style panels and are ideal for functional Skadis walls, modular setups, studio organizers, or display systems.

ā˜• Support the Project:
If you find this design helpful and want to support more modular, beautiful, and practical projects like this, consider supporting me here:
https://www.buymeacoffee.com/lilith3dprint

Thanks for scrolling all the way down — you’re officially a real one 🫶
Your support makes this possible and keeps creators like me designing through midnight prints and caffeine crashes.


šŸ’› Want to support more?
Buy Me a CoffeeĀ 

PayPalĀ 

Patreon

Boost Me (for free)

Hit that boost if you liked it — it helps way more than you think šŸ’« Thanks for the support!


🧭 Check out more models:


MakerWorld Profile

Thangs3D Profile

Comment & Rating (81)

(0/1000)

Boosted
I don’t think there are compatible with the H2D-sized Kumiko Skadis boards unfortunately šŸ˜•
The designer has replied
1
Reply
Boosted
What also would be fantastic is a jig that helps mounting to the wall, drilling the holes at the correct location.
2
Reply
Replying to @tholu :
Totally agree on both! Please @Lilith3dPrint šŸ™
designer
2
Reply
Oh , i never realised that , i will sort it out and upload a new print profile for the large plates
2
Reply
Print Profile
0.16mm layer, 4 walls, 15% infill
Perfect set of mounts. Easy to use and attractive when complete…Or well, mostly complete. Still another seven more rolls of filament to complete the wall panels. 😁
The profile uploader has replied
profile
3
Reply
Oh Wow, you really got yourself a project there , looks really nice , And you are using my boards as well , which is even better . Thank you for the rate !!
0
Reply
Print Profile
0.16mm layer, 4 walls, 15% infill
thank you. used those to mount my Kumiko skadis. works perfectly, maybe only makes sense to make the mounts a bit shorter, theres lots of spare space between the board and the mounting plane anyway
The profile uploader has replied
profile
1
Reply
Thank you so much for the 5 stars and feedback! The 20 mm gap is intentional so different inserts can fit — some designs (like the inverted hook versions) need that extra space behind the board, as they use gravity to stay in place. If you’d like a closer fit, you can easily scale the height down in your slicer to 10 mm or 15 mm, and it won’t affect functionality. Glad to hear the mounts are working perfectly for you!
(Edited)
0
Reply
Replying to @Lilith3dPrint :
Yeah, i see. Meant that you can add an extra profile with shorter stands to gain extra points:)
0
Reply
Replying to @igor_kovalsky :
Yes, i can do that no problem . Thank you !!
0
Reply
Print Profile
0.16mm layer, 4 walls, 15% infill
It was perfect I will use it more often now
The profile uploader has replied
Show original
profile
2
Reply
Looks really good . Thank you for sharing teh pic .
0
Reply
Boosted
Print Profile
0.16mm layer, 4 walls, 15% infill
It didn't quite work the way I thought it would, but it did inspire me to learn some things in fusion. And that's worth 5 and a boost to me!
The profile uploader has replied
profile
1
Reply
Thank you for the boost and the rate!!I like the ones you designed. Theses connectors were designed for the skadis plates i have designed, i never tested them with other plates to check the compatibility. is good to know that they don't fit.
(Edited)
1
Reply
Works great. Thanks!
The designer has replied
0
Reply
Thank you !!1
0
Reply
Print Profile
0.16mm layer, 4 walls, 15% infill
Printed 8 pcs to get the right distance to the wall for 2 pieces of art pictures
The profile uploader has replied
Show original
0
Reply
Thank you for the rare !!. #if it works , it works
0
Reply
Print Profile
0.16mm layer, 4 walls, 15% infill
For some reason it would only fit M5
(Edited)
0
Reply
How do people attach it to the wall Screws? Bolts
The designer has replied
Show original
0
Reply
These will work with the standard drywall screws , now it depends what wall you have for these boards
1
Reply
Replying to @Lilith3dPrint :
Thank you for your reply Screws and anchors for plasterboard I bought M4x25mm screws I plan to attach 12 Skadis boards
Show original
designer
1
Reply
Replying to @SARY0221 :
Yes, that should work just fine , there are diffrent tipes of spacers , depending on what distance you want between the wall and the boards. Another thing , this connectors will work with the standard skadis and with my kumiko skadis boards , i am not sure how they will work with other printed boards , but if you are using my kuko pannels , let me know if you need a specific size to fill up the space that you have and i can add it as a print profile .
0
Reply
Hello! Where is the wall Spacer Connector for your 198mm by 200mm Panel?
(Edited)
The designer has replied
designer
1
Reply
Hi , The connectors are on the file itself https://makerworld.com/en/models/1377008-skadis-kumiko-tile-lightweight-strength-edition#profileId-1499594 . They are on the same print profile
0
Reply
Replying to @Lilith3dPrint :
I only see the panel, I don't see any connectors. I printed the panel, but how do I connect them?
0
Reply
Replying to @keysk :
Oh, Then this panel must be one of the ones that had been requested by the comunity. Not a problem , i will make the connectors and add them to the print profile . I will let you know as soon as they get uploaded
0
Reply

License

If you want to use this model commercially, please join my membership.
Join Now
This user content is licensed under a Standard Digital File License.

You shall not share, sub-license, sell, rent, host, transfer, or distribute in any way the digital or 3D printed versions of this object, nor any other derivative work of this object in its digital or physical format (including - but not limited to - remixes of this object, and hosting on other digital platforms). The objects may not be used without permission in any way whatsoever in which you charge money, or collect fees.