Search models, users, collections, and posts

Crokinole Board

GIF

Print Profile(4)

All
P1S
H2D
P1P
X1E
X1 Carbon
A1
X1
H2D Pro
H2S
P2S
H2C
X2D
A2L

Captain Shield
Captain Shield
Designer
18.4 h
9 plates
5.0(4)

Regular Multicolor Board
Designer
18.1 h
9 plates
5.0(2)

S.Wars Dejarik Board
Designer
18.4 h
9 plates
5.0(1)

Single Color with bevels
Designer
17.6 h
9 plates
5.0(1)

Open in Bambu Studio
Boost
214
534
39
47
296
84
Released 

Bill of Materials

Bambu Filaments
Select all
Maroon Red (10205) / Refill / 1kg
Blue (10601) / Refill / 1kg
Jade White (10100) / Refill / 1kg
Black (10101) / Refill / 1kg
List other parts
  • Latex Rubber Tubing x 1: See description or assembly guide for details.

Description

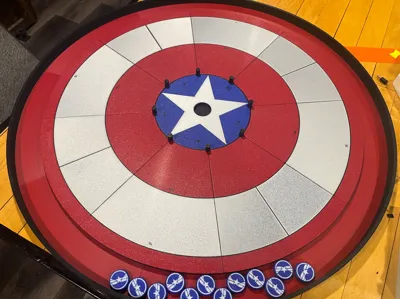
This full size 3D-printable Crokinole board is as fun and playable as a wooden board with a few key advantages: It costs much less (about 2.5 rolls of filament), Can be designed and printed in a variety of different colors and patterns, and has the option of being permanently assembled, or left as a fantastic portable option that is easier to store and transport.

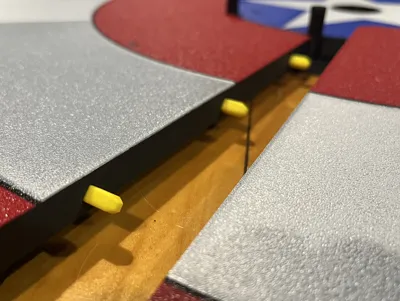
Rather than a smooth top, this board is printed with build plate texture which allows the smooth buttons to glide across the surface. (It can be printed with a smooth top as well but I really like how the texture plays).

All parts were printed on a Bambu labs printers (P1S and A1). 

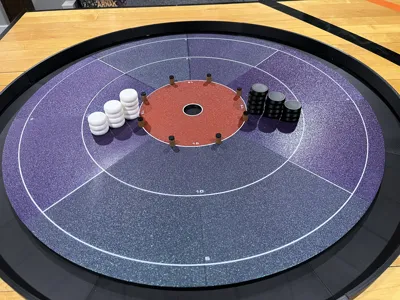
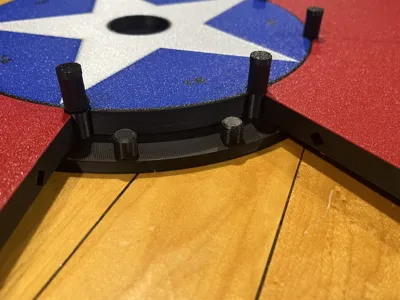
Multicolor files include the Superhero Shield, Space Chess-style board, regular board as well as single color parts with embossed scoring lines for single color printers.

The model for the buttons/disks can be found here.  
Avengers themed disks can be found here. S.Wars disks coming soon!
Check out our storage/scoring tracker box for keeping your buttons/disks nicely organized and to keep score.  

Wall mounting brackets and other accessories coming soon!
 

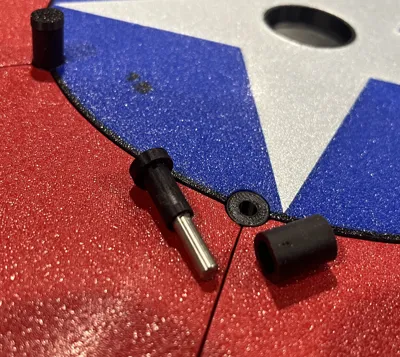
Note: bumper pins require additional parts to make them strong and bouncy:

The bumpers have a core of either 3mm and 4mm steel pins. 3mm pins available here from Bambu, or 4mm pins from here from Amazon.
Latex rubber tubing for the outside - available from here from Amazon or your local hardware store.
 

3D PRINTING SETTINGS

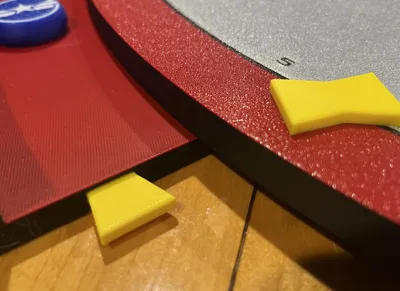
3D printed on a Bambu Lab P1S and A1 with AMS with a combination of regular, and silk, and sparkle PLA. Printed at .20 layer height with 15% infill unless otherwise noted. Surface pieces printed face down. Allow pieces to sufficiently cool before removing and turn off aux fans to prevent premature cooling and warping. You may use a deburring tool on any sharp edges for better fitment and to prevent "speed bumps" between the wedge pieces.  

The boards can be left "portable" but for a better, smoother board free of any bumps, I recommend glueing all the pieces together to keep them strait and even.  

I have made 3 boards with texture, but this summer I plan on making a board on a smooth build plate, then sanding and varnishing the top surface to see how that compares to a regular wooden board.  The textured surface does work nice with smooth disks as it provides low surface contact for the disks to glide fairly smooth.  For casual games with friends and family it works perfect!


Documentation (1)

Assembly Guide (1)
Crokinole Assembly Guide.pdf

Comment & Rating (39)

(0/1000)

I printed this board in the colors of the highschool I teach at and it turned out great! I have a wooden board that I brought to school for kids in a game club to try and the kids love the game, but I was stressed every time the high school kids were acting like high school kids around my expensive board. So printing a board is a perfect solution. It plays great as is, but it is a little slower than my wood board so I tried a couple things to see if I could make it even better and I found this "Slide Polish" on Amazon. I sprayed this stuff on the board, buffed it out for 30 seconds and now the board plays just as fast as my wood board at 1/10th the price. It was already great, but now it's even smoother. If the designer of this board has an affiliate program with Amazon it could be worth listing with this print. Either way the board is wonderful and I'll probably print a few more as my students want to start a crokinole league! Thank you very much for posting this for all of us!!
The designer has replied
2
Reply
I’ll have to try that. Does the polish work if the pieces are printed with texture or do they have to be printed facedown on a smooth plate?
0
Reply
Replying to @SHDesigns :
I made the board face down on the textured plate, but I was using pieces that were printed facedown on a smooth plate. I'll print off some disks on a textured plate and report back.
0
Reply
Replying to @SHDesigns :
I printed some disks on a textured plate at they slide great as well. They're just a little bit louder as they slide than the ones printed on a smooth plate. Because I've already applied the polish to the board I'm not able to do a before and after with the polish and compare, but I wanted to see if it made any difference so I applied some polish to a few of the disks and flicked them alongside others without the polish and they definantly slid further. Like I mentioned before, it's definantly not something you have to have, but it does make the speed much closer to my wood board if you're looking for that. I'll be printing another board sometime soon and I'll do some before an after tests and report back what I find. Thank you again for designing this print and sharing it with all of us. It's Amazing!!
1
Reply
Print Profile
Regular Multicolor Board
Great design. Took quite a while to print, and I had to do some good cleaning of the edges to get everything fit together nicely, but the end solution is really great. For 1/10 of the price of a real board this gets it really close. The main issue are the gaps between pieces, but some heavy pressure usually gets the thing back in shape. I've investigated that maybe using some car wax on this would get to to the next level, but it's good enough as is and will see if I take this further.
0
Reply
Do the bumper pins natural stay in place in the center or do you need to super glue them? I used the 3mm pins as suggested, but they are very loose when placed inside my board.
0
Reply
Replying to @tjbizzle :
They are quite loose, but it doesn't bother me and it doesn't affect anything really. If it bothers you I'd say super glue them. Or 3D print the dowels, those will be rougher and fit more tightly (I had done that before I got steel ones). Don't know if there is much difference.
0
Reply
Print Profile
Captain Shield
This came out incredible. Is it as good as a wood crokinole board? I'll probably never know but I am ok with that as I got this for a fraction of the cost. The light that shines in children's eyes when you throw down a shield to play a game on is awesome. I was concerned that there are extra lines on the board but there isn't it's just the seams of the sections and these don't show as much as they show on the original picture.
1
Reply
Boosted
still have to get the pegs and print off the pieces! Need to probably use some glue to make sure the edges are flat for the pieces to go over! but very cool. nice design!
The designer has replied
0
Reply
Looks awesome! It's nice to see it out "in the wild." Glue will decently help. My board had a few spots that created a ridge, but once I glued them together flat they were fine. It's not as perfect as a high-end wooden board, but for 3D printing and casual family games it's perfect for me.
1
Reply
Boosted
The print quality of this model is amazing! Not done with the print but wow! Well done!
0
Reply
Boosted
Print Profile
Regular Multicolor Board
this is and amazing model, everything first perfectly and printed without any issues whatsoever. it looks very nice and works well
0
Reply
Boosted
Edit: I was wrong about the cost! It is in fact about 2.3kg of filament. Thats about $45, not $100! So don't be mislead or dissuaded by my comment here! --- I'd love to hear back after you try making a smoothed and varnished top version! I'm thinking about printing it, but it's about $100 of filament after slicing it and adding up the costs. Maybe you could even design a version that splits into fewer pieces to print on the H2D.
(Edited)
The designer has replied
0
Reply
Should be a bout 2.5 rolls of filament total, but of course if you are buying certain color just for this project, that can add up. Creating a smooth one is on the list of things to do, just a matter of getting to it. I don't yet have an H2D, but starting thinking through how I could make it less pieces. Unfortunately the bed is still a bit too small to fit two wedge pieces in 1, but I have some ideas to make it in less pieces and less seams.
0
Reply
Boosted
Replying to @SHDesigns :
Where are you getting 2.5 rolls of filament? I just used your project file, sliced them all, and added up to ~3,830g of filament. I'm factoring in that some of the larger pieces need to be printed 8 times. I am using the cap shield version, so there are some changes for filament colors, but that wouldn't amount to a difference near 1.3 kg of filament
0
Reply
Replying to @wesyarber :
Wedges 8x167=1136 Gutters 8x10⁴‎=833 Center hub 148 Center surface 140 Bits 38 Total 2294 Perhaps you are increasing infill?
0
Reply
Boosted
Print Profile
Captain Shield
I’m still printing it, but love the project! One suggestion for print profile - add shape modifiers to increase the wall loops or infill density for the posts on the bottom center piece that holds everything together. I had some of those snap off on my second plate, and I wasn’t being rough! I plan to make that modification in the slicer and reprint, so I’ll probably post that here! Bit love the design!
The profile uploader has replied
0
Reply
Great suggestions. Feel free to post a profile with that update, or I can change the main file.
(Edited)
1
Reply
Boosted
Replying to @SHDesigns :
Just posted them! They are a bit buried in the list of print profiles, but feel free to make the same modifications to yours / repost the same 3mf file! I also rounded over the edges for the tops of the gutter walls.
0
Reply
Everything is turning out awesome so far! Quick question - is the diameter for the holes in the center hub supposed to match your chosen dowel diameter? I got the Bambu 3mm dowels as recommended and they feel loose in the center hub (and figured you would have made an option for a different center hub if it mattered). Or am I supposed to super glue the dowels into the center hub?
(Edited)
1
Reply
Print Profile
Single Color with bevels
Super print profile but unfortunately the 15 on the central disk is mirrored The rest still works great
Show original
0
Reply
If you open it in Bambu studio, you can right click on the central disk and mirror it to fix the 15 being backwards.
0
Reply

License

This user content is licensed under a Standard Digital File License.

You shall not share, sub-license, sell, rent, host, transfer, or distribute in any way the digital or 3D printed versions of this object, nor any other derivative work of this object in its digital or physical format (including - but not limited to - remixes of this object, and hosting on other digital platforms). The objects may not be used without permission in any way whatsoever in which you charge money, or collect fees.