Magnetic Stirrer (2 x 18650 Lithium Batteries in Parallel + TP4056 Charging Protection Board)


Print Profile(1)

Description
In 2020, I used acrylic as the panel and hand-crafted an adjustable speed magnetic stirrer.
Recently, I saw a magnetic stirrer that I found quite aesthetically pleasing, so I decided to convert this acrylic version into a 3D printed one.
The original version wasn't quite suitable for my needs, so I made some modifications.
Based on the original design, I've made a few changes:
- Compatible with the R140 circular motor from Shunde Electronics.
- Compatible with a TP4056 charging protection board; can be charged via a Type-C port.
- The 18650 battery holder has been changed to a 2-cell parallel version.
- The stirring rod storage hole, originally 30mm, has been deepened to 35mm.
- Several pillars and the base have been merged into a single unit; only the stirring rod holder and motor mount require adhesive.
STEP files are provided for everyone to modify and adapt to their own versions.
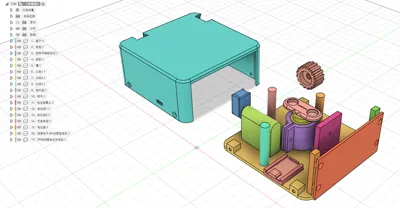
Parts List, BOM
The links to the following components are from when I made the acrylic version in 2020.
You can purchase components of the same dimensions from other stores, I recommend using Taobao's 88VIP red packets to get free shipping.
A two-yuan red packet every day to get one component, can save some money.
- 18650 battery; since the battery holder is parallel, one or two cells can be used.
- 18650 Battery Holder, 1 piece.
- R140 Circular DC Motor, 1 piece.
- PWM DC Motor Speed Controller with Switch, 1 piece.
- Type-C Interface TP4056 Lithium Battery Charging Protection, 1 piece.
- Several electronic wires.
- M3*12 countersunk self-tapping screws, 10 pieces, for the top cover, battery holder, and battery cover plate.
- M3*12 machine screws + M3 nuts, 1 set, for the motor mount.
- M2*10 machine screws + M2 nuts, 2 sets, for the rotor.
- 10mm diameter * 3mm thick magnets, 3 pieces.
- 8*35mm (or smaller) magnetic stirring rod * 1.
The motor mount and stirring rod holder are secured with adhesive (502 can be used).
It is recommended to use transparent or white PETG filament to print the shell, so that the internal charging and motor indicator lights can be seen.
Precautions:
1. The rotary encoder on the speed control module has a protrusion; after tightening the nut, the knob will tilt and interfere with the shell. This needs to be sanded down.


2. After testing, the angle from the off position to the optimal speed position of the speed control knob is approximately 130°. Adjusting it further down will result in a speed that's too fast and will cause the magnetic stirrer to not be held in place. Adjust according to your actual situation.


--------------------------------------Gorgeous dividing line--------------------------------------
You can find other models on my homepage, Click here
Boost Me (for free)
If this design is helpful to you, please give me a free boost. Thank you!
Comment & Rating (3)