Pond cleaning - mulm suction cup - Mulmsauger


Print Profile(1)

Description
German | English |
|
|
German
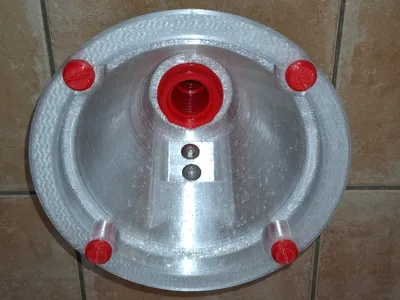
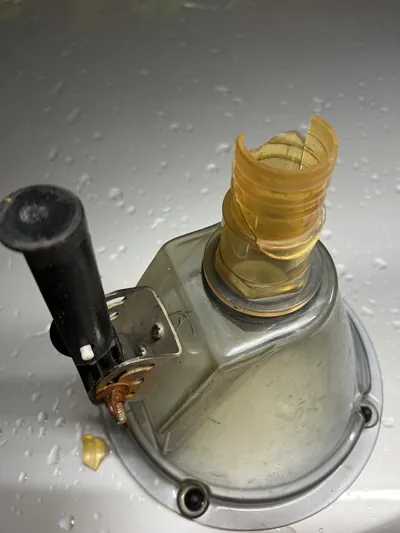
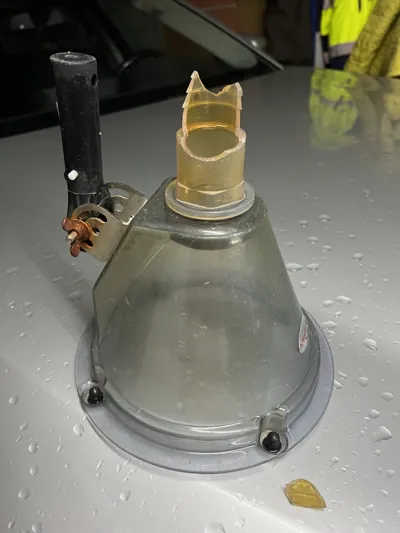
- The sludge bell from my sister’s pond cleaning system had seen better days
- In fact, only the hose connection was broken, but the funnel also showed cracks everywhere and wouldn’t have lasted much longer
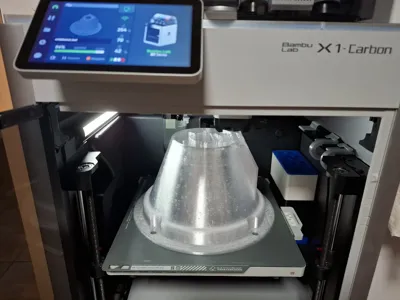
- Instead of just replacing the hose adapter, I decided to reconstruct the entire funnel
- To achieve an optimal 3D-printable result, I made several modifications to the original, focusing on the mount’s robustness and the protruding feet as wear parts
- And since the telescopic pole’s fastening mechanism was only partially functional, hindering its intended use, I devised an entirely new solution
The original design is entirely transparent, however, with my available materials, I could only achieve partial transparency. I utilized “Bambu PETG translucent clear” and a 0.8mm hotend for printing. A larger hotend necessitates fewer printed walls, thereby enhancing transparency. A welcome side effect is a considerable reduction in print time (10 hours instead of 20 hours)
- Assembly
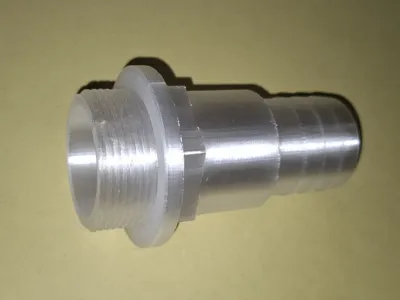
- Attach the metal component to the funnel (nut inside)
- Secure the rod holder to the metal component
- Insert M6 screws into the knurled holder
- Position the fixing block within the rod holder and fasten it using the knurled holders
Insert the rod locking mechanism into the rod holder
- Materials
- PETG translucent clear for the suction funnel, TPU90A for the sealing ring, PETG HF for remaining components
- Small parts (stainless steel!)
- 2x M5x25 hexagon head screws (securing metal to funnel)
- 2x M5 nuts
- 2x 5.2mm inner washers
- 1x M6x75 hexagon head screw (bracket fastening)
- 1x M6 nut
- 1x 6.3mm inner washer
2x M6x40 hexagon head screws (angle of inclination adjustment)
- 3D Printing
- Deactivate calibration strip generation or promptly remove it after printing and before initiating the first layer. Alternatively, post-print removal is possible but may leave residue
- For the funnel, a 0.8mm nozzle is recommended, saving approximately 10 hours of print time and increasing transparency
English
- The sludge bell of my sister’s pond cleaning system had seen better days
- In reality, only the hose connection was fractured; however, the funnel exhibited pervasive cracking and was nearing the end of its lifespan
- Instead of merely replacing the hose adapter, I opted to completely reconstruct the funnel
- To ensure a superior 3D-printable outcome, I incorporated several modifications to the original design. These enhancements centered on improving the mount’s structural integrity and designating the projecting feet as readily replaceable wear components
- Furthermore, given that the telescopic rod’s securing mechanism was only partially functional, thereby compromising its intended utility, I conceived a novel solution
The original design showcases complete transparency. However, constrained by the available materials, I could only achieve partial transparency. I employed “Bambu PETG translucent clear” filament and a 0.8mm hotend for the print. Using a larger hotend reduces the need for numerous wall layers, thus amplifying transparency. An advantageous byproduct is a significant reduction in printing time, approximately 10 hours compared to the original 20 hours
- Assembly
- Affix the metallic component to the funnel (nut internally)
- Attach the rod holder to the metallic component
- Insert M6 screws into the knurled holder
- Insert the securing block into the rod holder and fasten it with the knurled holders
Insert the rod locking mechanism into the rod holder
- Materials
- PETG translucent clear for the suction funnel, TPU90A for the sealing ring, and PETG HF for the remaining parts
- Small parts (stainless steel!)
- Two M5x25 hexagon head screws (securing the metal to the funnel)
- Two M5 nuts
- Two 5.2mm internal washers
- One M6x75 hexagon head screw (securing the bracket)
- One M6 nut
- One 6.3mm internal washer
Two M6x40 hexagon head screws (adjusting the inclination angle)
- 3D Printing
- Disable the generation of the calibration strip, or remove it immediately after printing the calibration strip and before commencing the first layer. Alternatively, removal can be performed after printing, though this might leave traces
- For printing the funnel, it is recommended to employ a 0.8mm nozzle. This significantly reduces printing time by roughly 10 hours while slightly enhancing transparency
License
You shall not share, sub-license, sell, rent, host, transfer, or distribute in any way the digital or 3D printed versions of this object, nor any other derivative work of this object in its digital or physical format (including - but not limited to - remixes of this object, and hosting on other digital platforms). The objects may not be used without permission in any way whatsoever in which you charge money, or collect fees.
Comment & Rating (2)