Search models, users, collections, and posts

Modular Infinity Cube! Perfect Hinges

GIF

Print Profile(4)

All
A1
P1S
A1 mini
H2D
X1E
P1P
X1
X1 Carbon
H2D Pro
H2S
P2S
H2C
X2D
A2L

Rouned Cube, 0.2mm layer, 3 walls, 0% infill
Designer
1.8 h
1 plate
4.8(28)

Chamfered Cube, 0.2mm layer, 3 walls, 0% infill
Designer
1.9 h
1 plate
4.9(7)

infill and brim variations - ROUNDED
Designer
27.9 h
9 plates
5.0(2)

infill and brim variations - CHAMFERED
Designer
28 h
9 plates
4.5(2)

Open in Bambu Studio
Boost
341
748
92
37
558
337
Released 

Description

Modular Infinity Cube – Perfect Hinges

After countless iterations and a lot of dedication, I’m proud to share my final design for the Modular Infinity Cube.


Unlike most infinity cube designs, this is not print-in-place—and that’s intentional. By assembling it post-print, this design completely eliminates hinge imperfections, offering a smoother, cleaner, and more satisfying movement than typical models.

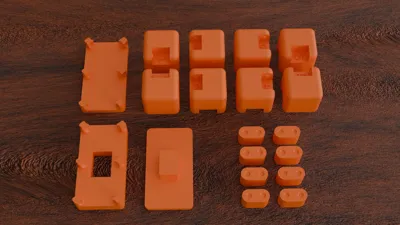
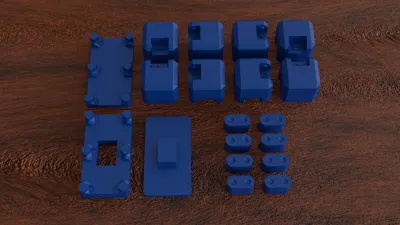
  • The STL and .3mf files include optimal print orientations for best results.
  • There are three custom parts included to assist with easy and accurate assembly—no special tools required, just a stable surface.

Be sure to follow the instructions below and watch the assembly video to get the best results.

If you'd like to support my work or get a commercial license, you can do so by heading over to my Patreon – your support makes future designs possible!

Boost Me (for free)

If you like my Work and want to support future projects this is the place to do it ;) Thank You!


Assembly Guide

This guide explains how to assemble the Modular Infinity Cube.

There are a total of eight (8) hinges that must be manually assembled. Each hinge piece is labeled with a number. Align the matching numbers together (1 with 1, 2 with 2, and so on). Then, use the Upper Bracket, Lower Bracket, and Press Cap to press the hinge pieces securely into position. 


Important: The numbers must be positioned next to each other — not opposite or misaligned! Thanks to its modular design, you’re not limited to building the standard cube.


Feel free to create a setup with just 4 cubes, or even expand to 16! Sky’s the limit!


Correct Orientation
correct number alignment
incorrect orientation
Set the correctly aligned cubes on the Bottom Bracket.
Add the Top Bracket on top of the cubes with the opening hole above the correctly aligned Hinge.
Put the Hinge Piece into the hole. Next the Push Cap will be used.
Put the Press Cap on top of the Top Bracket. It should slot in easily.
Push the Press Cap down.
 Push uniformly, on a stable surface and with a lot of force. If done correctly there will be an audible click.

Repeat this process for all 8 hinges. The order doesn’t matter, as long as you correctly align the numbered parts.
A helpful approach is to start with all the odd-numbered hinges first, followed by the even-numbered ones.

Comment & Rating (92)

(0/1000)

Printed with Elegoo PLA. The rounded corners on the underside came out warped. Rest of it look fine. It works, with a bit of resistance. Do you maybe have any tips to improve the bottom side corners? I printed with 210°C and the speed settings in your profile. And I changed infill to 10%. Picture is the same cube, camera was a bit fighting with the white balance ;)
The designer has replied
designer
1
Reply
Thanks for the feedback! I’ve had similar issues with bottom edges on certain filaments. From my experience, it's usually due to printing too hot and too fast. My profiles are tuned for Bambu PLA, so ELEGOO PLA may not perform the same. In Bambu Studio, try adjusting the filament settings: Temperature: Use results from a temperature tower test Speed: Print in 50% speed mode The settings in the images are in German, but their positions are identical in English. I recommend printing a 2×2 cube at each temperature to find the sweet spot. If these changes don’t help, likely noting will—I wasted 1kg of Prusament fine-tuning mine. Bambu’s "smart" features like auto extrusion, speed, and cooling—often unchangeable—can sometimes make things worse. Cura worked flawlessly for me at slow speeds (50mm/s), but it’s risky with Bambu printers, so I wouldn’t recommend it.
0
Reply
Replying to @VertLV :
ok, thanks for hints, I will try again with reduced speed and temp (i am using Orca). If that doesn't work I will try with some Bambu PLA ;-)
0
Reply
Replying to @chrismaddahl :
You are welcome! You can also try the chamfered edges version, it comes out better more reliably.
0
Reply
Print Profile
Rouned Cube, 0.2mm layer, 3 walls, 0% infill
interesting Idea! if you get it right the first time it is awesome, if you put it together wrong like I did, it has PLA issues on the second assembly. I printed out several and they all move great. the tools help to put everything together. assembling multiple in a row, I stood on the tool to save my hands.
The profile uploader has replied
profile
1
Reply
Thanks for the positive feedback! Standing on them was a smart Idea, when I assembled 5 of them in a row, it was pretty hard on my hands.
0
Reply
Replying to @VertLV :
I forgot to mention, I printed them at 80%. still came out great!
0
Reply
Replying to @Nocho :
Another good idea! I really enjoy the premium feel the heavier cube gives you.
0
Reply
Print Profile
Chamfered Cube, 0.2mm layer, 3 walls, 0% infill
by far the best looking infinity cube
The profile uploader has replied
profile
1
Reply
Thanks for the feedback, I am very happy that you enjoy my design!!
0
Reply
Print Profile
Rouned Cube, 0.2mm layer, 3 walls, 0% infill
Difficult to put together, strength-wise, but it sure does look amazing!
(Edited)
The profile uploader has replied
profile
1
Reply
Thanks for the feedback! I am glad you enjoy it. Sadly if you make it easier to put together it looses a lot of strength for normal use.
0
Reply
FANTASTIC!!!! I'm printing them in series. Since I got the first one, my children keep asking for more, and even more to give to their friends. Excellent design. Congratulations again.
(Edited)
The designer has replied
Show original
designer
1
Reply
I am very happy to hear that your kids enjoy it!! Thank you for the super positive feedback!!
0
Reply
Print Profile
Rouned Cube, 0.2mm layer, 3 walls, 0% infill
Very cool idea. Printed great on P1S.
The profile uploader has replied
profile
1
Reply
Thanks for the feedback! I am glad you are enjoying my design!!
0
Reply
Print Profile
Rouned Cube, 0.2mm layer, 3 walls, 0% infill
came out well after i figured it out. printed 8 more to make a multicolor one. Will attach a picture when that one is done. now that it is done i have made only one mistake. but still came out really good in my opinion.
The profile uploader has replied
profile
1
Reply
Can't wait to see the results!!
0
Reply
okay i feel silly, but when i try and do the even's they are backwards to each other. What am I doing worng?
(Edited)
The designer has replied
designer
1
Reply
Hey, thanks for the comment. This is not a problem. As long as the numbers are next to each other it is the correct alignment. I hope you will enjoy your Cube!!
0
Reply
Love this print… Had to post the latest creation. The purge waste on this one got a little out of hand 😂
0
Reply
excellent print and instructions. No more splintered hinges! Printed in ABS and it still snapped together perfectly. (Definitely do it on a firm surface)
0
Reply

License

This user content is licensed under a Standard Digital File License.

You shall not share, sub-license, sell, rent, host, transfer, or distribute in any way the digital or 3D printed versions of this object, nor any other derivative work of this object in its digital or physical format (including - but not limited to - remixes of this object, and hosting on other digital platforms). The objects may not be used without permission in any way whatsoever in which you charge money, or collect fees.