UM790/780 Pro NAS Conversion and WiFi/Bluetooth Signal Enhancement


Print Profile(1)

Description
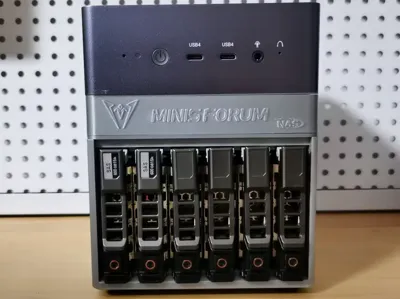
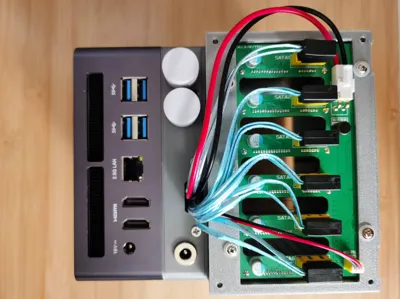
Transforming a UM790/780 Pro into a 6-bay 2.5-inch NAS, simultaneously resolving suboptimal Wi-Fi and Bluetooth signal strength with external button antennas.
Required Components:
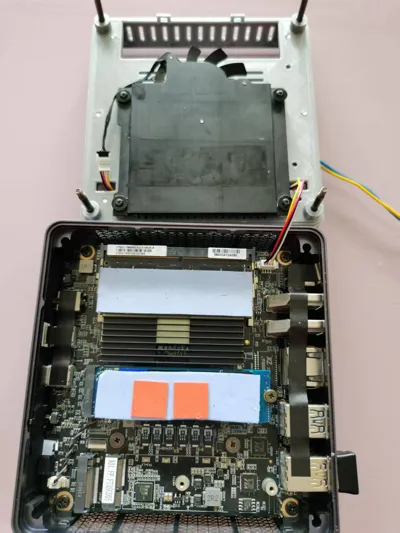
M.2 NVMe to 6-port SATA adapter card (ASM1166 chip). 84 RMB
Insert into the M.2 slot near the edge of the mainboard.
- Six 20cm right-angle SATA cables. 39 RMB
DC 5.5*2.5/2.1 female-to-dual-male power cable. 4 RMB
Split the original 19V power supply; one male connector to the main unit, the other to the DC099 DC jack mentioned below.
- Six Dell 13th-generation 2.5-inch hard drive caddies. 30 RMB
- A 6-bay 2.5-inch backplane compatible with Dell caddies, 20mm inter-drive spacing, 73mm x 116.7mm, purchased from “玩客定制定制店” on Xianyu. 120 RMB.
1.25 4p dual-female splitter cable (1 male, 2 female). 8 RMB
Connect the male connector to the motherboard's 4-pin fan header; one female connector to the fan, the other to the 1.25 4p to DuPont wire described below.
1.25 4p to four DuPont 2.54 male wires. 4 RMB
Sever and rejoin the red and black wires of the DuPont cable, simultaneously connecting the red and black wires of the power-on signal synchronization cable provided with the backplane. Use the fan's 12V voltage as the backplane's power-on signal input; confirm with the backplane vendor that 3~12V voltage is supported—testing confirms this.
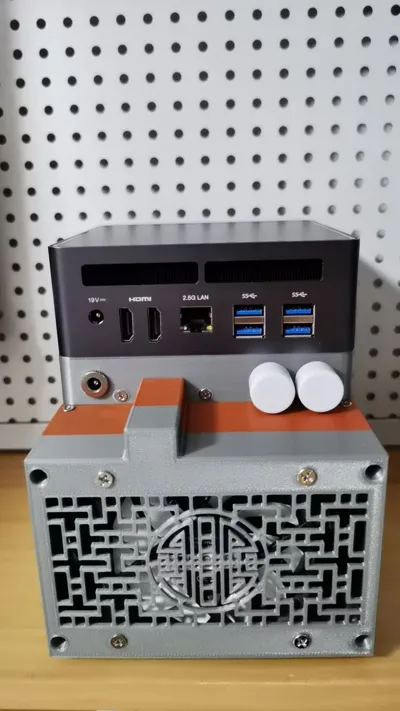
Connect the male ends of the four DuPont wires to the fan connector on the NAS rear case as shown below (This method of sharing the 4-pin fan header with the main unit's fan will result in excessive fan speed and noise)

Alternatively, acquire a DC 5~12V manual four-wire fan speed controller, obtaining 12V power from the output of the “5A 75W adjustable DC step-down module” below; insert the rear case fan's 4-pin connector into the corresponding socket on the speed controller. The controller knob regulates fan on/off and speed. Remember to switch the knob off when the main unit is off, otherwise, the fan will remain powered. For synchronized fan on/off with the main unit, consider a MOS tube switching driver module: connect the new red and black DuPont wires to the signal input terminals of the switching module; connect the output terminals of the step-down module to the DC input terminals of the switching module; connect the output of the switching module to the power input of the speed controller.
- Two 1.8cm diameter button antennas (SMA female). 13 RMB
- Two 10cm IPEX to SMA cables (outer male, inner female). 7 RMB
- One 10cm DC099 DC jack with cable (5.5*2.5). 2 RMB
A 5A 75W adjustable DC step-down module. 10 RMB
If the DC099 is not connected to a 12V power supply, use this step-down module to reduce the voltage to 12V, then connect it to the backplane using the VH3.96 cable supplied with the backplane. Carefully connect the positive and negative output terminals of the step-down module to the VH3.96 cable to ensure correct polarity with the backplane. Some VH3.96 red/black wires are reverse-polarized; naively connecting the red wire to the OUTPUT + terminal of the step-down module will result in its destruction. Don't ask how I know.
- Thirteen M3 5mm countersunk screws.
- Twenty M3 5mm flat-head screws.
- If printing a rear case with fan mounts, install an 8010/8015 fan. 20 RMB
Total cost excluding 3D printed parts and hard drives: approximately 350 RMB.
Comment & Rating (1)